Showing posts with label orange blossom. Show all posts

Sunday, 6 October 2013

Carrot, pistachio and coconut cake (gluten-free)

Carrot pistachio and coconut cake (gluten free) with an orange blossom drizzle icing and topped with chopped pistachios and orange zest
Flicking through this month’s Good Food magazine, this cake caught my eye. A few friends and colleagues are coeliac and so I’m always on the look-out for good gluten-free recipes: this one looked really unusual and tasty.


Having decided to make this, and made sure that I had all the ingredients, I realised that I don’t own the 24cm cake tin that the recipe demanded. I decided to go with it anyway and split the mixture between 2 20cm sandwich tins. The cakes were obviously smaller and a little thinner than the original, but generally completely fine.


This cake was lovely and easy to make – a quick blitz in the stand mixer to froth up the eggs and sugar and then gradually add in the rest of the ingredients. It did take much longer than the suggested hour to cook though – I think it took about an hour and a half in the end, but my oven always bakes slowly so I have suggested 1 hour 15 minutes.


The Good Food recipe suggested serving the cake with rose scented double cream. However, I was taking this into work and so wanted to pretty it up a bit! I decided to flavour my icing with orange blossom water as I felt that it would complement the other flavours, but you could also use rose water and then top with crystallised rose petals rather than the orange zest – which could look really pretty.


I loved this cake! It was really unusual and had a lovely flavour and moist texture. I love the flavour of coconut but I’m not usually sure about desiccated coconut as the texture can be a bit dry and claggy. However, the rest of this cake was so moist that this was not a problem. I’ll definitely be making this again!


Carrot, pistachio and coconut cake

Ingredients

  1. 3 large eggs
  2. 200g golden castor sugar
  3. 2 tsp vanilla extract
  4. 200g ground almonds
  5. 100g desiccated coconut
  6. 2 tsp ground cinnamon
  7. 140g butter, melted
  8. 2 large carrots, grated
  9. 100g pistachios, roughly chopped or pulsed in a mini processor

To ice:

  1. 1 - 2 tsp orange blossom water
  2. 100g icing sugar
  3. Zest of one orange
  4. Chopped pistachios

Or serve with:

  1. 300ml double cream
  2. 2 tblsp icing sugar
  3. A few drops of rose water

Method

  1. Pre-heat the oven to 160C.
  2. Line one 24cm cake tin, or 2 20cm cake tins.
  3. Beat the eggs, sugar and vanilla extract in a stand mixer until frothy.
  4. Stir in the ground almonds, coconut and cinnamon.
  5. Stir in the melted butter.
  6. Add the grated carrots and pistachios and stir until all ingredients are evenly combined.
  7. Pour the mixture into the tin/s and place in pre-heated oven.
  8. Bake for approximately 1 hr 15 minutes (check after an hour), or until cake is firm and golden on top.
  9. Remove from oven and place on a wire rack to cool in the tin for at least 4 hours.

To ice

  1. When cool, mix the orange blossom water with the icing sugar.
  2. Add extra water until the icing is smooth and pipeable.
  3. Place the icing in a piping bag and drizzle over the cake.
  4. Scatter over the chopped pistachios and the orange zest. 

Or to serve with scented cream:

  1. Tip the cream, icing sugar and rose water into a mixing bowl.
  2. Whisk to soft peaks. 

Sunday, 22 September 2013

Honeybread biscuits with Sark wildflower honey

3 baby onesie cookies


One of my closest friends has recently had a beautiful baby boy and so I decided to bake up some goodies to help her through those sleep-deprived first weeks. I’ve had a set of new baby cookie cutters in the cupboard for ages and I’d seen this recipe in my most recent Good Food magazine (cut out into very cute bee shapes!) so I decided to give it a go. I had a jar of very special Sark wildflower honey from a recent weekend on the beautiful island of Sark in the Channel Islands and so decided to use it for this recipe.


Making these biscuits is actually very easy – just stick all the ingredients in a food processor and whizz! The original recipe suggested that you could roll and cut the dough straight away – I decided to stick with the Biscuiteers’ method of popping them in the fridge first. To be honest, I’m not sure if this is necessary!


The original recipe just suggested plain icing, but I added lemon juice and a touch of orange blossom water to add a bit of interest and echo the floral flavours of the honey.


However, icing these was not simple! I must remember when I next make biscuits that I should not attempt to ice with more than 2 or 3 colours! Mixing up lots of different colours of line and flooding icing takes ages! And icing biscuits generally takes quite a while! In the end, these weren’t quite as neat as I’d have liked because I had to hurry to get them finished!


Overall, these biscuits were nice and spicy and the honey flavour came through well in the background. I’m not sure that I would worry about putting in really good quality honey next time, as I think that the other flavours meant that the quality of the honey was not really noticeable. I really did like the extra flavour that the lemon and orange flower water gave to the icing.   


Honeybread biscuits with Sark wildflower honey

Makes approximately 20-25 biscuits


3 teddy bear cookiesIngredients

  1. 300g plain flour
  2. 100g diced butter
  3. 1 tblsp mixed spice
  4. 2 tsp ground ginger
  5. 100g light brown soft sugar
  6. 1 large egg
  7. 100g clear honey


To decorate

  1. 500g royal icing sugar
  2. 75ml lemon juice or water
  3. Couple of drops of orange blossom water (optional)


Method

  1. Place all the biscuit ingredients into a food processor and whizz to a smooth dough.
  2. Split the dough in half.
  3. Place half of the dough between two sheets of baking parchment and roll out to the thickness of a £1 coin. Place in the fridge for 20 minutes.
  4. Repeat with the second half of the dough.
  5. Pre-heat oven to 180C.
  6. Remove dough from fridge, stamp out shapes using chosen cutters and place on a baking tray.
  7. Bake for about 10-12 minutes until crisp and golden brown.
  8. Place on a wire rack to cool.


To ice

  1. Add the water to the royal icing sugar in a large bowl.
  2. Stir with a wooden spoon until combined (this stops your kitchen being coated in a fine dusting of icing!)
  3. Use an electric mixer to beat the mix (starting on low and increasing to high speed) for about 5 minutes. You are looking for the mix to be bright white and a toothpaste-like consistency (this is “line icing”).
  4. Divide the line icing between smaller bowls.
  5. Use a skewer to add small amounts of the paste colours to the bowls of icing, adding a little at a time until you reach the desired colour. 
  6. Spoon some of the icing into a piping bag with a very small round tip.
  7. Pipe the outlines of the shapes. Set aside the rest of the line icing to add details to the iced biscuits.
  8. Add water/more juice to the icing left in the bowls until you reach a pouring consistency (this is called “flooding icing”).
  9. Spoon into a piping bag or piping bottle.
  10. Pipe the flooding icing onto the biscuits to fill the areas outlined on the biscuits.
  11. Allow iced biscuits to set.
  12. Use remaining line icing and other decorative items to complete the decoration of the biscuits.
  13. Leave to dry for at least 24 hours.

Sunday, 7 October 2012

Disney Cupcakes


The occasion: a Disney-loving colleague’s 50th Birthday. Cheerfully, I volunteered to make a cake and started eagerly researching Disney cakes on Flickr. A little more research online and I discovered a local shop (www.thesugarstore.co.uk) that hired out tins, including a Wilton castle-shaped tin:
Enchanted Castle Pan
Wilton Enchanted Castle cake tin

This sparked my imagination and I was quickly envisaging a beautiful Disney castle with fireworks exploding overhead and Mickey and Minnie sat in front:


The Wilton website (www.wilton.com/idea/Enchanted-Castle-Cake) suggested a two-layer cake would be suitable for this tin and, after a search through the recipe books for something more exciting than a basic sponge, I decided on an orange sponge with orange blossom icing – a variation on the Primrose Bakery Lemon Layer Cake with lemon buttercream that I made not long ago (highly recommended – it’s delicious!).

Unfortunately, it wasn’t to be: the cake just refused to come out of the tin cleanly.

Disaster!
Not sure quite where it went wrong, could have been any of the following:
  • Tin not greased enough / correctly – I followed the Wilton website’s instructions to use a vegetable oil spray and dust with flour but maybe this wasn’t enough?
  • Oven temperature too high – the cake is clearly cooked on the outside but perhaps not quite done on the inside.
  • Uneven cooking in oven?
  • Cake too moist for this type of tin?
  • Tin a bit old and very well-used – may have lost non-stick ability?

As you can see – parts of the cake did turn out well but the rest was a bit of a disaster.

Disappointed, there was no choice but to start again. By this time, it was rather late on a Sunday evening and I didn’t want to take a risk and try again – so back to what I know best – cupcakes!

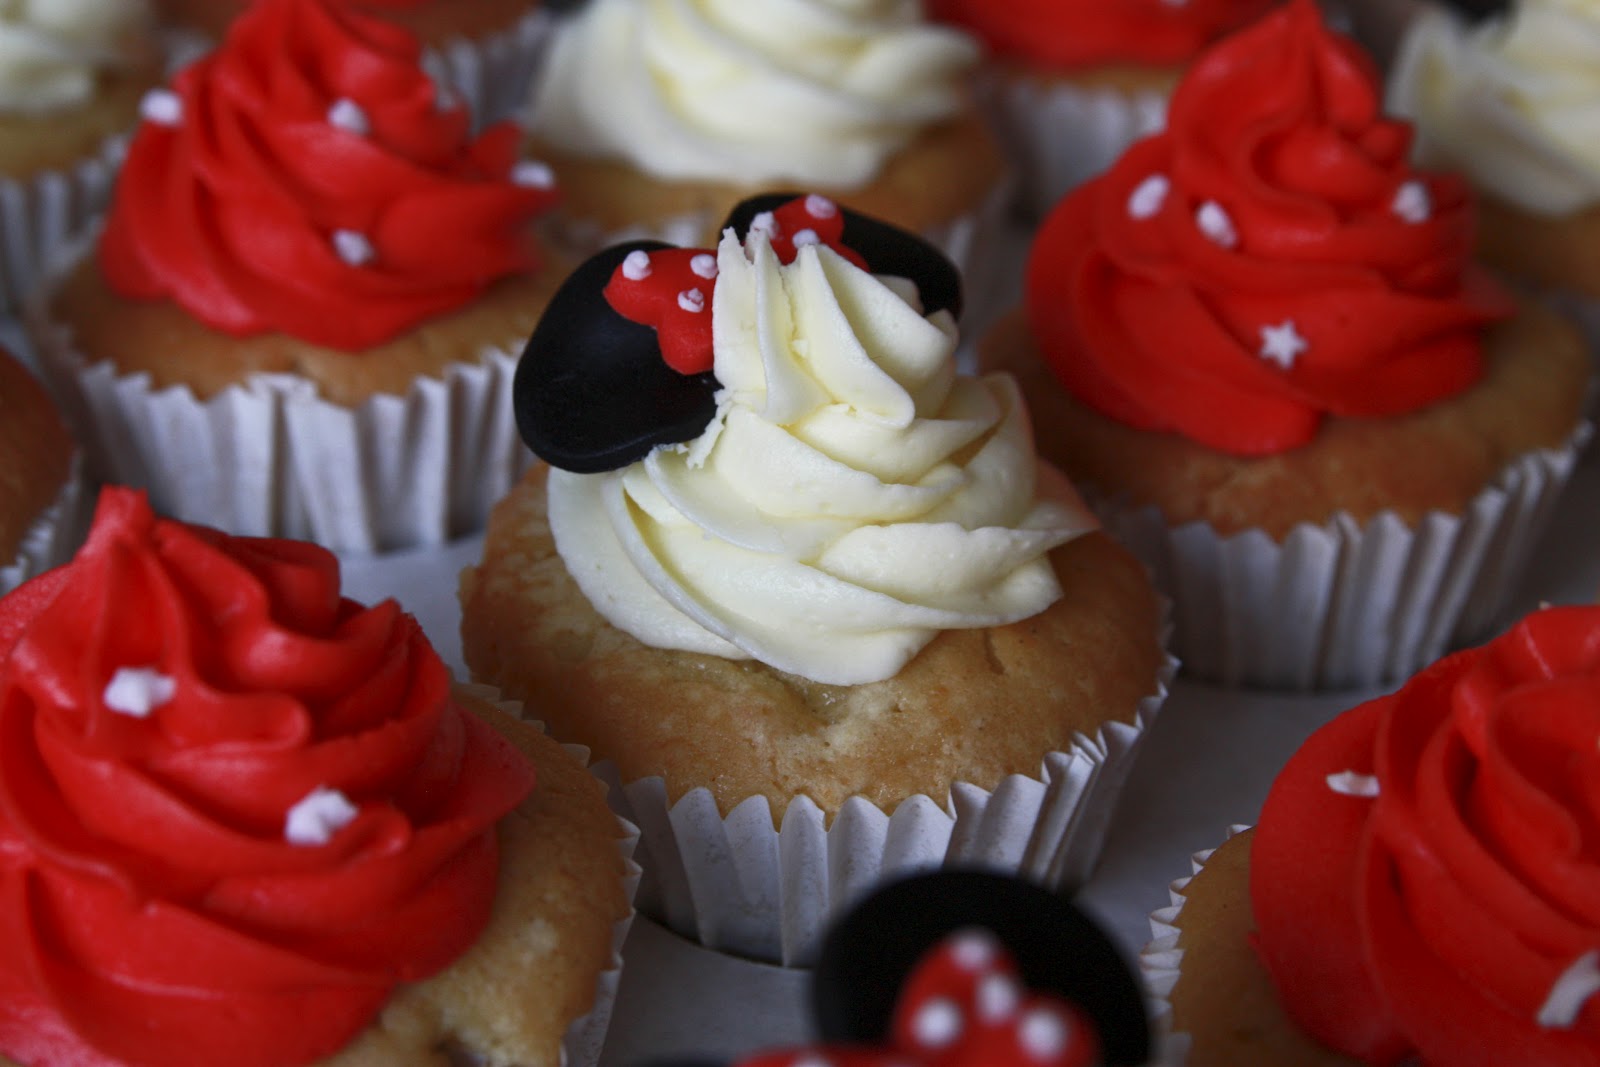
Having already made up the batch of orange blossom buttercream, I decided to make up a double batch of Primrose Bakery Orange Cupcakes, with a Minnie Mouse theme:

Disney cupcakes


Orange cupcakes with orange blossom buttercream 

Ingredients (single batch of 12 cupcakes)
  1. 110g butter, at room temperature
  2. 225g golden castor sugar
  3. 2 large eggs
  4. 150g self-raising flour, sifted
  5. 125g plain flour, sifted
  6. 90ml semi-skimmed milk
  7. 2 tblsp orange juice
  8. Grated zest of 2 oranges
Buttercream:
  1. 115g butter, at room temperature
  2. 500g icing sugar, sifted
  3. 4 tblsp freshly squeezed orange juice
  4. 2 tsp orange blossom water
  5. Red food colouring (preferably a paste rather than a liquid)
Method:
  1. Preheat oven to 160C/350F/GM4.
  2. Line a 12 hole muffin tin with cupcake cases.
  3. In a large mixing bowl, cream the butter and sugar until light and fluffy this will take at least 5 minutes with an electric hand mixer – don’t rush this stage).
  4. Add the eggs, one at a time, mixing for a few minutes after each addition. It should result in a lovely light mousse-like mixture.
  5. Combine the two flours in a separate bowl.
  6. Combine the milk and orange juice in a jug.
  7. Add one third of the flours to the creamed mixture and stir gently to combine.
  8. Pour in one third of the milk mixture and stir gently.
  9. Continue to add flours and then milk mixture alternately, stirring gently after each addition, until all have been added.
  10. Gently stir in orange zest.
  11. Spoon mixture into the cupcake cases, filling to about 2/3 full.
  12. Bake in the oven for about 30 minutes until lightly golden brown. The cakes will spring back lightly when touched, if cooked.
  13. Remove from the oven and leave to cool in tin for about 10 minutes, before carefully placing on a wire rack to finish cooling.

While the cakes are in the oven, make up the buttercream:
  1. In a large mixing bowl, beat the butter, juice and half of the icing sugar until smooth.
  2. Add the rest of the icing sugar and beat until smooth and creamy.
  3. Add 1 tsp of orange blossom water and mix well.
  4. Taste the icing to check flavour – add more orange blossom water as desired.
  5. Divide buttercream into two bowls. Colour one lot with red food colouring.
Once cakes are fully cool, place buttercream into an icing bag with a star shaped nozzle (I use the Wilton 1M nozzle). Swirl onto cupcakes. Use a different icing bag and clean nozzle for second coloured batch of icing. (Blog on buttercream swirls to follow - I promise!)

Minnie Mouse Decorations:

Ingredients:
  1. Ready coloured black, red and white ready-to-roll icing
  2. Red and white writing icing 
Method:
  1. Roll out black icing to approx 2-3mm thick. Stamp out 2cm circles (I used the back of a piping nozzle). Lay out to dry.
  2. Roll out red icing to approx 2-3mm thick. Stamp out small hearts using plunger cutter.
  3. Use red writing icing to join together two hearts at the tip to create Minnie bows. Once firm, use white writing icing to add dots.
  4. Roll out white icing to approx 1-2mm thick. Stamp out small stars using plunger cutter. 
  5. Allow all decorations to dry and firm. Allow buttercream on cakes to dry and firm before pushing decorations into icing swirls. 
Disney cupcakes

 So, not the beautiful Disney castle and fireworks that I had envisioned, but most importantly - the Birthday Girl was delighted and the cakes tasted good!

The disastrous orange cake? When I eventually turned it out of the tin, it tasted pretty good so I decided to break it up and freeze it. The plan is to use it to have a go at making cake pops. I've never attempted these but have a book (given to me by a friend) and it seems a good way to use up this leftover cake - blog to follow ...