Sunday, 7 July 2013

The Very Hungry Caterpillar biscuits


20 Hungry Caterpillar biscuits

One of my very good friends is expecting a baby and so I offered to organise a baby shower for her. We decided to hold it at a cafĂ© called Tart in Bristol, which offers a fantastic range of home-made cakes and tarts (and a lovely glass of sparkling rose wine!). As such, I couldn’t make any cakes etc to take along, but decided that I could get away with taking some iced biscuits along as favours.


My friend hasn’t found out whether she is expecting a boy or a girl so the theming for the party had to be gender-neutral. I decided to go for a bright and cheerful theme based on The Very Hungry Caterpillar book – which I loved as a child! I bought some spotty bunting and tablecloth, some Hungry Caterpillar napkins and made some bunting from pictures in the book printed onto photo paper. Inspired by ideas on Flickr, I decided to make these biscuits and package them up in little bags for the party guests.These would also make great biscuits for a child's birthday party.


These biscuits follow the same Biscuiteers’ recipe and method as I used for my Easter spiced biscuits earlier in the year, simply leaving out the orange zest and spices, and adding extra lemon zest. This recipe makes great biscuits and so I always come back to it when I need to make cookie-cutter biscuits.


Be warned though - these look fab but did take a loooong time to decorate! 


Lemon cookie-cutter biscuits


Ingredients (makes approx. 24 biscuits)

  1. 350g plain flour
  2. 100g self-raising flour
  3. Zest of 2 lemons (save juice for the icing)
  4. 125g granulated sugar
  5. 125g salted butter, diced (at room temp)
  6. 125g golden syrup
  7. 1 large egg, lightly beaten


Method

  1. Sift the flour and baking powder into a mixing bowl.
  2. Add the sugar and stir well.
  3. Rub in the butter, using just the tips of your fingers, until the mixture resembles fine breadcrumbs.
  4. Make a well in the centre of your mix and add the golden syrup, egg and zest.
  5. Use a knife to stir the mixture until it begins to come together as a dough.
  6. Use your hands to bring the dough together.
  7. Divide the dough into two and shape into two flat disks.
  8. Place the first piece of dough between two sheets of baking parchments. (This means that you do not have to add extra flour when rolling.)
  9. Roll the dough out evenly until it is approximately 5-6mm thick all over (you can buy rolling guides, but I have this rolling pin, which is brilliant!). If the top or bottom sheets of parchment crinkle at any time, peel it off and smooth out.
  10. When rolled to the correct thickness, move the dough (still sandwiched between parchment) onto a baking tray and then into the fridge to chill for at least 20-30 minutes.
  11. Pre-heat oven to 170C.
  12. After chilling, use a square cutter to cut out the biscuits, cutting each one as close to the last as possible, in order to use the dough efficiently. Re-roll the dough as necessary, but try to work the dough as little as possible. 
  13. Place each biscuit onto a lined baking tray, allowing space between as the biscuits will spread a little.
  14. Bake the biscuits for 14 – 18 minutes. When cooked, the biscuits will be very lightly golden, firm around the edges but still slightly soft on top.
  15. Remove the baking trays from the oven and carefully remove each biscuit from the tray, placing them gently onto a wire cooling rack. The biscuits will still be very delicate at this stage. 
  16. Allow biscuits to cool totally before storing or icing.


To decorate

These biscuits were covered with rolled fondant and then decorated with royal icing, which dries to a very hard surface – making it easy to wrap these biscuits as presents or transport them. The easiest way to work with royal icing is to start with a ready-made royal icing mix. 


Ingredients

  1. 250g fondant icing
  2. 1 tblsp lemon juice for brushing
  3. 500g royal icing sugar
  4. 75ml lemon juice
  5. Paste food colours - red, green, yellow, blue
  6. Food colour pens


Method

  1. Roll out the fondant icing to approximately 2mm thick.
  2. Cut out using a square cutter (slightly smaller than the one used to cut out the biscuits).
  3. Brush each biscuit with a little lemon juice before topping with a square of icing.
  4. Add the 75ml juice to the royal icing sugar in a large bowl.
  5. Use an electric mixer to beat the mix (starting on low and increasing to high speed) for about 5 minutes. You are looking for the mix to be bright white and a toothpaste-like consistency (this is “line icing”).
  6. Divide the line icing between 3 smaller bowls.
  7. Use a skewer to add small amounts of the red, green and yellow paste colours to the bowls of icing, adding a little at a time until you reach the desired colour. 
  8. Spoon some of the icing into a piping bag with a very small round tip.
  9. Pipe the outlines of the caterpillar body with the green icing, the head with the red icing and the sun with the yellow icing. Set aside some of the red and green line icing to add details to the iced biscuits.
  10. Add water to the icing left in the bowls until you reach a pouring consistency (this is called “flooding icing”).
  11. Spoon into a piping bag or piping bottle.
  12. Pipe the red flooding icing onto the biscuits to fill the head areas outlined on the biscuits.
  13. Pipe some of the green flooding icing into sections of the body.
  14. Add a little blue or more green paste colour to the remaining green icing to vary the colour and pipe into further sections of the caterpillar body. Repeat for further sections of the caterpillar body.
  15. Pipe the yellow flooding icing into the piped sun, adding a little orange or red paste colour to add depth.  
  16. Allow iced biscuits to set. 
  17. Add details like hairs, feet and antennae using the food colour pens. 
  18. Use remaining red and green line icing to pipe tint caterpillars around the edge of the white fondant.  
  19. Leave to dry for at least 24 hours.

Sunday, 16 June 2013

Egg-free banana, oat and raisin muffins


Banana, oat and raisin muffins


Sunday afternoon and I’m waiting to watch the Queen’s Club tennis final but, unsurprisingly, the tennis is suspended due to rain.  Finding a hand of overripe bananas in the fruit bowl, I decided to make use of the time and whip up some banana muffins. I found this recipe on the web and decided to give it a go as it looked fairly simple and we had all of the ingredients in the cupboard.  I added a handful of raisins to the recipe for extra flavour and texture (would probably have used sultanas but we didn’t have any!).

This is a very easy and quick recipe. They are very banana-y and feel very healthy! I put in three bananas and I think that this was slightly too much as the balance of banana to cake wasn’t quite right and this meant that they were slightly sticky in the cases. The texture was generally good though – crisped on top but moist inside.
 
Egg-free banana, oat and raisin muffins

Ingredients

  1. Banana, oat and raisin muffins cooling on rack25g/1oz unsalted butter
  2. 3 tsp runny honey
  3. 2-3 large, ripe bananas
  4. 100g/3.5oz plain flour
  5. 55g/2oz porridge oats
  6. 1 heaped tsp baking powder
  7. 1/2 tsp bicarbonate of soda
  8. 1/2 tsp cinnamon
  9. Handful raisins or sultanas
  10. 75ml/2.5fl oz milk            


Method

  1. Preheat the oven to 190C/375F/Gas mark 5.
  2. Line a muffin tin with paper cases.
  3. Melt the butter and honey in a saucepan.
  4. Mix together all the dry ingredients in a bowl.
  5. Mash the banana and mix with the honey and butter.
  6. Add this mixture and the milk to the dry ingredients, stirring until mixed lightly.
  7. Spoon into the muffin cases, sprinkling a few extra oats on top.
  8. Bake for 25mins until golden brown and firm to touch.

Saturday, 15 June 2013

Superman Chocolate Birthday Cake


Child's Superman cake - Superman character flying over cityscape
So, third chocolate cake in three weeks! Not bad for someone who doesn’t make chocolate cakes! This week’s cake was for one of my good friend’s son’s 4th birthday – his requirements were that it had to be chocolate and had to have Superman on it! 


I did consider buying a Superman – maybe a Lego Superman – to pop on top of the cake, but somehow I let EHH convince me that it would be a challenge to make a Superman figure out of icing and that I would enjoy it. Hmmm – enjoy isn’t quite the word that I’d have used on Thursday night as I wrestled with red and blue icing, trying to convince it to come together into the muscled physique of an action hero. The ripped torso was actually fairly easy – it was the sticking on of limbs and the creation of the head that were the tricky bits. However, after a bit of swearing and the help of a few cocktail sticks, it all came together. His nose ended up a bit squashed and his red pants looked a little like a nappy, but he was clearly recognisable (red pants over the top of a blue superhero suit and a big Superman sign on his front always help with this!) and that would have to do! I left doing the red cape until he was actually on the cake to help with positioning.


Making the cake was the simple bit – having made two others in the last two weeks! I followed the same recipe for the cake as the KitKat cake but replaced the booze with water and added a tablespoon of vanilla extract. Rather than filling with jam and fresh cream, I simply filled and topped the cake with chocolate buttercream. As the cake was for children rather than adults, I made a milk chocolate buttercream (recipe below) rather than the richer dark chocolate buttercream.


Once the cake was made and filled and topped with buttercream, I left it to set in the fridge for about an hour. This allows the icing to firm and makes covering it in rolled fondant much easier. I covered first with a fairly thin layer of plain white rolled fondant, followed by a thin layer of navy rolled fondant. You could tint the fondant yourself but I always find tinting a big batch of dark coloured fondant very messy and time consuming, and it also requires a lot of food colour – even when using the decent paste food colours – so I always buy pre-coloured fondant for dark / bright colours. When rolling the fondant out, I suggest rolling it onto parchment paper that has been lightly dusted with icing sugar – you can then simply lift the parchment paper up and turn over onto the cake.


Child's Superman cake - Superman character flying over cityscapeOnce the cake was covered in navy fondant, I rolled out some black fondant and cut out various geometric, building-like shapes and stuck them onto the cake with a little water. I then added some white to the black fondant, rolled it and cut out more shapes that I stuck on top of the black cut-outs. I then repeated this – adding more white to create a lighter grey fondant and creating more shapes to create a third layer of buildings. I then used yellow writing icing to add some windows and, along with some red writing icing, to set one of the buildings “alight”! Popped Superman on top and rolled out some red fondant to make his cape, sticking it on carefully with a little water.


Finally (at about 1.30 at night!) the cake was complete! It took quite a lot of time and effort but I was fairly happy with the end result!

  
Milk chocolate buttercream icing

Ingredients

  1. 175 grams milk chocolate
  2. 250 grams unsalted butter (softened)
  3. 275 grams icing sugar (sifted)
  4. 1 tblsp vanilla extract

Method

  1. Melt the chocolate in a glass bowl sitting over a pan of simmering water, and set aside to cool slightly.
  2. In another bowl, beat the butter until it's soft and creamy.
  3. Add the sieved icing sugar and vanilla extract.
  4. Beat again until light and fluffy.
  5. Add the chocolate and mix together until everything is glossy and smooth. 

Monday, 3 June 2013

Chocolate and raspberry Kitkat gateau – again!

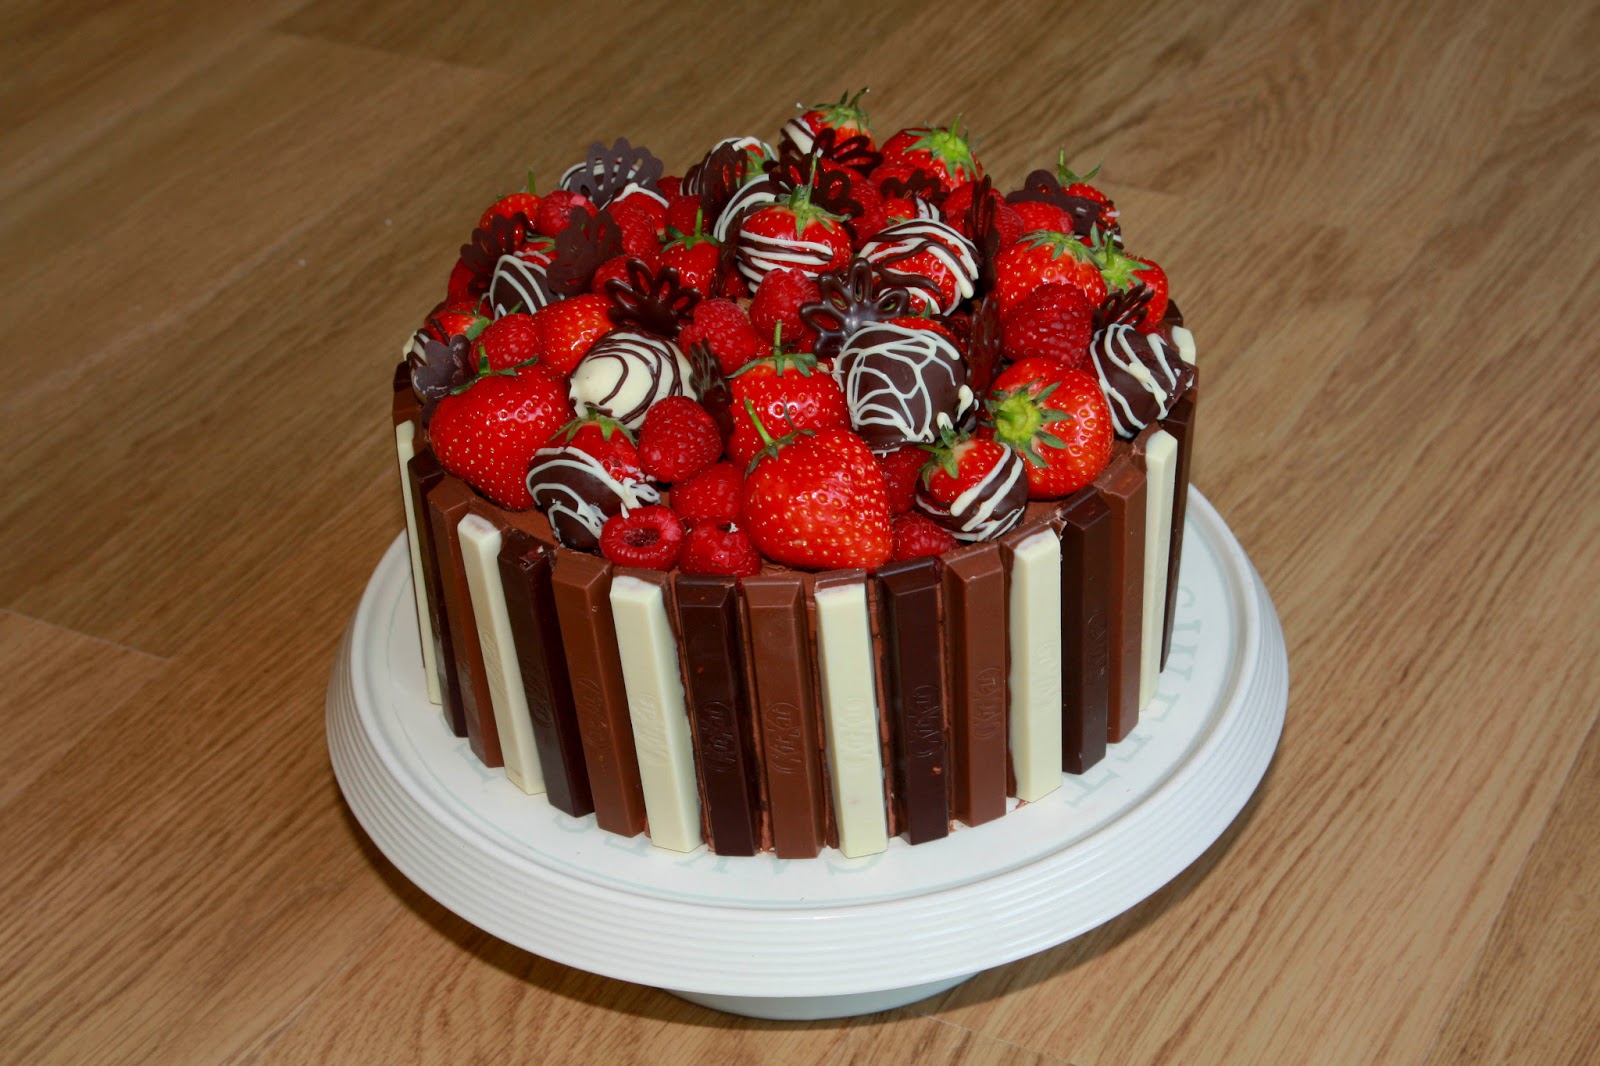
Chocolate and raspberry Kitkat gateau, topped with raspberries and chocolate-dipped strawberries


Having had a practise bake last weekend (!), this weekend was actually my friend’s hen do and so time to make my second chocolate and raspberry Kitkat gateau. Making it for the second time was definitely easier – having made a few mistakes last week, I followed my own instructions and tips this time and it was actually a fairly easy and simple cake to bake.


I did make a couple of changes this time – I didn’t have much raspberry liqueur left and so I had a search through our alcohol cupboard and found a bottle of plum brandy and decided to use that in the cake instead. You can’t really taste the alcohol in the cake but it does add an extra depth and slight fruitiness to the cake and so I figured changing the type of alcohol shouldn’t affect the flavour too much. I’m not sure if adding the alcohol rather than just water affects the texture at all – will test this out next week when I have to make another chocolate cake – this time for a four-year-old’s birthday so no alcohol in this one!


Last week, I wasn’t that keen on the chocolate icing so I decided to make a few changes. This time, I added a tablespoon of cocoa, to increase the chocolate flavour and reduce the sweetness. Instead of the raspberry liqueur, I added a tablespoon of very strong coffee (1 tsp instant coffee granules dissolved in 1 tblsp hot water) and also 1 tsp salt. You can’t taste the coffee but adding it helps to reduce the sweetness and intensify the chocolate flavour; the salt similarly helps to bring out the chocolate flavour. For me, these changes definitely helped to improve the icing – adapted recipe below.     


Close up of chocolate and raspberry Kitkat gateau, topped with raspberries and chocolate-dipped strawberriesThe only other change was to use three different types of Kitkat on the outside – dark, milk and Cookies and Cream (topped with white chocolate) – just for a slightly different look.


Chocolate icing:


Ingredients

  1. 175 grams dark chocolate (minimum 70% cocoa solids)
  2. 250 grams unsalted butter (softened)
  3. 275 grams icing sugar (sifted)
  4. 1 tblsp cocoa (sifted)
  5. 1 tbsp strong coffee (1 tsp instant coffee granules dissolved in 1 tblsp hot water)
  6. 1 tsp salt


Method

  1. Melt the chocolate in a glass bowl sitting over a pan of simmering water, and set aside to cool slightly.
  2. In another bowl, beat the butter until it's soft and creamy.
  3. Add the sieved icing sugar, cocoa, salt and coffee.
  4. Beat again until light and fluffy.
  5. Add the chocolate and mix together until everything is glossy and smooth.