Showing posts with label Dr Oetker cake release spray. Show all posts

Saturday, 30 August 2014

Blackberry and yoghurt mini loaf cakes

Blackberry and yoghurt mini loaf cake topped with lemon icing and a blackberry

I love blackberry-picking! We used to spend hours picking them as a family on the cliffs of Guernsey and then eating home-made blackberry and apple jam throughout the winter months.

This year’s blackberries seem to be particularly early – I picture blackberry picking as a September, even October activity, but the bushes were heavy with ripe and juicy berries when we went out last Sunday. In a short time, we filled our tub and managed to come home with 2.4kg of blackberries! Now what to do with them?!!

I froze a good pile of them (lay them out in a single layer on a baking tray and freeze them flat before then pouring the individually frozen berries into freezer bags) for future use. A scour of the internet then came up with this delicious sounding blackberry and yoghurt loaf cake on the Pudding Lane blog. I’m rather distrustful of loaf cakes – I haven’t had much luck with them in the past (they tend to end up burnt on the outside and sunken in the middle!) – and so I decided to make use of my favourite Lakeland mini loaf cake tin instead.

These cakes are quick and easy to make. The only slight change I made was dusting the blackberries with cornflour – this tends to prevent them from sinking.  The recipe is designed for a 1 kg loaf tin and so made slightly too much for my mini loaf tin: I popped the extra into 6 fairy cake cases and baked these at the same time as the loaf cakes.

I was really impressed with this recipe – it is very moist and the lemon and blackberry flavours come through strongly and work really well together! Will definitely be making these again!   

Blackberry and yoghurt mini loaf cakes


Blackberry and yoghurt mini loaf cakes on a wire cooling rack

Ingredients
  1. 2 eggs
  2. 225g yoghurt
  3. 225g caster sugar
  4. 150g ground almonds
  5. 100g self-raising flour
  6. 1 tsp baking powder
  7. 20g cornflour
  8. 1 lemon
  9. 150g blackberries
  10. 150g icing sugar

Method
  1. Preheat oven to 170C.
  2. Spray a mini loaf cake with cake-release spray.
  3. Place sugar and eggs into a mixing bowl, then whisk for 4-5 minutes (less in a stand mixer) until the mixture is pale, airy and forms ribbons when you drag the whisk across the surface.
  4. Add the yoghurt, the zest of the lemon and a pinch of salt, and fold together to mix.
  5. Sieve in the almonds, flour and baking powder, and fold until the mixture is combined.
  6. Sprinkle the blackberries with cornflour and then add two thirds of them to the cake mix.
  7. Pour the cake mix into your prepared tin and sprinkle over the remaining blackberries (reserving 12 for decoration), pushing slightly into the top of the cakes.
  8. Place the cakes in the centre of the oven. Bake for 20-25 minutes, until the cakes are golden and springy.
  9. Cool the cakes in the tin for about 15 minutes and then remove from the tin and place on a wire rack.
  10. While it's cooling, mix the icing sugar with enough juice from the lemon to make a thick pouring consistency.
  11. Pour over the cake once cool and top with a blackberry.

To make one large loaf cake: place the mixture in a 1 kg loaf tin and bake for 45 minutes – 1 hour. 

Thursday, 27 February 2014

Mini orange, cinnamon and sultana loaf cakes

Cup of tea and a mini orange, cinnamon and sultana loaf cake

After a successful batch of mini lemon loaf cakes, I decided to try out a more adventurous recipe with my Lakeland mini loaf tin. After a search on Pinterest, I found this recipe by Laythetable – this recipe was for 6 mini loaves, using mini loaf paper cases. To use the 12 hole mini loaf tin, I doubled the ingredient quantities.

The original recipe suggested soaking the sultanas in Amaretto, which would be delicious! However, I didn’t have any Amaretto – after a rummage in our alcohol cupboard (which mostly contains gin!), the best  thing I could find to use as an alternative was Pimms! I also think Cointreau would be a great substitute if you have some! If you want to avoid alcohol entirely, you could simply use orange juice. As I did not plan my bake in advance, I only managed to soak my sultanas for about 45 minutes – this was ok and they did plump up a little, but the longer that you can soak them, the better!

The method for making the cake is fairly standard – it’s really important to beat the butter and the sugar thoroughly – at least 5 minutes in a stand mixer. When adding the beaten eggs, it should be done little by little to avoid the mixture splitting, however, if it does split, just add a little of the flour – this should bind the mixture back together.

Greasing the mini loaf tin well is really important. I really recommend a decent spray with Dr Oetker cake release spray and then rub the grease around with your fingers to ensure that every spot is covered.

The original recipe suggested finishing the cakes with a glaze followed by a drizzle, but I decided to go for a piped drizzle topped with a  sprinkling of orange zest. I have provided the methods for both so that you can choose!  

These cakes were really good – very moist and full of flavour! EHH took them into work and they were very well received – even by one colleague who claimed not to like orange cake!

Mini orange, cinnamon and sultana loaf cakes

Ingredients
Mini orange cinnamon and sultana loaf cake
  1. 75g sultanas
  2. Amaretto / Cointreau / Pimms / orange juice
  3. 2 oranges
  4. 1 tsp cinnamon
  5. 1 tsp baking powder
  6. 4 large eggs
  7. 170g self raising flour
  8. 60g ground almonds
  9. 230g unsalted butter
  10. 230g granulated sugar
  11. 100g icing sugar

Method
  1. Place the sultanas in a small bowl or cup and cover with the alcohol / orange juice. Leave to soak for as long as possible – ideally overnight or longer.
  2. Strain sultanas through a sieve and reserve the liquid.
  3. Preheat the oven to 180C.
  4. Lightly grease the mini loaf tin (ideally spray liberally with cake release spray) or place 12 mini loaf cases on a baking tray
  5. Zest one and a half of the oranges (save the remaining zest and the juice of the oranges for use in the icing).
  6. Sift the flour, ground almonds, cinnamon and baking powder together.
  7. Using a hand/stand mixer, cream the butter and sugar until pale, smooth and creamy.
  8. Break the eggs into a bowl and whisk with a fork to combine yolks and whites. 
  9. Bit by bit, add the eggs into the creamed butter and sugar, beating thoroughly between each addition.
  10. Add in the sultanas and orange peel.
  11. Add half of the flour mix and mix gently, then repeat with the remaining flour mix.
  12. Spoon the mixture into the tin / cases evenly.
  13. Use a teaspoon to smooth the tops.
  14. Place in the oven for around 18 - 25 minutes. Turn the tray after about 14 minutes if your oven bakes unevenly. Towards the end of the bake, you may wish to cover with brown paper to present the tops browning before the middle is cooked.
  15. Remove from the oven and allow to cool for 10 minutes before removing the cakes from the tin.
  16. Place the cakes on a wire rack to finish cooling.

To glaze (while the cakes are still warm):
  1. Juice one orange and mix this with a tablespoon of the soaking liqueur.
  2. Place the icing sugar in a bowl and add the liquid a bit at a time until it resembles runny honey.
  3. Use a skewer to make a few piercings in each cake, then spoon the glaze over each (around 2 tablespoons per cake).
  4. Top each glazed cake with a sprinkle of orange zest.

To ice with a drizzle (once the cakes are cool):
  1. Place the icing sugar in a bowl and add a spoonful of the soaking liqueur, followed by enough orange juice to create a smooth piping icing – it should be just a little runnier than toothpaste.
  2. Spoon the icing into a piping bag with a small round nozzle and drizzle across the cakes.
  3. Top each iced cake with a sprinkle of orange zest.


Monday, 24 February 2014

Mini lemon loaf cakes


I can’t believe it is nearly the end of February already! January whizzed by and I actually didn’t bake all month! February has been more productive but it has taken me until now to get around to writing things up! At the start of February, I decided it was about time to try out one of my Christmas presents – the Lakeland mini loaf baking tin. I’m a bit obsessed with little things generally and love my mini sandwich cake tin (but actually don’t use it nearly enough!), so this baking tin was near the top of my wish list this year! After a scour of Pinterest and the internet generally, I realised that there aren’t many recipes out there for mini loaf cakes. I was going to go with a general loaf cake recipe and adapt the baking times, but I found that Lakeland had a few recipes specifically for this tin, so decided to give the lemon loaf cake recipe a go!


The recipe is fairly easy to follow and quick to make. The only slightly frustrating thing is that it uses medium, rather than large, eggs. I only ever have large eggs and so had to lightly whisk three large eggs, weigh the mix and then spoon out the right amount (medium eggs are defined as those that weigh (still in their shells) between 53g and 63g and large are those that weigh between 63g and 73g; egg shells tend to weigh about 6-8g, so I aim for about 160g of whisked egg for this recipe).


If you don’t have ground almonds, you can replace with the same amount of flour, but be aware that the cakes will probably rise more. If you do this, I would suggest not using all of the mix in the cake tin.


When it comes to greasing the mini loaf tin, I find the easiest way by far is to spray it liberally with cake release spray and then just use your fingers to ensure that all sides are coated. This means that the cakes come out smoothly and perfectly!


The mini lemon loaf cakes are very cute! I topped mine with a piped zig-zag drizzle of the lemon icing but you could simply spoon the icing on, or water the icing down a little more and use it as a glaze rather than an icing. The cakes were moist and zesty and kept really well (in a cake tin) for about 5 days. They would be fab for an afternoon tea party, with lots of other mini cakes and treats! Definitely a recipe that I’ll be using again!


Mini lemon loaf cakes


Ingredients

  1. 200g unsalted butter, softened, plus extra to grease
  2. 175g golden caster sugar
  3. 2 unwaxed lemons
  4. 3 medium eggs, beaten
  5. 200g plain flour
  6. 2 level tsps baking powder
  7. Pinch of salt
  8. 50g ground almonds
  9. 2 tbsp milk
  10. 150g icing sugar, sifted


Method

  1. Preheat the oven to 180°C/350°F.
  2. Lightly grease the loaf tin (ideally, spray with cake release spray).
  3. Cream together the butter and caster sugar until pale, light and fluffy.
  4. Grate the zest from the lemons, reserve 2 tsp zest to decorate, and add the rest to the mixture. Gradually add the beaten eggs, mixing well between each addition.
  5. Sift together the flour, baking powder and salt.
  6. Fold these dry ingredients into the cake mixture.
  7. Fold in the ground almonds.
  8. Add the milk and the juice from one lemon and mix until smooth.
  9. Divide the mixture between the Mini Rectangular Loaf Tin and level with a teaspoon.
  10. Bake on the middle shelf of the oven for 25-30 minutes or until golden brown and springy, turning the tin after about 18 minutes to ensure that the cakes bake evenly.  
  11. Leave the cakes to cool in the tin for 10 minutes then ease out onto a wire rack and leave until completely cool.
  12. Meanwhile, squeeze the juice from the remaining lemon.
  13. Mix the lemon juice into the icing sugar a little at a time, until the icing is smooth and runny and will coat the back of a spoon (it will need to be thicker – about the consistency of toothpaste – if you want to pipe the icing).
  14. Drizzle the icing sugar over the cakes and sprinkle with the reserved zest.

Sunday, 19 May 2013

Chocolate and raspberry brownies


Chocolate and raspberry brownies cooling on rack


Wow! It’s been ages since I last wrote a blog post! Don’t worry – I’ve been making and eating lot of cake in this time, just haven’t gotten around to writing it up!

So, going back a couple of weeks, a very good friend had just given birth to her first baby and so, of course, I wanted to make cake for her and her husband. They don’t live nearby and so I had to post the cake – so no cupcakes, or anything else delicate! I’d recently been given a chocolate and raspberry brownie recipe from a friend (strangely, I had cut out the exact same recipe from Good Food recently!) and so decided that this was the perfect opportunity to give it a go! The only thing that I changed to this recipe was the addition of 100g of white chocolate chunks - just to add an extra dimension!

I’m not much of a chocolate cake fan and I generally find brownies too rich, however, raspberries are just the perfect addition to brownies – they really cut through the richness. These brownies are definitely a treat – just try not to think about the amount of sugar, butter and chocolate in the recipe! They are very simple to make but do be careful of adding the eggs too early – you need to allow the melted chocolate mix to cool, otherwise the eggs will cook in the heat of the chocolate!

In the past, I have found brownies tricky – getting the outside crisp and the inside set but gooey! This gave me the perfect opportunity to dig out a baking tray that I hadn’t yet used (bought on impulse when Lakeland had a 3 for 2 offer on their baking tins!) – a Lakeland individual tray bake tin. A quick spray of cake release spray over the tin and it was ready to go. There was a reasonable amount of mixture that wouldn’t fit into the tray, and so I used this to fill some mini loaf cake cases and just popped these into the oven at the same time.     

As the brownies were in the individual traybake tin, I decided to reduce the baking time by 5 minutes and this turned out to be perfect – the brownies came out crisp on the outside and gooey inside – perfect! I left them to cool for a while in the tin and then eased them out and onto a cooling rack.

I wrapped these in clingfilm and popped them in a box and into the post for my friends. Annoyingly, despite paying first class postage, they didn’t arrive until 6 days later. She claimed that they were still delicious, however, whether they truly were, whether she was being kind, or whether she was in that early motherhood, sleep deprived state that meant that any cake was good cake, I’m not sure!  The one that I had, a couple of days after baking, was really tasty and a really good texture! I’ll definitely be making these again!   

Chocolate and raspberry brownies

Ingredients
    Individual chocolate and raspberry brownie
  1. 200g dark chocolate, broken into chunks
  2. 100g milk chocolate, broken into chunks
  3. 100g white chocolate, broken into chunks
  4. 250g pack salted butter
  5. 400g soft light brown sugar
  6. 4 large eggs
  7. 140g plain flour
  8. 50g cocoa powder
  9. 200g raspberries
Method
  1. Heat oven to 170C.
  2. Line a 20 x 30cm baking tray tin with baking parchment OR spray an individual traybake tin with cake release spray.
  3. Put the dark and milk chocolate, butter and sugar in a pan and gently melt, stirring occasionally with a wooden spoon.
  4. Remove from the heat and set aside to cool.
  5. Stir the eggs, one by one, into the melted chocolate mixture.
  6. Sieve over the flour and cocoa, and stir in.
  7. Stir in half the raspberries and half of the white chocolate chunks, scrape into the tray, then scatter over the remaining raspberries and white chocolate.
  8. Bake on the middle shelf for 30 mins (25 if you are using the individual traybake tin) or, if you prefer a firmer texture, for 5 mins more.
  9. Leave in tin to cool before slicing into squares.
  10. Store in an airtight container.

Monday, 29 April 2013

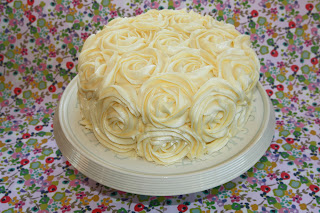
Lemon layer cake with lemon buttercream roses

Lemon layer cake with lemon buttercream rose swirls

Birthday cake time! Not for me but for a very good friend. As I know she loves lemon cake, I decided to stick with a safe and well-trusted recipe that I have done before – Primrose Bakery’s Lemon Layer Cake. I won’t type out the recipe again, as it is the one I wrote a blog on in November for my Halloween Lemon Layer Cake.  We were going out for dinner on Friday so the cake had to be made on Thursday after work. Thankfully, it’s a fairly simple cake to make and bake – as long as you get the timings right.

This time, rather than buttering the sandwich tins and lining the bases, I used my trusty Dr Oetker Cake Release spray – it is so easy to use and does the job really well.  I think I mentioned it last time, but do make sure you keep an eye on these cakes – you do not want them to over-bake. This time, the cakes still looked slightly anaemic, but were bouncy when touched – this is what you are looking for.

As I was baking this after work, it was quite late by the time the cakes had baked and cooled, therefore, I decided to just do a crumb layer of buttercream icing on the Thursday night. A crumb layer is basically just a simple thin covering of icing all over the cake. This seals the cake and creates a good base for then icing the roses.  Leaving it overnight meant that this layer of buttercream had firmed really well and made it much easier to pipe the roses.

The buttercream is best left in the fridge overnight but needs to be taken out of the fridge for at least an hour before using, and then given a really good beat!  People are always amazed by rose swirls on cakes and cupcakes but they are really not that difficult to do. This is a good photo tutorial and there are lots of film clips on YouTube. To be honest, the main things are getting the consistency of the buttercream right, a Wilton 2D piping nozzle, steady pressure on the icing bag and lots of practice! I do them quite a bit and I still have days when they just don’t seem to go right!   

I’ve attempted this design of icing before and found the sides to be very tricky. This time, I used my tilting turntable (placed on top of a cake tin to bring it up to a good height) and this made piping the swirls onto the cake much easier!  

For full cake recipe, visit this blog post.

Filling and decorating the cake

Ingredients
  1. 6 tblsp lemon curd
  2. 220g butter, at room temperature
  3. 1kg icing sugar
  4. Juice of 2-3 lemons
To make the buttercream icing:
  1. In a large mixing bowl, beat the butter, juice of 2 lemons and half of the icing sugar until smooth.
  2. Add the rest of the icing sugar and beat until smooth and creamy.
  3. Add extra juice, if required to get the correct consistency. Beat until smooth.

To assemble
  1. Place the first cake onto your plate / stand.
  2. Spread 3 tablespoons of lemon curd on top of the first cake and another 3 on a second cake.
  3. Carefully place the second cake on top of the first cake.
  4. Place the third cake on top of the others.
  5. Use a palette knife to spread a thin layer of buttercream icing evenly all over the cake. Leave to firm.
  6. Fill a piping bag (topped with a suitable nozzle) with the remaining buttercream.  
  7. Start by piping a rose swirl in the centre of the cake, then work outwards and down the sides of the cake.
  8. Fill any gaps with swirls of icing.