Showing posts with label baking. Show all posts

Thursday, 27 February 2014

Mini orange, cinnamon and sultana loaf cakes

Cup of tea and a mini orange, cinnamon and sultana loaf cake

After a successful batch of mini lemon loaf cakes, I decided to try out a more adventurous recipe with my Lakeland mini loaf tin. After a search on Pinterest, I found this recipe by Laythetable – this recipe was for 6 mini loaves, using mini loaf paper cases. To use the 12 hole mini loaf tin, I doubled the ingredient quantities.

The original recipe suggested soaking the sultanas in Amaretto, which would be delicious! However, I didn’t have any Amaretto – after a rummage in our alcohol cupboard (which mostly contains gin!), the best  thing I could find to use as an alternative was Pimms! I also think Cointreau would be a great substitute if you have some! If you want to avoid alcohol entirely, you could simply use orange juice. As I did not plan my bake in advance, I only managed to soak my sultanas for about 45 minutes – this was ok and they did plump up a little, but the longer that you can soak them, the better!

The method for making the cake is fairly standard – it’s really important to beat the butter and the sugar thoroughly – at least 5 minutes in a stand mixer. When adding the beaten eggs, it should be done little by little to avoid the mixture splitting, however, if it does split, just add a little of the flour – this should bind the mixture back together.

Greasing the mini loaf tin well is really important. I really recommend a decent spray with Dr Oetker cake release spray and then rub the grease around with your fingers to ensure that every spot is covered.

The original recipe suggested finishing the cakes with a glaze followed by a drizzle, but I decided to go for a piped drizzle topped with a  sprinkling of orange zest. I have provided the methods for both so that you can choose!  

These cakes were really good – very moist and full of flavour! EHH took them into work and they were very well received – even by one colleague who claimed not to like orange cake!

Mini orange, cinnamon and sultana loaf cakes

Ingredients
Mini orange cinnamon and sultana loaf cake
  1. 75g sultanas
  2. Amaretto / Cointreau / Pimms / orange juice
  3. 2 oranges
  4. 1 tsp cinnamon
  5. 1 tsp baking powder
  6. 4 large eggs
  7. 170g self raising flour
  8. 60g ground almonds
  9. 230g unsalted butter
  10. 230g granulated sugar
  11. 100g icing sugar

Method
  1. Place the sultanas in a small bowl or cup and cover with the alcohol / orange juice. Leave to soak for as long as possible – ideally overnight or longer.
  2. Strain sultanas through a sieve and reserve the liquid.
  3. Preheat the oven to 180C.
  4. Lightly grease the mini loaf tin (ideally spray liberally with cake release spray) or place 12 mini loaf cases on a baking tray
  5. Zest one and a half of the oranges (save the remaining zest and the juice of the oranges for use in the icing).
  6. Sift the flour, ground almonds, cinnamon and baking powder together.
  7. Using a hand/stand mixer, cream the butter and sugar until pale, smooth and creamy.
  8. Break the eggs into a bowl and whisk with a fork to combine yolks and whites. 
  9. Bit by bit, add the eggs into the creamed butter and sugar, beating thoroughly between each addition.
  10. Add in the sultanas and orange peel.
  11. Add half of the flour mix and mix gently, then repeat with the remaining flour mix.
  12. Spoon the mixture into the tin / cases evenly.
  13. Use a teaspoon to smooth the tops.
  14. Place in the oven for around 18 - 25 minutes. Turn the tray after about 14 minutes if your oven bakes unevenly. Towards the end of the bake, you may wish to cover with brown paper to present the tops browning before the middle is cooked.
  15. Remove from the oven and allow to cool for 10 minutes before removing the cakes from the tin.
  16. Place the cakes on a wire rack to finish cooling.

To glaze (while the cakes are still warm):
  1. Juice one orange and mix this with a tablespoon of the soaking liqueur.
  2. Place the icing sugar in a bowl and add the liquid a bit at a time until it resembles runny honey.
  3. Use a skewer to make a few piercings in each cake, then spoon the glaze over each (around 2 tablespoons per cake).
  4. Top each glazed cake with a sprinkle of orange zest.

To ice with a drizzle (once the cakes are cool):
  1. Place the icing sugar in a bowl and add a spoonful of the soaking liqueur, followed by enough orange juice to create a smooth piping icing – it should be just a little runnier than toothpaste.
  2. Spoon the icing into a piping bag with a small round nozzle and drizzle across the cakes.
  3. Top each iced cake with a sprinkle of orange zest.


Monday, 11 November 2013

Bramley apple and custard cake


Apple and custard cake on a cake stand

This week, I’ve been given another big bag of Bramley apples so I’ve been flicking through Pinterest to find some new Bramley apple recipes. Whilst browsing, I found this fab looking cake and followed it through to Cookie’s Cakes and Bakes (CCB) – a lovely baking blog with lots of delicious looking recipes (like her coconut and lime drizzle cake – yum! Will be trying this one out!).  I just love custard but had a bit of a failure when I last tried making a custard cake, however, I couldn’t resist giving this one a go.


It’s not a quick cake to make: firstly you need to make the custard, then the cake, then peel, core and slice the apples before arranging them neatly on top of the cake! However, it is worth the effort! I followed the recipe given by CCB almost exactly; the only thing that I changed was the addition of the apricot jam glaze, which just helped the cake to look that bit more special. 

I love the custard layer running through this cake; the texture of the cake is great and the apples on the top are delicious. However, like last time that I made a custard cake, I found that the custard powder in the actual cake leaves a dry taste in your mouth. I’ll definitely be making this cake again (would be also be fantastic with rhubarb) but next time, I’ll leave out the custard powder and simply up the flour (which is the recipe I have given below).  


Bramley apple and custard cake


Ingredients
  1. 200g soft butter
  2. 110g caster sugar
  3. 2 eggs
  4. 1 tsp vanilla extract
  5. 225g plain flour
  6. 2 tsp baking powder
  7. 2 tablespoons milk (at room temperature)
  8. 3-4 Bramley apples, peeled cored and cut into slices
  9. Demerara sugar for sprinkling over the cake
  10. 2 tblsp apricot jam, warmed and sieved to remove any lumps


For the custard:

  1. 2 tablespoons custard powder
  2. 55g caster sugar
  3. 250ml milk
  4. 20g butter
  5. 2 tsp vanilla extract

Method

  1. Preheat the oven to 180C.
  2. Grease a 20cm deep cake tin and line the bottom of the tin with baking parchment (or simply line with a non-stick cake tin liner – much easier!).
  3. Mix together the custard powder and caster sugar in a saucepan.
  4. Whisk in the milk, stirring over a medium heat until the custard thickens.
  5. Take the custard off the heat and stir in the butter and vanilla extract.
  6. Pour into a bowl, place some clingfilm over the top (making sure that it touches the surface of the custard to prevent it forming a skin) and leave to cool.
  7. Sift the flour and baking powder into a large bowl.
  8. In a separate bowl, cream together the butter and sugar until very light and fluffy (at least 5 minutes in a stand mixer).
  9. Beat in the eggs, one at a time until the mixture is frothy and mousse-like. Add a tablespoon of the flour with each egg to stop the mixture curdling.
  10. Gently stir in remaining flour.
  11. Mix in 2 tablespoons of milk to loosen the batter a little.
  12. Spread half the batter in the cake tin.
  13. Spread the cooled custard all over the batter.
  14. Use a small spatula to carefully spread the remaining batter over the custard, making sure that all the custard is covered with batter.
  15. Place your apple slices over the top of the cake.
  16. Sprinkle Demerara sugar all over the cake.
  17. Bake for 50-60 minutes or until risen and golden. A skewer inserted in the middle of the cake should come out clean.
  18. Allow to cool for 15 minutes and then remove from the tin and place on a wire rack.
  19. Use a pastry brush to brush the top of the cake with the warmed apricot jam.

Sunday, 27 October 2013

Caramel Apple Crumble Cake


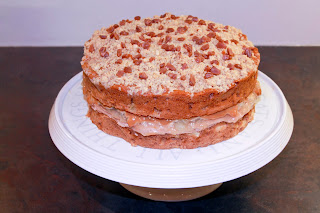
Caramel apple crumble cake filled with pureed apple and cinnamon buttercream

Bake Number Three for EHH’s birthday! Having been given a carrier bag full of Bramley apples, I’ve been searching out cake recipes using cooking apples. I found this recipe on the Waitrose website and, seeing that EHH loves anything caramelly and we still had loads of apples, it seemed like the perfect thing to bake for his birthday.

I made a few adaptations to the recipe. Firstly, my deep 20cm cake tin was already in use for my carrot cake, so I decided to split the recipe between two sandwich tins and then sandwich the cakes together with a filling. As you can see from the photo, I went rather OTT with the fillings and used pureed apple (that I already had in the fridge), cinnamon buttercream and the remaining Carnation caramel – layering the buttercream, then the apple and then the caramel. This was way too much and it oozed out everywhere! I would recommend that you use one of the fillings, or alternatively, make less of each and put the apple in the middle with a ring of buttercream around the edge!

I also added the crumble topping. The original recipe was simply topped with a tablespoon of Demerara sugar, but I just love crumble cakes and so decided to add this to my version.

As I sent the complete cake into EHH’s work, I didn’t get a taste! However, the comments that came back were very enthusiastic, so I hope that it was nice! Will definitely be giving this one another go soon – possibly with a caramelised nut topping that I have seen in another recipe…

Caramel Apple Crumble Cake

Caramel apple crumble cakes cooling on the rack
Ingredients:

  1. 125g unsalted butter, softened, plus extra for buttering
  2. 397g can Carnation Caramel
  3. 2 medium eggs
  4. 225g self-raising flour, sifted
  5. 2 tsp baking powder
  6. 2 tsp ground cinnamon
  7. 300g Bramley apples, peeled, cored and diced
  8. 2 tbsp semi-skimmed milk

For the crumble topping

  1. 75g plain flour
  2. 50g butter
  3. 40g chopped nuts (optional)
  4. 25g demerara sugar
  5. 25g butterscotch pieces

To fill

  1. Cinnamon buttercream:
  2. 55g butter, at room temperature
  3. 30ml semi-skimmed milk, at room temperature
  4. ½ tsp vanilla extract
  5. 2 tsp cinnamon
  6. 250g icing sugar, sifted

Or

  1. 100g Bramley apples (peeled and chopped)
  2. 20g soft brown sugar

Method

  1. Preheat the oven to 160C.
  2. Lightly grease and base-line two 20cm sandwich tins.
  3. Firstly prepare the crumble topping: Sift the flour into a bowl and rub in the butter. Stir through the sugar and nuts and set aside.
  4. Place the butter with 225g of the caramel in a large bowl and beat with an electric mixer until well combined.
  5. Beat in the eggs one at a time.
  6. Sift over the flour, baking powder and cinnamon and fold together.
  7. Gently stir in the apple and the milk.
  8. Spoon the cake mix into your cake tins and smooth the top.
  9. Sprinkle the crumble mixture over the top of one of the cakes.
  10. Bake for 40 minutes - 1 hour, or until risen and springy. You will probably find that the crumble-topped cake will need slightly longer in the oven.
  11. Allow to cool slightly and then remove the cake from the tins and cool on a wire rack.

While the cakes are cooling, make up the filling. Either make cinnamon buttercream:

  1. In a large mixing bowl, beat the butter, milk, cinnamon, vanilla extract and half of the icing sugar until smooth.
  2. Add the rest of the icing sugar and beat until smooth and creamy.

Or:

  1. Place the apples in a saucepan with a tablespoon of water.
  2. Cook gently over a gentle heat until the apples are mushy.
  3. Remove from the heat and taste.
  4. Add the soft brown sugar to sweeten as desired.

   12. Spread the cake without the crumble with your chosen filling.
   13. Drizzle over the remaining caramel.
   14. Sandwich with the crumble-topped cake. 
   15. Sprinkle the top of the cake with the butterscotch pieces. 

Monday, 21 October 2013

Shortcake biscuits with salted peanut caramel filling


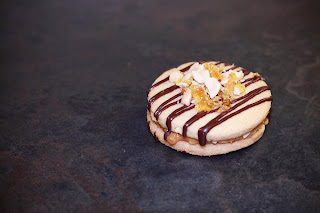
shortcake biscuit with salted peanut caramel filling

I love baking when there is no pressure - an opportunity to try something new, experiment with new techniques and flavours, without the pressure of cooking for an occasion. A couple of weeks ago, I had a quiet Sunday afternoon with nothing planned and so decided to try out this recipe, recommended tby a friend. I’d never baked with peanuts and never tried making proper caramel so they seemed like something fun to try out!

The caramel peanuts were actually very easy to make – just keep a very close eye on the caramel while it is in the pan. Don’t stir it but give it a very gentle swirl when you can see it turning golden – just to ensure that it cooks evenly.

The biscuits were simple, but time-consuming to make. Don’t make these if you are in a hurry! The actual processing time is fairly quick and easy but you do need to let the biscuits rest in the fridge twice before baking. Once cool, the biscuits are a lovely crunchy texture and have a great flavour, even without all the extra bits!

Using a tin of Carnation caramel to sandwich the biscuits is easy – you could make the caramel yourself (see recipe for Millionaire’s shortbread) but for these, the ready-made caramel works just fine.

Overall, these biscuits are very sweet but tasty – I think my dad would love them! They are best eaten fresh – when the biscuits are lovely and crunchy and contrast well with the smooth sticky caramel. They do last ok – probably for about 5 days, but the biscuits lose their crunch after about a day and so aren’t quite so good.  

Shortcake biscuits with salted peanut caramel filling

shortcake biscuits with salted peanut caramel filling on a wire cooling rack

For the caramel peanuts

  1. 50g caster sugar
  2. 1 tbsp water
  3. 2 tbsp salted peanut halves

For the biscuits

  1. 250g unsalted butter
  2. 250g caster sugar
  3. 2 tbsp crunchy peanut butter
  4. 375g plain flour, plus extra for dusting

For the salted peanut caramel filling

  1. 300g dulce de leche / Carnation caramel
  2. ½ tsp sea salt flakes
  3. 1 tbsp salted peanuts, chopped
  4. 75g dark chocolate, melted

Method

  1. For the caramel peanuts, line a non-stick baking tray with baking parchment and arrange the peanuts on the tray.
  2. Heat the sugar and water in a saucepan until the sugar melts and the mixture is boiling and golden-brown in colour (do not stir the caramel).
  3. Pour the caramel over the peanuts and set aside to harden.
  4. Once set, roughly chop the caramel peanuts and set aside.
  5. Cream the butter and sugar together in a bowl, then beat in the peanut butter until well combined. Sift over the flour and stir until the mixture comes together as a dough.
  6. Divide the dough into two balls, cover both with cling film and chill in the fridge for 15 minutes.
  7. Place the first piece of dough between two sheets of baking parchments. (This means that you do not have to add extra flour when rolling.)
  8. Roll the dough out evenly until it is approximately 5-6mm thick all over (you can buy rolling guides, but I have this rolling pin, which is brilliant!). If the top or bottom sheets of parchment crinkle at any time, peel it off and smooth out.
  9. Cut out biscuits, with a 5cm round cookie cutter, cutting each one as close to the last as possible, in order to use the dough efficiently. Re-roll the dough as necessary, but try to work the dough as little as possible.
  10. Place the biscuits onto the lined baking trays and chill for a further 15 minutes.
  11. Preheat the oven to 170C and line two baking sheets with baking parchment.
  12. Bake the biscuits in the oven for 12-15 minutes, or until golden-brown.
  13. Remove the biscuits from the oven and set aside to cool for 5 minutes, then transfer to wire rack to cool completely.
  14. Repeat stages 8-13 for the second piece of biscuit dough. 
  15. Spread the caramel on half the biscuits, then sprinkle with sea salt and chopped peanuts. Sandwich together with a plain biscuit.
  16. Melt the chocolate in a bowl set over a saucepan of simmering water (do not let the base of the bowl touch the water).
  17. Drizzle the melted chocolate over the biscuits then sprinkle over the caramel peanuts.
  18. Set aside until the chocolate has set, then serve.

Sunday, 6 October 2013

Carrot, pistachio and coconut cake (gluten-free)

Carrot pistachio and coconut cake (gluten free) with an orange blossom drizzle icing and topped with chopped pistachios and orange zest
Flicking through this month’s Good Food magazine, this cake caught my eye. A few friends and colleagues are coeliac and so I’m always on the look-out for good gluten-free recipes: this one looked really unusual and tasty.


Having decided to make this, and made sure that I had all the ingredients, I realised that I don’t own the 24cm cake tin that the recipe demanded. I decided to go with it anyway and split the mixture between 2 20cm sandwich tins. The cakes were obviously smaller and a little thinner than the original, but generally completely fine.


This cake was lovely and easy to make – a quick blitz in the stand mixer to froth up the eggs and sugar and then gradually add in the rest of the ingredients. It did take much longer than the suggested hour to cook though – I think it took about an hour and a half in the end, but my oven always bakes slowly so I have suggested 1 hour 15 minutes.


The Good Food recipe suggested serving the cake with rose scented double cream. However, I was taking this into work and so wanted to pretty it up a bit! I decided to flavour my icing with orange blossom water as I felt that it would complement the other flavours, but you could also use rose water and then top with crystallised rose petals rather than the orange zest – which could look really pretty.


I loved this cake! It was really unusual and had a lovely flavour and moist texture. I love the flavour of coconut but I’m not usually sure about desiccated coconut as the texture can be a bit dry and claggy. However, the rest of this cake was so moist that this was not a problem. I’ll definitely be making this again!


Carrot, pistachio and coconut cake

Ingredients

  1. 3 large eggs
  2. 200g golden castor sugar
  3. 2 tsp vanilla extract
  4. 200g ground almonds
  5. 100g desiccated coconut
  6. 2 tsp ground cinnamon
  7. 140g butter, melted
  8. 2 large carrots, grated
  9. 100g pistachios, roughly chopped or pulsed in a mini processor

To ice:

  1. 1 - 2 tsp orange blossom water
  2. 100g icing sugar
  3. Zest of one orange
  4. Chopped pistachios

Or serve with:

  1. 300ml double cream
  2. 2 tblsp icing sugar
  3. A few drops of rose water

Method

  1. Pre-heat the oven to 160C.
  2. Line one 24cm cake tin, or 2 20cm cake tins.
  3. Beat the eggs, sugar and vanilla extract in a stand mixer until frothy.
  4. Stir in the ground almonds, coconut and cinnamon.
  5. Stir in the melted butter.
  6. Add the grated carrots and pistachios and stir until all ingredients are evenly combined.
  7. Pour the mixture into the tin/s and place in pre-heated oven.
  8. Bake for approximately 1 hr 15 minutes (check after an hour), or until cake is firm and golden on top.
  9. Remove from oven and place on a wire rack to cool in the tin for at least 4 hours.

To ice

  1. When cool, mix the orange blossom water with the icing sugar.
  2. Add extra water until the icing is smooth and pipeable.
  3. Place the icing in a piping bag and drizzle over the cake.
  4. Scatter over the chopped pistachios and the orange zest. 

Or to serve with scented cream:

  1. Tip the cream, icing sugar and rose water into a mixing bowl.
  2. Whisk to soft peaks.