Showing posts with label salted caramel. Show all posts

Saturday, 26 October 2013

Billionaire’s Shortbread with salted caramel


Billionaire's shortbread with salted caramel and butterscotch pieces
It’s that time of year again – EHH’s birthday!  What this means is that not only do I have to come up with some imaginative birthday presents but I have to make cakes for the 70 odd people at his work! I’ve set quite a precedent so I had to make sure that I delivered!


As it was EHH’s birthday, the first choice was his – Billionaire’s shortbread! I haven’t made this in a while and so was very happy to have another go. Last time I made Millionaire's shortbread, it turned out pretty well, but I felt that I could have cooked the caramel longer for a more intense taste: this time I cooked the caramel for nearly 25 minutes, stirring constantly and it made a real difference! The caramel had much more flavour and was deliciously chewy rather than just sticky and smooth.  I also suggested adding some salt to the caramel to add a bit more oomph, so I’ve added this in on this occasion.  Finally, I found some butterscotch pieces in the bottom of a cupboard and so decided to sprinkle these over the top of the chocolate, thus making this Billionaire’s rather than just Millionaire’s shortbread! The butterscotch pieces really added an extra dimension, a real crunch, to this bake and I would highly recommend!


Billionaire’s shortbread with salted caramel


Billionaire's shortbread with salted caramel and butterscotch pieces
Ingredients

  1. 175g butter, at room temperature
  2. 75g caster sugar
  3. 250g plain flour
  4. 60g butterscotch pieces
  5. 200g dark chocolate, broken into pieces
  6. 50g white chocolate, broken into pieces

For the caramel

  1. 100g butter
  2. 50g light brown sugar
  3. 50g golden syrup
  4. 2 x 397g tins of condensed milk
  5. I tsp sea salt flakes

Method

  1. Preheat the oven to 170C and grease and line a deep 30cm x 20cm baking tin with baking parchment
  2. Put the butter and sugar in a large bowl and cream with an electric mixer for about 5 minutes until light and fluffy.
  3. Stir in flour until evenly mixed, forming a dough.
  4. Press the dough into the prepared tin, then bake for 20-25 minutes, until golden.
  5. Remove from oven and allow to cool completely in the tin.
  6. In a heavy based, non-stick pan, melt the butter, light brown sugar, golden syrup and condensed milk over a low heat.
  7. Stirring constantly, bring the mixture to a simmer and then bubble gently for at least 20 minutes, until it turns a dark golden colour.
  8. Remove from heat and stir through ½ tsp sea salt flakes.
  9. Pour the salted caramel evenly over the shortbread, sprinkle with the remaining ½ tsp salt and then leave to set.
  10. Put the dark chocolate into a heatproof bowl and melt over a pan of just simmering water (don

    ’t allow the water to touch the bowl).
  11. Melt the white chocolate in the same way and set aside.
  12. Allow the dark chocolate to cool slightly and then pour it over the caramel and spread evenly.
  13. Sprinkle over the butterscotch pieces.
  14. Set aside and allow to cool and set.    
  15. Drizzle the white chocolate over the top of the dark chocolate and butterscotch pieces.
  16. Leave to cool completely and then cut the shortbread into squares.

Monday, 21 October 2013

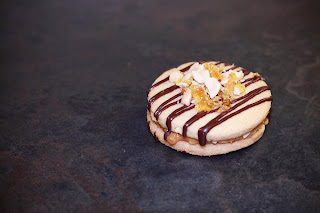
Shortcake biscuits with salted peanut caramel filling


shortcake biscuit with salted peanut caramel filling

I love baking when there is no pressure - an opportunity to try something new, experiment with new techniques and flavours, without the pressure of cooking for an occasion. A couple of weeks ago, I had a quiet Sunday afternoon with nothing planned and so decided to try out this recipe, recommended tby a friend. I’d never baked with peanuts and never tried making proper caramel so they seemed like something fun to try out!

The caramel peanuts were actually very easy to make – just keep a very close eye on the caramel while it is in the pan. Don’t stir it but give it a very gentle swirl when you can see it turning golden – just to ensure that it cooks evenly.

The biscuits were simple, but time-consuming to make. Don’t make these if you are in a hurry! The actual processing time is fairly quick and easy but you do need to let the biscuits rest in the fridge twice before baking. Once cool, the biscuits are a lovely crunchy texture and have a great flavour, even without all the extra bits!

Using a tin of Carnation caramel to sandwich the biscuits is easy – you could make the caramel yourself (see recipe for Millionaire’s shortbread) but for these, the ready-made caramel works just fine.

Overall, these biscuits are very sweet but tasty – I think my dad would love them! They are best eaten fresh – when the biscuits are lovely and crunchy and contrast well with the smooth sticky caramel. They do last ok – probably for about 5 days, but the biscuits lose their crunch after about a day and so aren’t quite so good.  

Shortcake biscuits with salted peanut caramel filling

shortcake biscuits with salted peanut caramel filling on a wire cooling rack

For the caramel peanuts

  1. 50g caster sugar
  2. 1 tbsp water
  3. 2 tbsp salted peanut halves

For the biscuits

  1. 250g unsalted butter
  2. 250g caster sugar
  3. 2 tbsp crunchy peanut butter
  4. 375g plain flour, plus extra for dusting

For the salted peanut caramel filling

  1. 300g dulce de leche / Carnation caramel
  2. ½ tsp sea salt flakes
  3. 1 tbsp salted peanuts, chopped
  4. 75g dark chocolate, melted

Method

  1. For the caramel peanuts, line a non-stick baking tray with baking parchment and arrange the peanuts on the tray.
  2. Heat the sugar and water in a saucepan until the sugar melts and the mixture is boiling and golden-brown in colour (do not stir the caramel).
  3. Pour the caramel over the peanuts and set aside to harden.
  4. Once set, roughly chop the caramel peanuts and set aside.
  5. Cream the butter and sugar together in a bowl, then beat in the peanut butter until well combined. Sift over the flour and stir until the mixture comes together as a dough.
  6. Divide the dough into two balls, cover both with cling film and chill in the fridge for 15 minutes.
  7. Place the first piece of dough between two sheets of baking parchments. (This means that you do not have to add extra flour when rolling.)
  8. Roll the dough out evenly until it is approximately 5-6mm thick all over (you can buy rolling guides, but I have this rolling pin, which is brilliant!). If the top or bottom sheets of parchment crinkle at any time, peel it off and smooth out.
  9. Cut out biscuits, with a 5cm round cookie cutter, cutting each one as close to the last as possible, in order to use the dough efficiently. Re-roll the dough as necessary, but try to work the dough as little as possible.
  10. Place the biscuits onto the lined baking trays and chill for a further 15 minutes.
  11. Preheat the oven to 170C and line two baking sheets with baking parchment.
  12. Bake the biscuits in the oven for 12-15 minutes, or until golden-brown.
  13. Remove the biscuits from the oven and set aside to cool for 5 minutes, then transfer to wire rack to cool completely.
  14. Repeat stages 8-13 for the second piece of biscuit dough. 
  15. Spread the caramel on half the biscuits, then sprinkle with sea salt and chopped peanuts. Sandwich together with a plain biscuit.
  16. Melt the chocolate in a bowl set over a saucepan of simmering water (do not let the base of the bowl touch the water).
  17. Drizzle the melted chocolate over the biscuits then sprinkle over the caramel peanuts.
  18. Set aside until the chocolate has set, then serve.

Thursday, 1 November 2012

GBBO Caramel Layer Cake


I’m a little late in writing this up (let’s not talk about the virus that attacked my computer earlier this week!) as I was keen to get the Halloween posts up promptly. So this post takes us back a week to the final bake for EHH’s birthday – a Caramel Layer Cake from the GBBO Showstopper book. EHH loves caramel and very sweet things, so when I saw this in the book, it was an essential for his birthday.

It was the first time that I had made this cake – the cake itself was very simple to make, although it didn’t rise as much as I would like. If I were to make it again, I may use the traditional method of creaming the butter and sugar, etc, rather than doing the all-in-one method. The caramel icing took a little while to make but the most time-consuming element was the actual icing of the cake. The icing was quite nice to work with, it moved smoothly and was fairly easy to push around and cover the cake. However, I think I spent too long trying to get a perfectly smooth surface with a hot wet knife. This meant that when I piped on the chocolate and attempted to feather it, the caramel wasn’t damp enough and the feathering didn’t really work.  

The recipe suggests ¼ tsp of sea salt flakes but I ended up putting about 3 tsp in – which just came through; I don’t think you’d have noticed the salt at all if I had put less. Even with the salt, the cake overall is extremely sweet – possibly a little too much so for me, but perfect for those with a very sweet tooth!

Caramel Layer Cake

Great British Bake Off Showstopper Caramel Layer Cake

Ingredients
For the sponge

  1. 300g self-raising flour
  2. 300g castor sugar
  3. 250g butter, very soft but not runny, in cubes
  4. 4 large eggs
  5. 4 tblsp buttermilk, at room temperature
  6. 1 tsp vanilla extract

For the filling/topping

  1. 225g butter, at room temperature
  2. 450g dark brown muscovado sugar
  3. 175ml double cream
  4. 300g icing sugar
  5. Sea salt flakes – to taste
  6. 100g dark chocolate, broken up

Method

  1. Preheat the oven to 180C.
  2. Grease 3 x 20cm sandwich tins and line their bases with baking parchment.
  3. Sift the flour and sugar into a large bowl and add the butter.
  4. Whisk the eggs with the buttermilk and vanilla using a fork and then add this to the flour mixture.
  5. Beat on a low speed with an electric hand mixer or stand mixer, until everything is thoroughly combined and very smooth, thick and light.
  6. Divide the mixture evenly among the three tins and spread level.
  7. Bake for about 25 minutes until the sponges are springy when touched lightly.
  8. Set the tins on a wire rack and run a round-bladed knife around the insides of the tin to loosen the sponges.   Leave to cool for 2 minutes before turning out of the tins.
  9. Leave to cool completely.
Making the filling/topping
  1. Put 175g of the weighed butter into a medium-sized pan with the muscovado sugar and cream.
  2. Heat gently until the butter has melted and then bring to the boil.
  3. Reduce the heat and simmer gently for 5 minutes, stirring frequently.
  4. Pour into a heatproof mixing bowl and gradually beat in the icing sugar, using an electric mixer.
  5. When all the icing sugar has been added, continue beating until the mixture is fluffy and barely warm.
  6. Gradually beat in the rest of the butter, followed by the salt. Taste and add more salt as needed.
  7. Gently melt the chocolate in a glass bowl placed over a saucepan of simmering water.
  8. Spoon about half of the chocolate into another bowl and stir in slightly less than a quarter of the caramel mixture.

Assembling the cake

  1. Set one sponge layer on a serving plate and spread over one-third of the caramel mixture.
  2. Spread a second sponge layer with the chocolate-caramel mixture and set on the first layer.
  3. Place the third sponge layer on top and leave the cake to set.  
  4. When set, cover the top and sides of the cake with the remaining caramel mixtgure. If it has become too firm, gently reheat until workable.
  5. Spoon the remaining chocolate into a piping bag and pipe a spiral of chocolate on top of the cake. “Feather” by drawing a cocktail stick through the chocolate and caramel icing.