Showing posts with label Great British Bake Off. Show all posts

Sunday, 17 August 2014

Mary Berry's Florentines

chocolate covered florentines on a plate
I first made these luxurious biscuits a couple of weeks ago. I had a bit of spare time on a wet Sunday afternoon and fancied baking something new. I had never made florentines and had always imagined them to be fairly tricky: I was surprised to find that they are actually fairly quick and easy to make. What is also fantastic about them is that the ingredients are fairly standard stock cupboard items - so easy to whizz up without having to go to the shop!

My recipe comes from Mary Berry’s Ultimate Cake Book – except I add a few extra glace cherries, or add stem ginger instead of the glace cherries – which produces delicious florentines!

Randomly, florentines were then the Technical Challenge this week on Great British Bake Off. It was quite handy to hear Mary Berry describe exactly what she was looking for: the thin lattice edges and the crisp crack when you bite into the biscuit.

The trickiest bit of making these florentines is getting the chocolate layer right – cooling the melted chocolate to an appropriate thickness that it can be spread onto the biscuits without dripping through the lattice, and also so that it is thick enough to hold the forked pattern. To make them extra pretty, you can melt some white chocolate and pipe it over the other (non-chocolate-covered) side of the biscuits. Like this, they make lovely presents.

You can vary the nuts / fruit to suit your tastes – as suggested, stem ginger makes a delicious addition. For Christmas, I think that dried cranberries would be lovely.

FlorentinesFlorentines

Ingredients 
  1. 50g butter
  2. 50g Demerara sugar
  3. 50g golden syrup
  4. 50g plain flour
  5. 6 glace cherries  / 25g stem ginger – finely chopped
  6. 50g mixed candied peel, finely chopped
  7. 50g mixed nuts, finely chopped
  8. 200g plain chocolate, broken into pieces

Method 
  1. Pre-heat the oven to 180C.
  2. Line 3 baking trays with baking parchment.
  3. Place the butter, sugar and golden syrup into a small pan and heat gently until the butter has melted.
  4. Mix the flour, peel, nuts and stem ginger / cherries in a bowl.
  5. Stir this mix into the saucepan of melted butter/sugar/syrup.
  6. Spoon teaspoons of the mix onto the prepared baking trays and spread out with the back of the teaspoon. Leave plenty of room for the florentines to spread further.
  7. Bake in the pre-heated oven for 8-10 minutes until golden brown (turn the trays after 6 minutes if your oven bakes unevenly).
  8. Allow the florentines to cool and harden slightly before moving onto a cooling rack to fully cool.
  9. Melt about 150g chocolate in a glass bowl placed over a saucepan of simmering water.
  10. Remove the chocolate from the heat and add the remaining chocolate.
  11. Stir to incorporate the additional chocolate so that it cools and thickens a little.
  12. Use a teaspoon to spoon the chocolate onto the flat side of each florentine and spread out with the back of the teaspoon.
  13. Use a fork to mark a zig-zag pattern into the chocolate.
  14. Leave to cool. 


Monday, 26 May 2014

Coffee Kisses

2 coffee biscuits, sandwiched with chocolate buttercream

This is a fab, quick recipe, using store cupboard ingredients, that makes delicious biscuits! Perfect as a snack with your morning coffee, or at any time of day! 

A couple of weeks ago, my in-laws were popping down for the day and I realised the night before that I should probably whizz up something to offer them. I didn’t have the time or energy to go to the shop and so I needed to make something with the stuff that I had in the cupboards. I also wanted to make something that tasted fab, looked like I had made an effort but was actually quick and simple to make! Having made these biscuits a few times before, they came straight to mind and the decision was made.

The recipe comes from the original GBBO book “The Great British Book of Baking”. However, I’ve made a couple of adaptations – added a bit of extra flour and divided the mixture into far smaller balls: they recommend 16 but I’ve followed this recipe and the biscuits are crazily huge! I also rest the dough in the fridge for 20 minutes before baking, which helps the biscuits to keep their domed shape, rather than flattening out.

Give them a go – they’re delicious!

Coffee Kisses

Ingredients
  1. 200g self-raising flour
  2. 100g caster sugar
  3. 100g butter, chilled and diced
  4. 2 tsp instant coffee granules or powder
  5. 1 medium egg
For the buttercream
  1. 75g very soft butter
  2. 150g icing sugar
  3. 4 tsp cocoa powder
Method
  1. Line two baking trays with baking parchment.
  2. Combine the flour and the sugar in a mixing bowl.
  3. Add the butter and rub into the flour mixture until it resembles breadcrumbs.
  4. Dissolve the coffee in 2 tsp of boiling water.
  5. Beat the egg until frothy and mix in the coffee.
  6. Add to the bowl and stir with a wooden spoon to make a firm dough.
  7. Flour your hands well and then divide the dough into 30 pieces.
  8. Shape each piece into a neat ball.
  9. Arrange the balls on the baking trays, allowing space for them to spread.
  10. Place the trays in the fridge for 20 minutes.
  11. Pre-heat the oven to 170C.
  12. Take the baking trays out of the fridge and place in the oven.
  13. Bake for 15-20 minutes, until light golden and firm to the touch.
  14. Leave to cool for a few minutes and then transfer to a wire rack and leave to cool completely.
  15. Beat the butter with the icing sugar and cocoa powder until very light and smooth.
  16. Use the buttercream to sandwich the biscuits in pairs.  


Monday, 28 January 2013

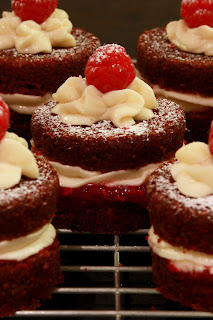
Mini Red Velvet cakes


Cup of tea and mini red velvet cake

As per my previous post, I’ve been inspired by GBBO this week. My second bake of the weekend was mini Red Velvet cakes – partly inspired by Claudia Winkleman on GBBO and partly due to my wish to use my new mini sandwich tin

Mini Red Velvet CakesI used the Bertinet Kitchen Red Velvet cupcake recipe used previously for my Halloween Red Velvet cupcakes, simply spooned into the mini sandwich tin rather than cupcake cases. The recipe suggests that it makes 14 and it did overspill considerably out of my 12 hole tin, so I would use less next time! Before spooning the mix in, I sprayed the tin liberally with Dr Oetker cake release spray and the cakes came out very easily so I would definitely recommend!

Once baked, I allowed the cakes to cool for about 10 minutes before turning them out onto a wire rack. I then allowed them to cool completely before cutting their rather mushroomed tops off and cutting them in half. To improve their appearance, I then turned them over, so that the bottom edge became the top. The cakes were then filled with a mix of crushed raspberries and raspberry jam and vanilla buttercream, topped with a buttercream star and a raspberry and dusted with icing sugar. 

Sunday, 27 January 2013

Honey and Lemon Beehive cakes

Mini honey and lemon beehive cake


I’ve been inspired by GBBO this week and was debating between three things for weekend baking – the honey and lemon cake made by Martha Kearney, the red velvet cakes made by Claudia Winkleman and the chocolate éclairs from the Technical Challenge. I really fancy a go at making éclairs but decided against in the end – I think they’re better eaten fresh and seeing as it is only me and the EHH around this weekend, we’d get very fat! I also wouldn’t want to take them into work as they are typically filled with fresh cream and should therefore be kept in the fridge.

I loved the look and the idea of the honey and lemon cake – but decided to make mini ones instead – this was a mistake!  I didn’t use Martha’s recipe used on the show – I found this one on the Good Food website, which was really well rated and so decided to do that, with the addition of the zest from two lemons. I also swapped the dark brown sugar for light brown – I find that dark brown can be a little overpowering. I also decided to leave off the drizzle topping and decorate with a buttercream. Rather than making it as one large cake, I divided the mixture between 12 cupcake cases.

Once baked, I allowed to the cakes to cool, then sliced off their tops to create a flat base and turned them out of the cupcake cases.  As they are fairly sticky cakes, they didn’t turn out that well – if I were to do them again, it would be better to use silicon baking cases, or bake in the tin without the cases – just lots of cake-release spray. I then turned the cakes upside down and trimmed a little from the top corner – to create a more domed top. 

Icing them was very tricky and took a little bit of practise – the first few I did looked awful! My new turntable definitely helped. I used a small round icing nozzle and carefully turned the turntable as I iced.  I tried starting the icing from the top and from the bottom, but it didn’t seem to make much difference – slightly easier from the top, I think!

In the end, the cakes taste fantastic but I wasn’t thrilled with their appearance – they are a little untidy for my liking, and will also be tricky to eat! I’ll definitely do this recipe again – but either as a large cake or as normal cupcakes with just a beehive iced on top!

Honey and Lemon Beehive cakes
Mini honey and lemon beehive cakes

Ingredients

  1. 250g clear honey
  2. 225g unsalted butter
  3. 100g light brown muscovado sugar
  4. 3 large eggs , beaten
  5. 300g self-raising flour
  6. Grated zest of two lemons

Buttercream icing:

  1. 110g butter, at room temperature
  2. 500g icing sugar, sifted
  3. 3 tblsp freshly squeezed lemon juice
  4. 1 tblsp honey

Method

  1. Cut the butter into pieces and drop into a medium pan with the honey and sugar.
  2. Melt slowly over a low heat.
  3. When the mixture looks quite liquid, increase the heat under the pan and boil for about one minute.
  4. Tip mixture into a clean glass bowl and place in a larger bowl of cool water – this will help it to cool more quickly.
  5. Leave to cool for 20-30 minutes, to prevent the eggs cooking when they are mixed in.
  6. Preheat the oven to 140C.
  7. Place 12 silicon cupcake cases into a baking tin.
  8. Beat the eggs into the melted honey mixture using a wooden spoon.
  9. Sift the flour into a large bowl and pour in the egg and honey mixture and the lemon zest, beating until you have a smooth, quite runny batter.
  10. Pour the mixture into the cupcake cases and bake for 40-50 minutes, until the cakes are well-risen, golden brown and spring back when pressed. A skewer pushed into the centre of the cake should come out clean.
  11. Whilst the cakes are cooking, make the buttercream.
  12. In a large mixing bowl, beat the butter, juice, honey and half of the icing sugar until smooth.
  13. Add the rest of the icing sugar and beat until smooth and creamy.
  14. Once the cakes are cooked, remove from oven and allow to cool in the tin for about 10 minutes before removing and placing on a wire rack.
  15. Allow to cool thoroughly before slicing the tops off the cakes to create a flat base.
  16. Turn out of the cupcake cases.
  17. Turn upside down and trim the top edges to create a domed top.
  18. Place icing in a piping bag with a small round nozzle.
  19. Pipe around the cake in a spiral to create a beehive look.
  20. Decorate with bees made from fondant icing.

Thursday, 1 November 2012

GBBO Caramel Layer Cake


I’m a little late in writing this up (let’s not talk about the virus that attacked my computer earlier this week!) as I was keen to get the Halloween posts up promptly. So this post takes us back a week to the final bake for EHH’s birthday – a Caramel Layer Cake from the GBBO Showstopper book. EHH loves caramel and very sweet things, so when I saw this in the book, it was an essential for his birthday.

It was the first time that I had made this cake – the cake itself was very simple to make, although it didn’t rise as much as I would like. If I were to make it again, I may use the traditional method of creaming the butter and sugar, etc, rather than doing the all-in-one method. The caramel icing took a little while to make but the most time-consuming element was the actual icing of the cake. The icing was quite nice to work with, it moved smoothly and was fairly easy to push around and cover the cake. However, I think I spent too long trying to get a perfectly smooth surface with a hot wet knife. This meant that when I piped on the chocolate and attempted to feather it, the caramel wasn’t damp enough and the feathering didn’t really work.  

The recipe suggests ¼ tsp of sea salt flakes but I ended up putting about 3 tsp in – which just came through; I don’t think you’d have noticed the salt at all if I had put less. Even with the salt, the cake overall is extremely sweet – possibly a little too much so for me, but perfect for those with a very sweet tooth!

Caramel Layer Cake

Great British Bake Off Showstopper Caramel Layer Cake

Ingredients
For the sponge

  1. 300g self-raising flour
  2. 300g castor sugar
  3. 250g butter, very soft but not runny, in cubes
  4. 4 large eggs
  5. 4 tblsp buttermilk, at room temperature
  6. 1 tsp vanilla extract

For the filling/topping

  1. 225g butter, at room temperature
  2. 450g dark brown muscovado sugar
  3. 175ml double cream
  4. 300g icing sugar
  5. Sea salt flakes – to taste
  6. 100g dark chocolate, broken up

Method

  1. Preheat the oven to 180C.
  2. Grease 3 x 20cm sandwich tins and line their bases with baking parchment.
  3. Sift the flour and sugar into a large bowl and add the butter.
  4. Whisk the eggs with the buttermilk and vanilla using a fork and then add this to the flour mixture.
  5. Beat on a low speed with an electric hand mixer or stand mixer, until everything is thoroughly combined and very smooth, thick and light.
  6. Divide the mixture evenly among the three tins and spread level.
  7. Bake for about 25 minutes until the sponges are springy when touched lightly.
  8. Set the tins on a wire rack and run a round-bladed knife around the insides of the tin to loosen the sponges.   Leave to cool for 2 minutes before turning out of the tins.
  9. Leave to cool completely.
Making the filling/topping
  1. Put 175g of the weighed butter into a medium-sized pan with the muscovado sugar and cream.
  2. Heat gently until the butter has melted and then bring to the boil.
  3. Reduce the heat and simmer gently for 5 minutes, stirring frequently.
  4. Pour into a heatproof mixing bowl and gradually beat in the icing sugar, using an electric mixer.
  5. When all the icing sugar has been added, continue beating until the mixture is fluffy and barely warm.
  6. Gradually beat in the rest of the butter, followed by the salt. Taste and add more salt as needed.
  7. Gently melt the chocolate in a glass bowl placed over a saucepan of simmering water.
  8. Spoon about half of the chocolate into another bowl and stir in slightly less than a quarter of the caramel mixture.

Assembling the cake

  1. Set one sponge layer on a serving plate and spread over one-third of the caramel mixture.
  2. Spread a second sponge layer with the chocolate-caramel mixture and set on the first layer.
  3. Place the third sponge layer on top and leave the cake to set.  
  4. When set, cover the top and sides of the cake with the remaining caramel mixtgure. If it has become too firm, gently reheat until workable.
  5. Spoon the remaining chocolate into a piping bag and pipe a spiral of chocolate on top of the cake. “Feather” by drawing a cocktail stick through the chocolate and caramel icing.


Tuesday, 23 October 2012

GBBO Flapjacks


So, second bake of the Great Baking Weekend for EHH’s birthday. Decided to make these flapjacks as they’re quick and easy, and I could make them on the Saturday. The recipe is taken from the GBBO Showstopper Book, under “Ruby Jacks” – but without the ginger. I’ve done them with the ginger and they taste fab – but decided to leave them plain this time as EHH isn’t hugely keen on ginger (although I love it!).

These flapjacks are great – right level of sweetness, crunchy and yet chewy – fab!

I’ve topped some of them with the white chocolate, cranberry and sour cherry topping suggested by the GBBO book (adding also dried blueberries as I had them in the cupboard). The others I finished with a drizzle of lemon icing leftover from the Sticky Ginger Cake made earlier.

Flapjack

Ingredients

  1. 115g butter
  2. 70g light brown muscovado sugar
  3. 5 tblsp / 125g golden syrup
  4. 180g porridge oats
Method

  1. Preheat the oven to 150C/300F/Gas 2.
  2. Line a 20.5cm square tin with baking parchment
  3. Put the butter, golden syrup and sugar in a pan.
  4. Stir over a low heat until melted.
  5. Place oats in a large bowl and pour over syrup mixture, mixing thoroughly to combine.
  6. Tip the mixture into the prepared tin and spread evenly, pressing down with the back of a spoon to level the surface (it will be a fairly thin layer).  
  7. Bake for 20-30 minutes, until golden brown.
  8. Set the tin on a wire rack.
  9. Carefully score the mixture into 16 squares, using an oiled knife, then leave until cool.

White chocolate topping:

Image of flaphack covered in white chocolate with dried blueberries, cranberries and sour cherries

Ingredients

  1. 100g good quality white chocolate
  2. 150g mix of dried cranberries, sour cherries and blueberries

Method

  1. Chop white chocolate into small pieces and place in a glass bowl.
  2. Simmer a small amount of water gently in a saucepan and place the glass bowl over this (ensuring it does not touch the boiling water).
  3. Stir the chocolate gently until melted.
  4. Spread the chocolate on top of the cooled flapjack squares.
  5. Decorate with the dried fruit and allow to set.

Lemon drizzle icing
Flapjack with lemon drizzle icing squiggles

Ingredients

  1. 100g icing sugar, sifted
  2. Finely grated zest of 1 lemon
  3. Lemon juice

Method

  1. Mix together icing sugar and lemon zest, then gradually add lemon juice until you have a smooth, slightly runny icing, adding more juice, if needed.
  2. Spoon into a disposable piping bag and drizzle in zig-zags across the cooled flapjacks.

Monday, 8 October 2012

GBBO Cornish Fairings


We’re off to the in-laws today as they’re giving us a lift to Heathrow tomorrow morning for our flight to Morocco! As a thank you, I thought I’d make them some biscuits – but nothing that would take too long as I had to pack too! I had a search through my recipe books and through the cupboards to see what we had in, and decided on Cornish Fairings from the GBBO Great British Book of Baking.

Cornish Fairings
Cup of tea and 3 Cornish fairings


Ingredients

  1. 100g plain flour
  2. 1 tsp baking powder
  3. ½ tsp bicarbonate of soda
  4. 1 tsp ground mixed spice (they suggest ½ tsp – I definitely prefer more oomph!)
  5. 40g castor sugar
  6. 50g butter, chilled and diced
  7. 1.5 tblsp mixed peel, finely chopped
  8. 3 tblsp golden syrup (level not rounded), gently warmed

Method

  1. Preheat the oven to 190C/375F/GM5.
  2. Cover 2 baking trays with baking parchment.
  3. Sift the flour, baking powder, bicarb, mixed spice and sugar in a mixing bowl.
  4. Add the butter and rub into the flour mixture, using the tips of your fingers, until it resembles fine breadcrumbs.
  5. Mix in the peel, followed by the syrup, to make a dough.
  6. Using your hands, roll the mixture into 18 marble-sized balls.
  7. Set them on the baking trays, spacing them well apart to allow for spreading.
  8. Bake in the pre-heated oven for 7-8 minutes, turning the trays half-way through baking to help the biscuits to bake evenly.
  9. Leave to cool on the trays for a minute until firm, then lift on to a wire rack and leave to cool completely.
  10. Store in an airtight tin.

 Verdict
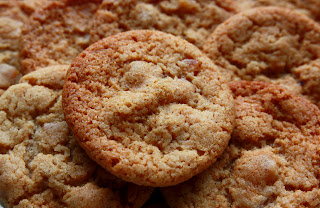
I actually ended up making two batches of these. The first batch was very sticky when it came together as a dough: the instructions in the GBBO book suggested that it should be a firm dough. I assumed that I had added too much golden syrup so added a bit more flour and sugar to firm up the dough. However, the biscuits didn’t spread as much as expected and were more cookie-like than I imagined they should be, although they tasted good.

Batch 2, I just accepted that it would be a sticky dough and went ahead with the bake. These spread a bit more and had more of a crunch once cool – although they still don’t look quite like those in the book’s photo. 

Close up of Cornish Fairings

Monday, 10 September 2012

GBBO Biscotti


So having decided that Sunday was a baking day, my dismal attempt at apple scones didn’t put me off and I decided to delve into my new GBBO Showstopper book and have a go at something a bit different. I’ve been making lots of cakes recently so decided to have a go at the Sour Cherry Biscotti. I’m a big fan of biscotti and tend to make it at Christmas as presents, as it lasts really well.
 
So, it all started well and my KitchenAid had beaten the butter, sugar and eggs into a lovely light mousse-like froth. I merrily sieved in the flour, salt and baking powder and turned to check the recipe, only to realise that I had chucked in s-r flour rather plain flour – aaaaargh! Having no idea what the impact of this would be - not wanting to use up my white chocolate, almonds and sour cherries but also not wanting to waste all of the ingredients already in the mix - I decided to substitute the key ingredients and see what happened. A delve into the depths of the larder delivered some dark chocolate, raisins and pistachios. I threw these in, divided the dough in two, stuck it on two baking trays and popped it in the oven: hoping that it didn’t decide to grow out of control and splurge out the sides of the oven!

Timer on the oven set, Batch Number Two – this time with plain flour – was started, with the delicious additions (as per recipe) of white chocolate, almonds and sour cherries. After lots of anxious glances through the oven window, Batch One came out of the oven – and looked surprisingly normal! After cooling, slicing and baking again, Batch One were complete and looking surprisingly good!

Dark chocolate, raisin and pistachio biscotti

45 minutes later, Batch Two (white chocolate, almond and sour cherry) were complete and looked very similar to the not-so-disastrous Batch One!

White chocolate, sour cherry and almond biscotti


Overall verdict? Both batches were delicious and went down a storm with my colleagues and with EHH’s colleagues. They were lovely and crisp when they came out of the oven but weren’t quite as crisp this morning – perhaps I didn’t bake them for long enough? Not sure they would have held up to much of a dunking!    

Dark chocolate, raisin and pistachio biscotti

Ingredients:


  1. 115g butter, softened
  2. 125g golden caster sugar
  3. 1 tsp vanilla extract
  4. 2 large eggs, at room temp, beaten
  5. 275g flour
  6. Pinch of salt
  7. ½ tsp baking powder
  8. 100g raisins
  9. 100g good quality dark chocolate, roughly chopped
  10. 100g pistachios


Method
  1. Preheat the oven to 180C / 350F / gas 4.
  2. Beat the butter, sugar and vanilla extract until light in colour and fluffy.
  3. Gradually beat in eggs, beating well after each addition.
  4. Sift the flour, salt and baking powder into the bowl and mix in with a wooden spoon to make a soft dough.
  5. Add the raisins, chocolate and pistachios and work in until evenly combined.
  6. Add a little more flour to the dough if it is still very sticky.
  7. Dust hands with flour and then turn the dough out onto a lightly floured work surface.
  8. Divide dough into two pieces and roughly shape each into a long, wide sausage in your hands.
  9. Lift each piece onto a lined baking sheet (one piece per baking sheet) and pat each piece into a neat rectangle about 8cm x 25 cm.
  10. Bake for about 25 minutes until just firm to the touch and golden (turn after about 18 minutes if your oven bakes unevenly). Remove from the oven (leave the oven on) and allow to cool for 10 minutes.
  11. Slice each piece of baked dough (still on baking sheets) on the diagonal. Gently tip the fragile slices over so that they are cut-side down on the baking sheet.
  12. Bake for a further 10 minutes until starting to colour.
  13. Remove from the oven and set the baking sheets on a wire rack to cool and firm up before removing.
  14. Store in an air-tight tin and eat within two weeks. 

Try alternative flavours:
  • sour cherry, white chocolate and almond (as per the recipe in the GBBO Show stoppers book)
  • orange zest, dark chocolate, dried cranberries and hazelnuts – with mixed spice and cinnamon instead of the vanilla extract
  • lemon zest, dried blueberries, white chocolate and almonds