Showing posts with label biscuits. Show all posts

Sunday, 6 July 2014

Key Lime Pie

Key lime pie

A couple of weekends ago, my brother and his girlfriend came to stay for a night. They spent the afternoon helping EHH in the garden and so I thought that I had better put together something good for dessert. I had already baked my mini blueberry and lemon loaf cakes for snacks (which my brother ate straight out of the tin!) and so didn’t want to make something cake-y for dinner. I’ve never made Key Lime Pie before and it is one of EHH’s favourite puds so I decided to give it a go.

I found this recipe on BBC Good Food’s website, but made a few adaptations based on the comments on the webpage. I reduced the butter in the base to 100g – which was plenty – and I used half Gingernuts and half Hobnobs instead of all Hobnobs, just to add an extra flavour dimension. As there were only four of us, I didn’t cover the pie in cream but served it on the side instead – so that we could keep the pie for longer in the fridge.

Making this dessert is fairly simple. Pressing the biscuit crumbs into the tart tin does take a bit of time but it is worth it. Make sure that you don’t end up with a very thick section around the rim rather than properly moulding the corners. I was worried about it coming neatly out of the tart tin - but as you can see, it came out beautifully! You do need to allow plenty of time for the pie filling to cool and set fully once it has been cooked – I didn’t leave mine for long enough and it was still a little runny.

Overall, I thought that this dessert was ok. I’m not a fan of the texture of the biscuit base (but I never am – I don’t like cheesecakes etc with similar bases) and I felt that the filling was perhaps a little sharp (perhaps due to using normal limes rather than key limes). I definitely preferred the lemon tart that I made a little while ago. However, EHH loved this one and my brother and his girlfriend also seemed to enjoy it.

(Key) Lime Pie

Ingredients
  1. 150g Hob Nobs
  2. 150g Gingernut biscuits
  3. 100g butter, melted
  4. 1 x 397g tin condensed milk
  5. 3 medium egg yolks
  6. finely grated zest and juice of 4 limes (preferably Key limes)
  7. 300ml double cream
  8. 1 tbsp icing sugar
  9. extra lime zest, to decorate

Method
  1. Heat the oven to 160C.
  2. Blitz the biscuits to crumbs in a food processor (or put in a strong plastic bag and bash with a rolling pin).
  3. Mix with the melted butter and press evenly across the base and up the sides of a 22cm loose-based tart tin.
  4. Bake in the oven for 10 minutes. Remove and cool.
  5. Put the egg yolks in a large bowl and whisk for a minute with electric beaters.
  6. Add the condensed milk and whisk for 3 minutes then add the zest and juice and whisk again for 3 minutes.
  7. Pour the filling into the cooled base then put back in the oven for 15 minutes, or until set on top.
  8. Cool then chill for at least 3 hours or overnight if you like.
  9. When you are ready to serve, carefully remove the pie from the tin and put on a serving plate.
  10. To decorate, softly whip together the cream and icing sugar.
  11. Dollop or pipe the cream onto the top of the pie and finish with extra lime zest.


Monday, 25 November 2013

Orange & Cinnamon Shortbread

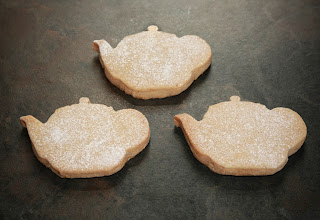
Orange and cinnamon shortbread in teapot shapes


Last week was my turn on the rota for cake at work. We have a big team briefing every Friday known affectionately as the “Friday cake meeting” – there’s a rota with each week assigned to a member of the team! It’s taken very seriously! Unfortunately, I have set a rather strong precedent and so I had people telling me all week that they were excited about what I was going to produce on Friday – talk about pressure!


The trouble with the Friday cake meeting is that it is on a Friday! This means that you have to bake on a week night after work and as it had been a long week, I wasn’t up for making anything fancy! To complicate things further, we have one person who is gluten-intolerant and one person who is allergic to nuts and eggs! They always insist that they don’t want people to go to extra effort for them but I wanted to ensure that I catered for them both.


I decided to go with the gluten-free lemon polenta cake that I made earlier in the week (which was a bit of a disaster as I miscalculated and used too few eggs – having drowned the resulting cake in lots of lemon syrup, it was edible but nowhere near perfect – fail!) and two new recipes: toffee apple crumble cake and these orange and cinnamon shortbread biscuits.


I’d seen this Cookie’s cakes and Bakes recipe on Pinterest a little while ago and had pinned it onto my Christmas Baking board. It seemed a nice simple recipe that would work well as little baked Christmas presents, or as part as a Christmas hamper. It’s also conveniently egg-free and so this seemed like a great opportunity to try it out.


It’s a great simple and speedy recipe and would be great for making with kids. I used my favourite teapot cookie cutter and simply dusted the cooked biscuits with icing sugar, but you could drizzle with chocolate, or an orange blossom flavoured water icing. You could also vary the flavouring – adding lemon zest, or vanilla essence, or other spices. Or you could add chopped chocolate, or dried fruit, or anything else you fancy!  


The resulting biscuits are short and crispy. They will lose their crisp crunch after a day but they will last fine for at least a week. I actually prefer them once they are a day old and are a bit softer, but that’s probably a matter of taste!


Orange & Cinnamon Shortbread


Ingredients

  1. 200g soft butter
  2. 100g icing sugar
  3. 100g cornflour
  4. 250g Plain flour
  5. Zest of one orange
  6. 1 tsp cinnamon


Method

  1. Pre-heat the oven to 180C.
  2. Line 2 baking trays with baking parchment.
  3. Beat the butter until very light and creamy.
  4. Add the orange zest and beat.
  5. Slowly add the icing sugar, cornflour, plain flour and cinnamon, stirring gently until combined.
  6. Use your hands to bring the mixture together to make a dough. Try not to handle the dough too much – it will affect the texture of the shortbread.
  7. Roll the dough out between two sheets of baking parchment until 10mm thick.
  8. Use cookie cutters to cut out desired shapes.
  9. Re-roll any off-cuts and cut out more shapes.
  10. Place on baking trays and bake for 12-15 minutes or until pale golden around the edges.
  11. Remove from oven and allow to cool for 5 minutes on the baking tray.
  12. Tip onto a wire rack to cool completely.


Sunday, 22 September 2013

Honeybread biscuits with Sark wildflower honey

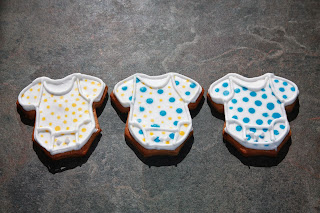
3 baby onesie cookies


One of my closest friends has recently had a beautiful baby boy and so I decided to bake up some goodies to help her through those sleep-deprived first weeks. I’ve had a set of new baby cookie cutters in the cupboard for ages and I’d seen this recipe in my most recent Good Food magazine (cut out into very cute bee shapes!) so I decided to give it a go. I had a jar of very special Sark wildflower honey from a recent weekend on the beautiful island of Sark in the Channel Islands and so decided to use it for this recipe.


Making these biscuits is actually very easy – just stick all the ingredients in a food processor and whizz! The original recipe suggested that you could roll and cut the dough straight away – I decided to stick with the Biscuiteers’ method of popping them in the fridge first. To be honest, I’m not sure if this is necessary!


The original recipe just suggested plain icing, but I added lemon juice and a touch of orange blossom water to add a bit of interest and echo the floral flavours of the honey.


However, icing these was not simple! I must remember when I next make biscuits that I should not attempt to ice with more than 2 or 3 colours! Mixing up lots of different colours of line and flooding icing takes ages! And icing biscuits generally takes quite a while! In the end, these weren’t quite as neat as I’d have liked because I had to hurry to get them finished!


Overall, these biscuits were nice and spicy and the honey flavour came through well in the background. I’m not sure that I would worry about putting in really good quality honey next time, as I think that the other flavours meant that the quality of the honey was not really noticeable. I really did like the extra flavour that the lemon and orange flower water gave to the icing.   


Honeybread biscuits with Sark wildflower honey

Makes approximately 20-25 biscuits


3 teddy bear cookiesIngredients

  1. 300g plain flour
  2. 100g diced butter
  3. 1 tblsp mixed spice
  4. 2 tsp ground ginger
  5. 100g light brown soft sugar
  6. 1 large egg
  7. 100g clear honey


To decorate

  1. 500g royal icing sugar
  2. 75ml lemon juice or water
  3. Couple of drops of orange blossom water (optional)


Method

  1. Place all the biscuit ingredients into a food processor and whizz to a smooth dough.
  2. Split the dough in half.
  3. Place half of the dough between two sheets of baking parchment and roll out to the thickness of a £1 coin. Place in the fridge for 20 minutes.
  4. Repeat with the second half of the dough.
  5. Pre-heat oven to 180C.
  6. Remove dough from fridge, stamp out shapes using chosen cutters and place on a baking tray.
  7. Bake for about 10-12 minutes until crisp and golden brown.
  8. Place on a wire rack to cool.


To ice

  1. Add the water to the royal icing sugar in a large bowl.
  2. Stir with a wooden spoon until combined (this stops your kitchen being coated in a fine dusting of icing!)
  3. Use an electric mixer to beat the mix (starting on low and increasing to high speed) for about 5 minutes. You are looking for the mix to be bright white and a toothpaste-like consistency (this is “line icing”).
  4. Divide the line icing between smaller bowls.
  5. Use a skewer to add small amounts of the paste colours to the bowls of icing, adding a little at a time until you reach the desired colour. 
  6. Spoon some of the icing into a piping bag with a very small round tip.
  7. Pipe the outlines of the shapes. Set aside the rest of the line icing to add details to the iced biscuits.
  8. Add water/more juice to the icing left in the bowls until you reach a pouring consistency (this is called “flooding icing”).
  9. Spoon into a piping bag or piping bottle.
  10. Pipe the flooding icing onto the biscuits to fill the areas outlined on the biscuits.
  11. Allow iced biscuits to set.
  12. Use remaining line icing and other decorative items to complete the decoration of the biscuits.
  13. Leave to dry for at least 24 hours.

Sunday, 7 July 2013

The Very Hungry Caterpillar biscuits


20 Hungry Caterpillar biscuits

One of my very good friends is expecting a baby and so I offered to organise a baby shower for her. We decided to hold it at a cafĂ© called Tart in Bristol, which offers a fantastic range of home-made cakes and tarts (and a lovely glass of sparkling rose wine!). As such, I couldn’t make any cakes etc to take along, but decided that I could get away with taking some iced biscuits along as favours.


My friend hasn’t found out whether she is expecting a boy or a girl so the theming for the party had to be gender-neutral. I decided to go for a bright and cheerful theme based on The Very Hungry Caterpillar book – which I loved as a child! I bought some spotty bunting and tablecloth, some Hungry Caterpillar napkins and made some bunting from pictures in the book printed onto photo paper. Inspired by ideas on Flickr, I decided to make these biscuits and package them up in little bags for the party guests.These would also make great biscuits for a child's birthday party.


These biscuits follow the same Biscuiteers’ recipe and method as I used for my Easter spiced biscuits earlier in the year, simply leaving out the orange zest and spices, and adding extra lemon zest. This recipe makes great biscuits and so I always come back to it when I need to make cookie-cutter biscuits.


Be warned though - these look fab but did take a loooong time to decorate! 


Lemon cookie-cutter biscuits


Ingredients (makes approx. 24 biscuits)

  1. 350g plain flour
  2. 100g self-raising flour
  3. Zest of 2 lemons (save juice for the icing)
  4. 125g granulated sugar
  5. 125g salted butter, diced (at room temp)
  6. 125g golden syrup
  7. 1 large egg, lightly beaten


Method

  1. Sift the flour and baking powder into a mixing bowl.
  2. Add the sugar and stir well.
  3. Rub in the butter, using just the tips of your fingers, until the mixture resembles fine breadcrumbs.
  4. Make a well in the centre of your mix and add the golden syrup, egg and zest.
  5. Use a knife to stir the mixture until it begins to come together as a dough.
  6. Use your hands to bring the dough together.
  7. Divide the dough into two and shape into two flat disks.
  8. Place the first piece of dough between two sheets of baking parchments. (This means that you do not have to add extra flour when rolling.)
  9. Roll the dough out evenly until it is approximately 5-6mm thick all over (you can buy rolling guides, but I have this rolling pin, which is brilliant!). If the top or bottom sheets of parchment crinkle at any time, peel it off and smooth out.
  10. When rolled to the correct thickness, move the dough (still sandwiched between parchment) onto a baking tray and then into the fridge to chill for at least 20-30 minutes.
  11. Pre-heat oven to 170C.
  12. After chilling, use a square cutter to cut out the biscuits, cutting each one as close to the last as possible, in order to use the dough efficiently. Re-roll the dough as necessary, but try to work the dough as little as possible. 
  13. Place each biscuit onto a lined baking tray, allowing space between as the biscuits will spread a little.
  14. Bake the biscuits for 14 – 18 minutes. When cooked, the biscuits will be very lightly golden, firm around the edges but still slightly soft on top.
  15. Remove the baking trays from the oven and carefully remove each biscuit from the tray, placing them gently onto a wire cooling rack. The biscuits will still be very delicate at this stage. 
  16. Allow biscuits to cool totally before storing or icing.


To decorate

These biscuits were covered with rolled fondant and then decorated with royal icing, which dries to a very hard surface – making it easy to wrap these biscuits as presents or transport them. The easiest way to work with royal icing is to start with a ready-made royal icing mix. 


Ingredients

  1. 250g fondant icing
  2. 1 tblsp lemon juice for brushing
  3. 500g royal icing sugar
  4. 75ml lemon juice
  5. Paste food colours - red, green, yellow, blue
  6. Food colour pens


Method

  1. Roll out the fondant icing to approximately 2mm thick.
  2. Cut out using a square cutter (slightly smaller than the one used to cut out the biscuits).
  3. Brush each biscuit with a little lemon juice before topping with a square of icing.
  4. Add the 75ml juice to the royal icing sugar in a large bowl.
  5. Use an electric mixer to beat the mix (starting on low and increasing to high speed) for about 5 minutes. You are looking for the mix to be bright white and a toothpaste-like consistency (this is “line icing”).
  6. Divide the line icing between 3 smaller bowls.
  7. Use a skewer to add small amounts of the red, green and yellow paste colours to the bowls of icing, adding a little at a time until you reach the desired colour. 
  8. Spoon some of the icing into a piping bag with a very small round tip.
  9. Pipe the outlines of the caterpillar body with the green icing, the head with the red icing and the sun with the yellow icing. Set aside some of the red and green line icing to add details to the iced biscuits.
  10. Add water to the icing left in the bowls until you reach a pouring consistency (this is called “flooding icing”).
  11. Spoon into a piping bag or piping bottle.
  12. Pipe the red flooding icing onto the biscuits to fill the head areas outlined on the biscuits.
  13. Pipe some of the green flooding icing into sections of the body.
  14. Add a little blue or more green paste colour to the remaining green icing to vary the colour and pipe into further sections of the caterpillar body. Repeat for further sections of the caterpillar body.
  15. Pipe the yellow flooding icing into the piped sun, adding a little orange or red paste colour to add depth.  
  16. Allow iced biscuits to set. 
  17. Add details like hairs, feet and antennae using the food colour pens. 
  18. Use remaining red and green line icing to pipe tint caterpillars around the edge of the white fondant.  
  19. Leave to dry for at least 24 hours.

Tuesday, 16 April 2013

Condensed milk cookies

Stem ginger cookies with lemon icing

Having spent all morning lazing in bed and reading, I decided that I should do something a bit more productive with my Sunday afternoon. Unusually, I didn’t feel like faffing around with fancy decorative icing, so I decided to make some simple biscuits for EHH to take into his work. I had a flick through my recipe files and cook books, but wasn’t feeling particularly inspired so I decided to go with one of my tried-and-tested recipes.


I call these “condensed milk cookies” – they came from Sainsbury’s magazine ages ago, which called them “soft, American-style cookies”. They are amazing – a bit like “Millie’s Cookies” – with a crisp outside and soft, chewy centre. The magazine gave 6 variations – I made three types this weekend: lemon and ginger, oats and honey, and cherry and almond, with slight variations on the magazine’s recipes. I always feel the need to make more than one batch of these – once you’ve opened the tin of condensed milk, it seems a waste not to! However, I have got about half a tin left, so I may need to make some more later in the week!


Cherry and almond cookies


Makes 12
Ingredients

    Cherry and almond cookies
  1. 125g soft unsalted butter
  2. 125g caster sugar
  3. 2 tblsp condensed milk
  4. 175g self-raising flour
    Pinch of salt
  5. 75g glace cherries, chopped finely
  6. 2 tblsp flaked almonds
  7. 1 tsp almond essence
  8. 75g icing sugar

Method

  1. Preheat oven to 150C.
  2. Using an electric/stand mixer, cream the butter and sugar until pale and fluffy.
  3. Beat in the condensed milk and the almond essence.
  4. Add the flour and a pinch of salt and mix.
  5. Stir in the cherries.
  6. Roll into 12 walnut sized balls and space at least 5cm apart on 2 baking trays.
  7. Flatten them slightly with the back of a spoon.
  8. Scatter each cookie with flaked almonds.
  9. Bake for about 25 minutes or until firm at the edges but still soft in the middle.
  10. Leave to cool for a few minutes before transferring to a cooling rack.
  11. Once cool, drizzle with icing made up from the icing sugar and 1 tblsp water (optional).


Alternatives:
Ginger and Lemon

  • For Step 3: Omit almond essence.
  • For Step 5: Omit cherries. Instead, add 2 tsp ground ginger, zest of one lemon and 75g of finely chopped crystallised or stem ginger.
  • Omit Step 8.
  • For Step 11, drizzle with icing made from 75g icing sugar with 1 tblsp lemon juice. 


Oats and honey

    3 oat and honey chewy cookies
  • For Step 3: Use 1 tblsp of honey and 1 tblsp condensed milk. Omit almond essence.
  • For Step 5: Omit cherries. Instead, add 75g oats.
  • For Step 8: Drizzle each cookie with honey and scatter with oats.
  • Omit Step 11.