Showing posts with label cookie cutters. Show all posts

Sunday, 22 September 2013

Honeybread biscuits with Sark wildflower honey

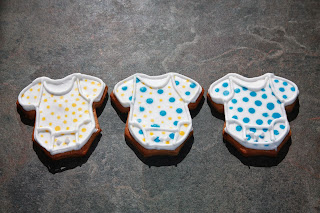
3 baby onesie cookies


One of my closest friends has recently had a beautiful baby boy and so I decided to bake up some goodies to help her through those sleep-deprived first weeks. I’ve had a set of new baby cookie cutters in the cupboard for ages and I’d seen this recipe in my most recent Good Food magazine (cut out into very cute bee shapes!) so I decided to give it a go. I had a jar of very special Sark wildflower honey from a recent weekend on the beautiful island of Sark in the Channel Islands and so decided to use it for this recipe.


Making these biscuits is actually very easy – just stick all the ingredients in a food processor and whizz! The original recipe suggested that you could roll and cut the dough straight away – I decided to stick with the Biscuiteers’ method of popping them in the fridge first. To be honest, I’m not sure if this is necessary!


The original recipe just suggested plain icing, but I added lemon juice and a touch of orange blossom water to add a bit of interest and echo the floral flavours of the honey.


However, icing these was not simple! I must remember when I next make biscuits that I should not attempt to ice with more than 2 or 3 colours! Mixing up lots of different colours of line and flooding icing takes ages! And icing biscuits generally takes quite a while! In the end, these weren’t quite as neat as I’d have liked because I had to hurry to get them finished!


Overall, these biscuits were nice and spicy and the honey flavour came through well in the background. I’m not sure that I would worry about putting in really good quality honey next time, as I think that the other flavours meant that the quality of the honey was not really noticeable. I really did like the extra flavour that the lemon and orange flower water gave to the icing.   


Honeybread biscuits with Sark wildflower honey

Makes approximately 20-25 biscuits


3 teddy bear cookiesIngredients

  1. 300g plain flour
  2. 100g diced butter
  3. 1 tblsp mixed spice
  4. 2 tsp ground ginger
  5. 100g light brown soft sugar
  6. 1 large egg
  7. 100g clear honey


To decorate

  1. 500g royal icing sugar
  2. 75ml lemon juice or water
  3. Couple of drops of orange blossom water (optional)


Method

  1. Place all the biscuit ingredients into a food processor and whizz to a smooth dough.
  2. Split the dough in half.
  3. Place half of the dough between two sheets of baking parchment and roll out to the thickness of a £1 coin. Place in the fridge for 20 minutes.
  4. Repeat with the second half of the dough.
  5. Pre-heat oven to 180C.
  6. Remove dough from fridge, stamp out shapes using chosen cutters and place on a baking tray.
  7. Bake for about 10-12 minutes until crisp and golden brown.
  8. Place on a wire rack to cool.


To ice

  1. Add the water to the royal icing sugar in a large bowl.
  2. Stir with a wooden spoon until combined (this stops your kitchen being coated in a fine dusting of icing!)
  3. Use an electric mixer to beat the mix (starting on low and increasing to high speed) for about 5 minutes. You are looking for the mix to be bright white and a toothpaste-like consistency (this is “line icing”).
  4. Divide the line icing between smaller bowls.
  5. Use a skewer to add small amounts of the paste colours to the bowls of icing, adding a little at a time until you reach the desired colour. 
  6. Spoon some of the icing into a piping bag with a very small round tip.
  7. Pipe the outlines of the shapes. Set aside the rest of the line icing to add details to the iced biscuits.
  8. Add water/more juice to the icing left in the bowls until you reach a pouring consistency (this is called “flooding icing”).
  9. Spoon into a piping bag or piping bottle.
  10. Pipe the flooding icing onto the biscuits to fill the areas outlined on the biscuits.
  11. Allow iced biscuits to set.
  12. Use remaining line icing and other decorative items to complete the decoration of the biscuits.
  13. Leave to dry for at least 24 hours.

Sunday, 7 July 2013

The Very Hungry Caterpillar biscuits


20 Hungry Caterpillar biscuits

One of my very good friends is expecting a baby and so I offered to organise a baby shower for her. We decided to hold it at a café called Tart in Bristol, which offers a fantastic range of home-made cakes and tarts (and a lovely glass of sparkling rose wine!). As such, I couldn’t make any cakes etc to take along, but decided that I could get away with taking some iced biscuits along as favours.


My friend hasn’t found out whether she is expecting a boy or a girl so the theming for the party had to be gender-neutral. I decided to go for a bright and cheerful theme based on The Very Hungry Caterpillar book – which I loved as a child! I bought some spotty bunting and tablecloth, some Hungry Caterpillar napkins and made some bunting from pictures in the book printed onto photo paper. Inspired by ideas on Flickr, I decided to make these biscuits and package them up in little bags for the party guests.These would also make great biscuits for a child's birthday party.


These biscuits follow the same Biscuiteers’ recipe and method as I used for my Easter spiced biscuits earlier in the year, simply leaving out the orange zest and spices, and adding extra lemon zest. This recipe makes great biscuits and so I always come back to it when I need to make cookie-cutter biscuits.


Be warned though - these look fab but did take a loooong time to decorate! 


Lemon cookie-cutter biscuits


Ingredients (makes approx. 24 biscuits)

  1. 350g plain flour
  2. 100g self-raising flour
  3. Zest of 2 lemons (save juice for the icing)
  4. 125g granulated sugar
  5. 125g salted butter, diced (at room temp)
  6. 125g golden syrup
  7. 1 large egg, lightly beaten


Method

  1. Sift the flour and baking powder into a mixing bowl.
  2. Add the sugar and stir well.
  3. Rub in the butter, using just the tips of your fingers, until the mixture resembles fine breadcrumbs.
  4. Make a well in the centre of your mix and add the golden syrup, egg and zest.
  5. Use a knife to stir the mixture until it begins to come together as a dough.
  6. Use your hands to bring the dough together.
  7. Divide the dough into two and shape into two flat disks.
  8. Place the first piece of dough between two sheets of baking parchments. (This means that you do not have to add extra flour when rolling.)
  9. Roll the dough out evenly until it is approximately 5-6mm thick all over (you can buy rolling guides, but I have this rolling pin, which is brilliant!). If the top or bottom sheets of parchment crinkle at any time, peel it off and smooth out.
  10. When rolled to the correct thickness, move the dough (still sandwiched between parchment) onto a baking tray and then into the fridge to chill for at least 20-30 minutes.
  11. Pre-heat oven to 170C.
  12. After chilling, use a square cutter to cut out the biscuits, cutting each one as close to the last as possible, in order to use the dough efficiently. Re-roll the dough as necessary, but try to work the dough as little as possible. 
  13. Place each biscuit onto a lined baking tray, allowing space between as the biscuits will spread a little.
  14. Bake the biscuits for 14 – 18 minutes. When cooked, the biscuits will be very lightly golden, firm around the edges but still slightly soft on top.
  15. Remove the baking trays from the oven and carefully remove each biscuit from the tray, placing them gently onto a wire cooling rack. The biscuits will still be very delicate at this stage. 
  16. Allow biscuits to cool totally before storing or icing.


To decorate

These biscuits were covered with rolled fondant and then decorated with royal icing, which dries to a very hard surface – making it easy to wrap these biscuits as presents or transport them. The easiest way to work with royal icing is to start with a ready-made royal icing mix. 


Ingredients

  1. 250g fondant icing
  2. 1 tblsp lemon juice for brushing
  3. 500g royal icing sugar
  4. 75ml lemon juice
  5. Paste food colours - red, green, yellow, blue
  6. Food colour pens


Method

  1. Roll out the fondant icing to approximately 2mm thick.
  2. Cut out using a square cutter (slightly smaller than the one used to cut out the biscuits).
  3. Brush each biscuit with a little lemon juice before topping with a square of icing.
  4. Add the 75ml juice to the royal icing sugar in a large bowl.
  5. Use an electric mixer to beat the mix (starting on low and increasing to high speed) for about 5 minutes. You are looking for the mix to be bright white and a toothpaste-like consistency (this is “line icing”).
  6. Divide the line icing between 3 smaller bowls.
  7. Use a skewer to add small amounts of the red, green and yellow paste colours to the bowls of icing, adding a little at a time until you reach the desired colour. 
  8. Spoon some of the icing into a piping bag with a very small round tip.
  9. Pipe the outlines of the caterpillar body with the green icing, the head with the red icing and the sun with the yellow icing. Set aside some of the red and green line icing to add details to the iced biscuits.
  10. Add water to the icing left in the bowls until you reach a pouring consistency (this is called “flooding icing”).
  11. Spoon into a piping bag or piping bottle.
  12. Pipe the red flooding icing onto the biscuits to fill the head areas outlined on the biscuits.
  13. Pipe some of the green flooding icing into sections of the body.
  14. Add a little blue or more green paste colour to the remaining green icing to vary the colour and pipe into further sections of the caterpillar body. Repeat for further sections of the caterpillar body.
  15. Pipe the yellow flooding icing into the piped sun, adding a little orange or red paste colour to add depth.  
  16. Allow iced biscuits to set. 
  17. Add details like hairs, feet and antennae using the food colour pens. 
  18. Use remaining red and green line icing to pipe tint caterpillars around the edge of the white fondant.  
  19. Leave to dry for at least 24 hours.

Sunday, 31 March 2013

Easter spiced biscuits


Easter spice biscuits - a mix of Easter bunnies, chicks and Easter baskets


Happy Easter! Browsing through the pictures on Flickr this week, I was inspired by the many beautifully decorated biscuits for Easter. I hadn’t made any iced biscuits since Christmas and so decided to have a go at making some for work. Delving through my vast and ever-growing collection of cookie cutters, I found a chick, a rabbit and also my handbag cutter, which I could adapt to make Easter hampers.


The Biscuiteers Book of Iced Biscuits” is my go-to book when making iced biscuits – they hold their shape and taste great! The book describes the icing process in detail and has lots of great ideas and pictures to inspire your decorating! Once you have mastered the basic recipe, it is easy to adapt to incorporate your own flavours. For my Easter spiced biscuits, I added lemon and orange zest, cinnamon and mixed spice to capture the Easter flavours of hot cross buns and traditional Easter biscuits.


These biscuits do taste great still warm out of the oven but also store really well – I find they are fine for at least a week, if stored in a biscuit tin.


Easter spiced biscuits

5 Easter basket biscuits
Ingredients

  1. 350g plain flour
  2. 100g self-raising flour
  3. 1 tsp cinnamon
  4. 1 tsp mixed spice
  5. Zest of an orange
  6. Zest of a lemon
  7. 125g granulated sugar
  8. 125g salted butter, diced (at room temp)
  9. 125g golden syrup
  10. 1 large egg, lightly beaten

Makes approx. 24 biscuits

Method

  1. Sift the flour, baking powder and all the spices into a mixing bowl. Add the sugar and stir well.
  2. Rub in the butter, using just the tips of your fingers, until the mixture resembles fine breadcrumbs.
  3. Make a well in the centre of your mix and add the golden syrup, egg and zests.
  4. Use a knife to stir the mixture until it begins to come together as a dough.
  5. Use your hands to bring the dough together.
  6. Divide the dough into two and shape into two flat disks.
  7. Place the first piece of dough between two sheets of baking parchments. (This means that you do not have to add extra flour when rolling.)
  8. Roll the dough out evenly until it is approximately 5-6mm thick all over (you can buy rolling guides, but I have this rolling pin, which is brilliant!). If the top or bottom sheets of parchment crinkle at any time, peel it off and smooth out.
  9. When rolled to the correct thickness, move the dough (still sandwiched between parchment) onto a baking tray and then into the fridge to chill for at least 20-30 minutes.
  10. After chilling, use your selected cutters to cut out the biscuits, cutting each one as close to the last as possible, in order to use the dough efficiently. Re-roll the dough as necessary, but try to work the dough as little as possible. 
  11. Place each biscuit onto a lined baking tray, allowing space between as the biscuits will spread a little.
  12. Bake the biscuits for 14 – 18 minutes. When cooked, the biscuits will be very lightly golden, firm around the edges but still slightly soft on top.
  13. Remove the baking trays from the oven and carefully remove each biscuit from the tray, placing them gently onto a wire cooling rack. The biscuits will still be very delicate at this stage. 
  14. Allow biscuits to cool totally before storing or icing. 

To decorate
Easter spice biscuits in the shape of chicks
These biscuits were decorated using royal icing, which dries to a very hard surface – making it easy to wrap these biscuits as presents or transport them. The easiest way to work with royal icing is to start with a ready-made royal icing mix.  

Ingredients
  1. 500g royal icing sugar
  2. 75ml water
  3. Paste food colours

Method
    Easter spice biscuits in the shape of Easter bunnies
  1. Add the water to the royal icing sugar in a large bowl.
  2. Use an electric mixer to beat the mix (starting on low and increasing to high speed) for about 5 minutes. You are looking for the mix to be bright white and a toothpaste-like consistency (this is “line icing”).
  3. Divide the line icing between smaller bowls.
  4. Use a skewer to add small amounts of the paste colours to the bowls of icing, adding a little at a time until you reach the desired colour.  
  5. Spoon some of the icing into a piping bag with a very small round tip.
  6. Pipe the outlines of the shapes. Set aside the rest of the line icing to add details to the iced biscuits.
  7. Add water to the icing left in the bowls until you reach a pouring consistency (this is called “flooding icing”).
  8. Spoon into a piping bag or piping bottle.
  9. Pipe the flooding icing onto the biscuits to fill the areas outlined on the biscuits.
  10. Allow iced biscuits to set.
  11. Use remaining line icing and other decorative items to complete the decoration of the biscuits (I used jelly beans and flowers stamped out from fondant icing).
  12. Leave to dry for at least 24 hours.

Monday, 31 December 2012

Christmas Spice Biscuits

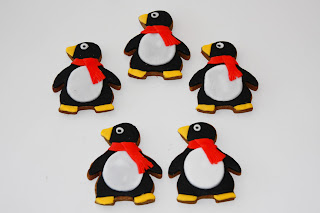
5 penguin biscuits with red scarves


Merry Christmas! Sorry it’s a little late – I’ve been having a lovely relaxing time back at home over Christmas. Time to catch up on writing up a few of the things that I made before Christmas.


At work, we have a Christmas Breakfast: everyone takes in a food contribution and we have a bit of a party, including handing out the Secret Santa gifts. I decided to buy the Really Good biscuit tin (as in my list of great gifts for bakers) as my Secret Santa gift and so felt that it really needed to be filled with biscuits! Biscuits are great as they can be prepared a few days in advance, so very useful at this time of year when evenings and weekends tend to be busy.


I wanted to make use of some of my Christmas cookie cutters, so decided on the Biscuiteers’ Treacle Spice biscuits – as the Biscuiteers’ biscuits are brilliant for using with cutters. I hadn’t baked these ones before but they sounded suitably festive! They are easy to make, although slightly hard to judge when they are cooked as they are a fairly dark colour.  They held their shape beautifully, even the delicate thin bits of the shapes. However, for me, they were a little too treacly and slightly bitter. Therefore, when I made a second batch to take home, I substituted half of the treacle for golden syrup and also added the zest of half an orange, which really improved them for me. Don’t worry if the dough seems very marbled when it comes together– this doesn’t matter and it is important not to over-work the dough as this will make the biscuits tough.


Here’s the adapted recipe (makes about 24 biscuits, I usually double the recipe):


Christmas Spice Biscuits


8 Christmas bauble cookies
Ingredients

  1. 200g plain flour
  2. ½ tsp baking powder
  3. ½ tsp ground ginger
  4. ½ tsp cinnamon
  5. ½ tsp mixed spice
  6. Zest of ½ an orange
  7. 50g dark brown sugar
  8. 100g salted butter, diced (at room temp)
  9. 25g black treacle
  10. 25g golden syrup

Method

  1. Sift the flour, baking powder and all the spices into a mixing bowl. Add the sugar and stir well.
  2. Rub in the butter, using just the tips of your fingers, until the mixture resembles fine breadcrumbs.
  3. Make a well in the centre of your mix and add the golden syrup, treacle and orange zest.
  4. Use a knife to stir the mixture until it begins to come together as a dough.
  5. Use your hands to bring the dough together.
  6. Divide the dough into two and shape into two flat disks.
  7. Place the first piece of dough between two sheets of baking parchments. (This means that you do not have to add extra flour when rolling.)
  8. Roll the dough out evenly until it is approximately 5-6mm thick all over (you can buy rolling guides, but I have this rolling pin, which is brilliant!). If the top or bottom sheets of parchment crinkle at any time, peel it off and smooth out.
  9. When rolled to the correct thickness, move the dough (still sandwiched between parchment) onto a baking tray and then into the fridge to chill for at least 20-30 minutes.
  10. After chilling, use your selected cutters to cut out the biscuits, cutting each one as close to the last as possible, in order to use the dough efficiently. Re-roll the dough as necessary, but try to work the dough as little as possible.  
  11. Place each biscuit onto a lined baking tray, allowing space between as the biscuits will spread a little.
  12. Bake the biscuits for 14 – 18 minutes. When cooked, the biscuits will be firm around the edges but still slightly soft on top.
  13. Remove the baking trays from the oven and carefully remove each biscuit from the tray, placing them gently onto a wire cooling rack. The biscuits will still be very delicate at this stage.  
  14. Allow biscuits to cool totally before storing or icing.


To decorate:

Snowflakes


I used the two smallest cutters from this set.

7 Christmas scnowflake iced biscuits

Ingredients

  1. 20ml orange juice or water
  2. 150g royal icing sugar
  3. Ice blue food colour
  4. Edible silver balls

Method

  1. Add the orange juice to the royal icing sugar.
  2. Use an electric mixer to beat the mix (starting on low and increasing to high speed) for about 5 minutes. You are looking for the mix to be a toothpaste-like consistency.
  3. Spoon the icing into a piping bag with a very small round tip.
  4. Ice the biscuits with a variety of swirling patterns, decorating with silver balls as required.

Baubles


I used the cutters from this set.


Christmas Bauble biscuits

Ingredients

  1. Ready-to-roll fondant icing
  2. Water
  3. Paste food colours
  4. Edible gold leaf
  5. Lustre dusts
  6. Clear alcohol (eg vodka/gin)

Method 

You can use either pre-coloured ready-to roll fondant or colour the fondant yourself – or I guess you could make your own fondant – but this seems like a lot of effort!

  1. Roll the coloured fondant out to approximately 2mm thick.
  2. If desired, roll the icing carefully over an embossing plate.
  3. Using the same cutters as used for the biscuits, cut out the fondant.
  4. Use a clean brush to brush each biscuit with water before carefully placing the fondant shapes onto the biscuits.
  5. Mix a sprinkling of lustre dust with a drop of the alcohol to create a paint.
  6. Use a fine paint brush to decorate the biscuits.
  7. Use another brush to gently lift fragments of the gold leaf and carefully place to form the top of the bauble.


Polar animals


I bought this set of polar animal cutters from TK Maxx just before Christmas – worth a look in there, they had lots of sets for bargain prices!

5 polar bear biscuits with blue scarves

Ingredients

  1. Ready-to-roll fondant icing
  2. Water
  3. Paste food colours

Method

You can use either pre-coloured ready-to roll fondant or colour the fondant yourself – or I guess you could make your own fondant – but this seems like a lot of effort!

  1. Roll the coloured fondant out to approximately 2mm thick.
  2. Using the same cutters as used for the biscuits, cut out the fondant.
  3. Use a clean brush to brush each biscuit with water before carefully placing the fondant shapes onto the biscuits.
  4. Use different colours of fondant to add details like the penguins’ feet and beaks, and scarves for the penguins and bears.    


 5 Blue whale biscuits