Showing posts with label Good Food magazine. Show all posts

Sunday, 24 November 2013

Lemon polenta cake (gluten-free)


Gluten free lemon polenta cake
Last weekend, EHH was off on a boys’ weekend and I had a couple of my friends over for a girly night. EHH was disappearing off during the day on Friday, so I whipped up a quick batch of chocolate and raspberry brownies on the Thursday night for him to take with him.

With EHH gone, I had Saturday to myself to potter in the kitchen and so I decided to have a go at a new recipe that I had spotted in BBC Good Food magazine – a gluten-free lemon polenta cake. I had a few brownies left for dessert for the girls but thought that this would be a good alternative. This week was also my week for Friday cakes at work, so I figured it would be a good opportunity to practise a gluten-free cake to take in with me later in the week.

I was a bit wary about tackling this recipe: it required a 25cm tin and I don’t have one, so I had to adapt it to fit in a 20cm tin. As the original recipe required 300g butter, 300g sugar, 300g ground almonds and 150g polenta, it seemed fairly easy to do two-thirds of the recipe and hope that it worked out ok for the tin! The recipe asked for 5 eggs, so I decided to go with 3 eggs and 1 yolk.  I decided to up the lemon zing and added the zest of 3 lemons rather than 2. As usual, I wrapped the cake tin in my magi-cake cake strips before baking and these really helped it to rise and bake evenly.

It’s actually a really easy cake to make and, fortunately, fitted perfectly in the 20cm deep tin. The cake is light and zingy, with rich almond sweetness and texture from the polenta. The texture isn’t that of a normal sponge, but it certainly doesn’t feel like a “gluten-free” poor relative cake. Once soaked in syrup and dusted in icing sugar, it looks elegant and delicious, and would be a great addition to a refined afternoon tea. Definitely a cake that I’ll be making again!   

Lemon polenta cake

Ingredients

  1. 200g butter, at room temperature
  2. 200g golden caster sugar
  3. 200g ground almonds
  4. Finely grated zest of 2-3 lemons
  5. 3 large eggs and 1 egg yolk
  6. Icing sugar (to dust)

For the lemon syrup

  1. Juice of 1 lemon
  2. 2 tbsp icing sugar

Method

  1. Pre-heat the oven to 180C.
  2. Grease and line a 20cm deep cake tin.
  3. Beat the butter and sugar in a stand mixer until light and fluffy (at least 5 minutes).
  4. Add the ground almonds, polenta and lemon zest.
  5. Beat until combined.
  6. Add the eggs, one at a time, beating well until smooth (it will still be a fairly thick mixture).
  7. Spoon the mixture into the tin and spread evenly.
  8. Bake for 45-50 minutes until golden and springy.
  9. Remove from the oven and place the tin on a wire rack to cool for 10 minutes.
  10. While it is cooling, place the lemon juice and icing sugar in a bowl and microwave for 45 seconds, until boiling and syrupy.
  11. Turn the cake out onto a wire rack and prick with a skewer.
  12. Spoon the syrup over the cake.
  13. Leave cake to cool.
  14. Dust with icing sugar before serving.  

Sunday, 22 September 2013

Honeybread biscuits with Sark wildflower honey

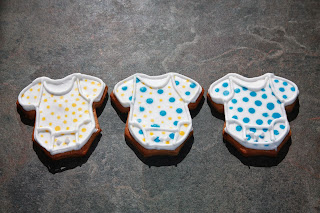
3 baby onesie cookies


One of my closest friends has recently had a beautiful baby boy and so I decided to bake up some goodies to help her through those sleep-deprived first weeks. I’ve had a set of new baby cookie cutters in the cupboard for ages and I’d seen this recipe in my most recent Good Food magazine (cut out into very cute bee shapes!) so I decided to give it a go. I had a jar of very special Sark wildflower honey from a recent weekend on the beautiful island of Sark in the Channel Islands and so decided to use it for this recipe.


Making these biscuits is actually very easy – just stick all the ingredients in a food processor and whizz! The original recipe suggested that you could roll and cut the dough straight away – I decided to stick with the Biscuiteers’ method of popping them in the fridge first. To be honest, I’m not sure if this is necessary!


The original recipe just suggested plain icing, but I added lemon juice and a touch of orange blossom water to add a bit of interest and echo the floral flavours of the honey.


However, icing these was not simple! I must remember when I next make biscuits that I should not attempt to ice with more than 2 or 3 colours! Mixing up lots of different colours of line and flooding icing takes ages! And icing biscuits generally takes quite a while! In the end, these weren’t quite as neat as I’d have liked because I had to hurry to get them finished!


Overall, these biscuits were nice and spicy and the honey flavour came through well in the background. I’m not sure that I would worry about putting in really good quality honey next time, as I think that the other flavours meant that the quality of the honey was not really noticeable. I really did like the extra flavour that the lemon and orange flower water gave to the icing.   


Honeybread biscuits with Sark wildflower honey

Makes approximately 20-25 biscuits


3 teddy bear cookiesIngredients

  1. 300g plain flour
  2. 100g diced butter
  3. 1 tblsp mixed spice
  4. 2 tsp ground ginger
  5. 100g light brown soft sugar
  6. 1 large egg
  7. 100g clear honey


To decorate

  1. 500g royal icing sugar
  2. 75ml lemon juice or water
  3. Couple of drops of orange blossom water (optional)


Method

  1. Place all the biscuit ingredients into a food processor and whizz to a smooth dough.
  2. Split the dough in half.
  3. Place half of the dough between two sheets of baking parchment and roll out to the thickness of a £1 coin. Place in the fridge for 20 minutes.
  4. Repeat with the second half of the dough.
  5. Pre-heat oven to 180C.
  6. Remove dough from fridge, stamp out shapes using chosen cutters and place on a baking tray.
  7. Bake for about 10-12 minutes until crisp and golden brown.
  8. Place on a wire rack to cool.


To ice

  1. Add the water to the royal icing sugar in a large bowl.
  2. Stir with a wooden spoon until combined (this stops your kitchen being coated in a fine dusting of icing!)
  3. Use an electric mixer to beat the mix (starting on low and increasing to high speed) for about 5 minutes. You are looking for the mix to be bright white and a toothpaste-like consistency (this is “line icing”).
  4. Divide the line icing between smaller bowls.
  5. Use a skewer to add small amounts of the paste colours to the bowls of icing, adding a little at a time until you reach the desired colour. 
  6. Spoon some of the icing into a piping bag with a very small round tip.
  7. Pipe the outlines of the shapes. Set aside the rest of the line icing to add details to the iced biscuits.
  8. Add water/more juice to the icing left in the bowls until you reach a pouring consistency (this is called “flooding icing”).
  9. Spoon into a piping bag or piping bottle.
  10. Pipe the flooding icing onto the biscuits to fill the areas outlined on the biscuits.
  11. Allow iced biscuits to set.
  12. Use remaining line icing and other decorative items to complete the decoration of the biscuits.
  13. Leave to dry for at least 24 hours.

Friday, 12 April 2013

Raspberry and blueberry lime drizzle cake


A slice of blueberry and raspberry lime drizzle cake


During Easter week, EHH’s parents came over to help us tackle the garden. I needed something fairly simple that I could whip up in the morning before they arrived, as I was playing netball the night before. I had a flick through my recipe file and found this recipe for raspberry and blueberry lime drizzle cake from BBC Good Food. I first made this last summer and it was delicious, but slightly too sticky. Therefore, this time, I decided to reduce the amount of syrup. Having read the comments on the website, I also decided to coat the fruit in flour to prevent them from sinking. One more simple touch that I added was a sprinkling of golden castor sugar on top at the end – this adds a lovely sweet crunch, which contrasts well with the soft sticky cake.


It is a really simple cake to make. I used my Magi-cake strips to prevent the outside of the cake from over-cooking; they also help to ensure that the cake rises evenly: I would highly recommend them!  The only tricky part is the length of time to cook - this varies enormously depending on your oven. Keep an eye on the cake after about 25-30 minutes as the top may begin to get too brown - cover with foil if it does look like it needs it. Test with a skewer to check whether it is cooked. 


The end result is delicious and lasts well for about 3-4 days. It is great on its own with a cup of tea and also works well as dessert – with cream or custard. Definitely one of my favourite cakes!


Raspberry and blueberry lime drizzle cake


Blueberry and raspberry lime drizzle cake cooling on the rack
Ingredients

  1. 225g softened butter, plus extra for greasing
  2. 225g golden caster sugar
  3. 4 medium eggs
  4. 2 limes, grated zest and juice
  5. 250g self-raising flour, sifted with a pinch of salt, plus extra flour
  6. 25g ground almonds
  7. 100g each blueberries and raspberries
For the syrup:
  1. Juice of 2 limes
  2. Grated zest of 1 lime
  3. 80g golden caster sugar, plus a little extra for scattering

Method

  1. Set oven to 180C.
  2. Line the base and sides of a 20cm/8in square cake tin (not loose-based) with baking parchment.
  3. Cream the butter and sugar together until light and fluffy (about 5 minutes in an electric mixer).
  4. Gradually beat in the eggs, adding a little flour towards the end to prevent curdling. Beat in the lime zest, then fold in the flour and almonds.
  5. Fold in enough lime juice - about 3 tablespoons - to give you a good dropping consistency (the mixture should drop easily from the spoon when tapped).
  6. Place the blueberries and raspberries in a bowl and scatter with the extra flour. Gently shake the bowl to ensure that all the fruit are evenly coated in flour. 
  7. Blueberry and raspberry lime drizzle cake ready to go in the oven
    Ready to go in the oven!
  8. Fold in three quarters of the blueberries and raspberries and turn into the prepared tin.
  9. Smooth the surface, then scatter the remaining fruit on top - it will sink as the cake rises.
  10. Bake for between 35 and 60 minutes (cover with foil if beginning to brown too much), or until firm to a gentle prod in the centre. A skewer pushed into the centre should be clean when removed.
  11. While the cake is baking, make the syrup: put the lime juice, zest and sugar in a small saucepan. Put over a gentle heat and stir, without allowing to bubble. The sugar should dissolve a little.
  12. As soon as the cake comes out of the oven, prick all over with a skewer then spoon the syrup over it.
  13. Once cool, carefully remove the cake from the tin and discard the lining paper.
  14. Scatter with golden castor sugar and cut into 12 pieces to serve.  
 

Sunday, 31 March 2013

Hot Cross Buns

A pile of hot cross buns


I love hot cross buns! I eat shop-bought ones all year round but, at Easter, there is something very special about home-made ones. My mum makes home-made hot cross buns every Easter and it is something that I have really missed for the last couple of years, so this year, I decided it was time to learn to make my own.

I started practising a couple of weeks ago when I attempted a “quick and easy” recipe that I found – which involved no kneading. Unfortunately, it turns out that “quick and easy” doesn’t really work! Or not when I tried anyway! Although the resulting buns had a nice flavour, they didn’t really rise at were very stodgy! Next attempt was in the bread-maker, which is really EHH’s realm! He followed the recipe in the book which came with the bread-maker. These buns were ok, but were fairly bland and missing the nice spicy hit that I like in hot cross buns. They also didn’t have quite the right home-made feel to them.


So Good Friday arrived and I decided that there really isn’t a shortcut to proper tasty home-made hot cross buns. I went with the recipe in last month’s Good Food magazine – the recipe was actually for a bun ring but worked fine just as normal buns. I added extra spice and lemon zest as I like my hot cross buns with lots of flavour! I actually enjoyed working the dough and the satisfaction of these rising beautifully and tasting fab definitely made all the work worthwhile.  My buns were not beautifully round – I think I need to work on my shaping, but they were light and fluffy and tasted great! If I were to make them  again, I think I would try brushing them with a spicy sugar syrup straight after baking – this was suggested in the quick and  easy version that I tried, and would be great on these buns!


Hot Cross Buns


Ingredients

  1. 300ml whole milk
  2. Zest of one orange
  3. Zest of one lemon
  4. 50g butter
  5. 500g strong white bread flour, plus 140g for the crosses, plus extra for dusting
  6. 1.5 tsp cinnamon
  7. 1.5 tsp mixed spice
  8. 1 tsp salt
  9. 85g golden caster sugar
  10. 7g sachet fast-action yeast
  11. 1 large egg, beaten, plus 1 egg to blaze
  12. Oil / cake-release spray, for greasing
  13. 100g mixed fruit


Method

  1. Warm the milk and zests in a small saucepan until steaming.
  2. Remove from the heat and add the butter, gently stirring until the butter has melted and the milk has cooled to hand temperature.
  3. Mix the flour, spices, sugar, yeast and salt in a large bowl (make sure that you don’t put the salt directly on top of the yeast).
  4. Pour in the milk mixture and the beaten egg, and mix together with a wooden spoon until the mixture clumps together.
  5. Tip onto a floured work surface and knead until smooth and elastic – the dough should bounce back when pressed with your finger.
  6. Transfer to a clean oiled bowl (I use a quick spray of cake release spray to coat the bowl) and cover with cling film or a tea towel. Leave somewhere warm for about 2 hours or until doubled in size (If your house is cool, place in an oven at about 30C).
  7. Line two baking trays with baking parchment and dust with flour.
  8. Tip the dough out of the bowl onto a work surface dusted with flour and knead to knock out any air bubbles.
  9. Add the dried fruit and knead to incorporate.
  10. Divide the dough into 12 pieces, roll each piece into a ball and place 6 on each baking tray, spacing evenly.
  11. Cover loosely with oiled clingfilm (again, cake release spray makes this easy!) and leave somewhere warm for about an hour, or until doubled in size.
  12. Heat the oven to 180C.
  13. Brush the buns with a little beaten egg.
  14. Mix the remaining flour with enough water to make a thick paste and then transfer to a piping bag.
  15. Use the paste to pipe a cross on each bun.
  16. Place the trays in the oven and bake for about 25 minutes, until golden and cooked through.