Sunday, 28 October 2012

Apple Amazing Cake


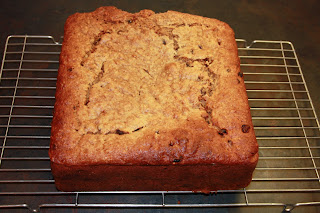
So next on the list for the baking marathon for EHH’s birthday was my Apple Amazing Cake. This is actually an Apple and Raisin Cake but has been re-named Apple Amazing Cake as lots of people have misheard and assumed that this was the name – it also tastes pretty amazing! It is a huge hunk of a cake and so serves lots of people! 

The recipe originally came from a colleague when I was temping many years ago – it’s actually a good thing to be typing it out as I was given it handwritten and it is now looking rather worse for wear, with many splatters and grease marks obscuring bits of the writing. Typing it out means that I’ll have a spare copy – I’d hate to lose this recipe!

The only problem with this recipe is that it does take forever to cook – and is a bit unpredictable in how long it will take! The recipe I was given says between 1.5 hours and 3 hours! You’re also not meant to open the oven too often to check otherwise it will sink!

The recipe is also in ounces rather than grams as this was how it was given to me!

Apple Amazing Cake

Image of huge Apple and Raisin cake
Ingredients
  1. 4 large cooking apples (peeled, cored and chopped)
  2. 1-2 tblsp soft brown sugar
  3. 24oz plain flour
  4. 3 level tsp bicarbonate of soda
  5. 12oz margarine
  6. 12oz castor sugar (I use golden)
  7. 1 tblsp cinnamon
  8. 12oz seedless raisins
  9. 4 large eggs (beaten)

Method
  1. Grease and line a 9” (22.5cm) square baking tin with baking parchment.
  2. Preheat the oven to 190C.
  3. Put chopped apples into a large saucepan with 2 tablespoons of water and 1 tablespoon soft brown sugar. 
  4. Cook over a low heat until soft and pureed (a few lumps left is fine), stirring regularly.
  5. Once pureed, remove from heat and taste – add extra soft brown sugar if needed, but be careful not to over-sweeten. Leave to cool.
  6. Put flour, bicarb and cinnamon in a large mixing bowl and rub in margarine until it resembles fine breadcrumbs.
  7. Stir in sugar, raisins and eggs.
  8. Stir in apple puree and mix everything together well.
  9. Pour into the prepared baking tin and cook at 190C for 30 minutes.
  10. After 30 minutes of cooking turn the oven down to 140C and then cook for another 1 – 2.5 hours.
  11. Check occasionally to ensure the top isn’t too brown. Cover with tin foil if needed.
  12. To check if cooked, insert a clean knife. If it comes out clean, it is ready.
Tuesday, 23 October 2012

GBBO Flapjacks


So, second bake of the Great Baking Weekend for EHH’s birthday. Decided to make these flapjacks as they’re quick and easy, and I could make them on the Saturday. The recipe is taken from the GBBO Showstopper Book, under “Ruby Jacks” – but without the ginger. I’ve done them with the ginger and they taste fab – but decided to leave them plain this time as EHH isn’t hugely keen on ginger (although I love it!).

These flapjacks are great – right level of sweetness, crunchy and yet chewy – fab!

I’ve topped some of them with the white chocolate, cranberry and sour cherry topping suggested by the GBBO book (adding also dried blueberries as I had them in the cupboard). The others I finished with a drizzle of lemon icing leftover from the Sticky Ginger Cake made earlier.

Flapjack

Ingredients

  1. 115g butter
  2. 70g light brown muscovado sugar
  3. 5 tblsp / 125g golden syrup
  4. 180g porridge oats
Method

  1. Preheat the oven to 150C/300F/Gas 2.
  2. Line a 20.5cm square tin with baking parchment
  3. Put the butter, golden syrup and sugar in a pan.
  4. Stir over a low heat until melted.
  5. Place oats in a large bowl and pour over syrup mixture, mixing thoroughly to combine.
  6. Tip the mixture into the prepared tin and spread evenly, pressing down with the back of a spoon to level the surface (it will be a fairly thin layer).  
  7. Bake for 20-30 minutes, until golden brown.
  8. Set the tin on a wire rack.
  9. Carefully score the mixture into 16 squares, using an oiled knife, then leave until cool.

White chocolate topping:

Image of flaphack covered in white chocolate with dried blueberries, cranberries and sour cherries

Ingredients

  1. 100g good quality white chocolate
  2. 150g mix of dried cranberries, sour cherries and blueberries

Method

  1. Chop white chocolate into small pieces and place in a glass bowl.
  2. Simmer a small amount of water gently in a saucepan and place the glass bowl over this (ensuring it does not touch the boiling water).
  3. Stir the chocolate gently until melted.
  4. Spread the chocolate on top of the cooled flapjack squares.
  5. Decorate with the dried fruit and allow to set.

Lemon drizzle icing
Flapjack with lemon drizzle icing squiggles

Ingredients

  1. 100g icing sugar, sifted
  2. Finely grated zest of 1 lemon
  3. Lemon juice

Method

  1. Mix together icing sugar and lemon zest, then gradually add lemon juice until you have a smooth, slightly runny icing, adding more juice, if needed.
  2. Spoon into a disposable piping bag and drizzle in zig-zags across the cooled flapjacks.

Sunday, 21 October 2012

Sticky Ginger Cake with lemon drizzle icing


It’s been a busy baking weekend! It was the Ever Hungry Husband’s (EHH) birthday last week while we were on holiday, and so, as tradition goes, he has to take cakes into work. The trouble is, there are over 60 people to feed at his work! The easy (and cheaper) thing to do would have been to get him to buy 6 bags of 10 doughnuts from the supermarket. But I like a challenge!

So, after a lot of deliberation and searching of the recipe books and files, we decided on Sticky Ginger Cake, flapjacks, Apple Amazing Cake, Raspberry Bakewell Slices and a Caramel Layer Cake.

The great thing about my Sticky Ginger Cake recipe is that it keeps for up to 2 weeks – the flavour keeps developing and it keeps beautifully moist and sticky. I’ve had the recipe for ages – no idea where it came from originally! However, if you follow the instructions carefully, it comes out beautifully every time and tastes fantastic!

Sticky Ginger Cake with lemon drizzle icing

Sticky ginger cake with lemon drizzle icing
Ingredients
1.    225g self-raising flour
2.    1 level tsp bicarbonate of soda
3.    2 tbsp ground ginger
4.    2 tsp ground cinnamon
5.    2 tsp ground mixed spice
6.    115g butter, cut into cubes, plus extra for greasing
7.    115g dark muscovado sugar
8.    115g black treacle
9.    115g golden syrup
10. 250ml whole milk
11. 85g drained stem ginger, finely chopped
12. 1 egg 

For the icing
1.    100g icing sugar, sifted
2.    Finely grated zest of 1 lemon
3.    Lemon juice

Method
  1. Preheat the oven to fan 160C/conventional 180C/gas 4. Butter and line an 18cm round, 7cm deep cake tin with parchment paper.
  2. Put the flour, bicarbonate of soda and all the spices into a large mixing bowl.
  3. Add the butter and rub it into the flour with your fingertips until the mixture resembles fine breadcrumbs.
  4. Put the sugar, treacle, syrup and milk in a medium saucepan and heat, gently stirring until the sugar has dissolved.
  5. Turn up the heat and bring the mixture to just below boiling point. (It will split and go lumpy at this point – don’t panic! This is normal!)
  6. Add the stem ginger to the flour mixture, then pour in the treacle mixture, stirring as you go with a wooden spoon.
  7. Break in the egg and beat until all the mixture is combined and it resembles a thick pancake batter.
  8. Pour this into prepared tin and bake for 50 minutes-1 hour, until the cake springs back when touched.
  9. Leave to cool completely in tin before turning cake out. (To freeze: wrap in greaseproof paper, then in cling film. Freeze for up to 1 month.)
  10. To make the icing, mix together icing sugar and lemon zest, then gradually add lemon juice until you have a smooth, slightly runny icing, adding more juice, if needed.
  11. Put icing into a disposable piping bag and drizzle icing in a zig-zag pattern over surface of cake, turn cake around and drizzle again to create the cross-hatched finish.
  12. Cake keeps for up to 2 weeks stored in an airtight container. 

Close up of sticky ginger cake with lemon drizzle icing

Thursday, 18 October 2012

White Row Cafe at White Row Farm


Heading home from Heathrow after a fab week in Morocco (including eating lots of cake – reviews to follow!), we decided to pop into White Row Cafe for a bite of lunch.

Having driven past many, many times, we discovered this cafe a few months ago and popped in for a slice of cake and cup of tea, which were fantastic. The cafe is in a really convenient location on the A36 and is part of a small farm complex with a large farm shop (including fresh fish counter and butcher), florist and gift shop, and fish and chip shop. The farm shop won Best Farm Shop in Bath in September this year. It’s got a great outdoor space, including picnic tables, play stuff for kids and farm animals to take a look at.

Visiting on a Wednesday lunchtime, we were surprised how busy the place was – it’s a fairly large cafe and we were lucky to get the last free table. It was filled with a wide variety of people – families, couples, friends of all ages. Despite this, the service was quick and friendly.

The lunch menu had fairly standard cafe options – soups, sandwiches, baguettes, paninis, jacket potatoes, omelettes and a daily specials board. They take pride in using their own produce or that from local named suppliers wherever possible. Feeling cold and hungry after a fairly long car journey, I opted for a jacket potato with prawns (about £6), which came served with a side salad and coleslaw. The jacket potato was huge, with a nice crispy skin, and there was a decent serving of prawns in Marie Rose sauce – which I couldn’t actually finish (so handed on over to the EHH). EHH had a Coronation Chicken baguette (again about £6), which he declared tasty and the bread good. We shared a pot of tea for two, which came in a nice large china tea pot, with a generous jug of milk, providing about two and a half cups of tea each.        

Having stuffed ourselves with our main courses, we didn’t have room for cake, even though there was a very tempting display of delicious looking home-made cakes. An impressive array of 13 cakes included marmalade cake, lemon drizzle, fruitcake, chocolate hedgehog cake (which looked suspiciously like tiffin to me!), and carrot cake. They also stock a range of packaged gluten-free treats, which was good to see. On our last visit, I tried their lemon drizzle cake and it was incredibly good – moist and really lemony!

Overall, I’d highly recommend this cafe – food, service and atmosphere all great. It’s clearly popular and deserves to be so. We’ll definitely be back – with more time so that I can have a potter around the farm shop and gift shop. Would be tempted to visit for breakfast, which is very reasonably priced and I imagine would be fantastic, or for fish and chips!  

Monday, 8 October 2012

GBBO Cornish Fairings


We’re off to the in-laws today as they’re giving us a lift to Heathrow tomorrow morning for our flight to Morocco! As a thank you, I thought I’d make them some biscuits – but nothing that would take too long as I had to pack too! I had a search through my recipe books and through the cupboards to see what we had in, and decided on Cornish Fairings from the GBBO Great British Book of Baking.

Cornish Fairings
Cup of tea and 3 Cornish fairings


Ingredients

  1. 100g plain flour
  2. 1 tsp baking powder
  3. ½ tsp bicarbonate of soda
  4. 1 tsp ground mixed spice (they suggest ½ tsp – I definitely prefer more oomph!)
  5. 40g castor sugar
  6. 50g butter, chilled and diced
  7. 1.5 tblsp mixed peel, finely chopped
  8. 3 tblsp golden syrup (level not rounded), gently warmed

Method

  1. Preheat the oven to 190C/375F/GM5.
  2. Cover 2 baking trays with baking parchment.
  3. Sift the flour, baking powder, bicarb, mixed spice and sugar in a mixing bowl.
  4. Add the butter and rub into the flour mixture, using the tips of your fingers, until it resembles fine breadcrumbs.
  5. Mix in the peel, followed by the syrup, to make a dough.
  6. Using your hands, roll the mixture into 18 marble-sized balls.
  7. Set them on the baking trays, spacing them well apart to allow for spreading.
  8. Bake in the pre-heated oven for 7-8 minutes, turning the trays half-way through baking to help the biscuits to bake evenly.
  9. Leave to cool on the trays for a minute until firm, then lift on to a wire rack and leave to cool completely.
  10. Store in an airtight tin.

 Verdict
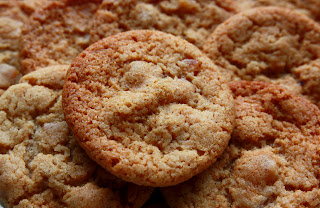
I actually ended up making two batches of these. The first batch was very sticky when it came together as a dough: the instructions in the GBBO book suggested that it should be a firm dough. I assumed that I had added too much golden syrup so added a bit more flour and sugar to firm up the dough. However, the biscuits didn’t spread as much as expected and were more cookie-like than I imagined they should be, although they tasted good.

Batch 2, I just accepted that it would be a sticky dough and went ahead with the bake. These spread a bit more and had more of a crunch once cool – although they still don’t look quite like those in the book’s photo. 

Close up of Cornish Fairings

Sunday, 7 October 2012

Disney Cupcakes


The occasion: a Disney-loving colleague’s 50th Birthday. Cheerfully, I volunteered to make a cake and started eagerly researching Disney cakes on Flickr. A little more research online and I discovered a local shop (www.thesugarstore.co.uk) that hired out tins, including a Wilton castle-shaped tin:
Enchanted Castle Pan
Wilton Enchanted Castle cake tin

This sparked my imagination and I was quickly envisaging a beautiful Disney castle with fireworks exploding overhead and Mickey and Minnie sat in front:


The Wilton website (www.wilton.com/idea/Enchanted-Castle-Cake) suggested a two-layer cake would be suitable for this tin and, after a search through the recipe books for something more exciting than a basic sponge, I decided on an orange sponge with orange blossom icing – a variation on the Primrose Bakery Lemon Layer Cake with lemon buttercream that I made not long ago (highly recommended – it’s delicious!).

Unfortunately, it wasn’t to be: the cake just refused to come out of the tin cleanly.

Disaster!
Not sure quite where it went wrong, could have been any of the following:
  • Tin not greased enough / correctly – I followed the Wilton website’s instructions to use a vegetable oil spray and dust with flour but maybe this wasn’t enough?
  • Oven temperature too high – the cake is clearly cooked on the outside but perhaps not quite done on the inside.
  • Uneven cooking in oven?
  • Cake too moist for this type of tin?
  • Tin a bit old and very well-used – may have lost non-stick ability?

As you can see – parts of the cake did turn out well but the rest was a bit of a disaster.

Disappointed, there was no choice but to start again. By this time, it was rather late on a Sunday evening and I didn’t want to take a risk and try again – so back to what I know best – cupcakes!

Having already made up the batch of orange blossom buttercream, I decided to make up a double batch of Primrose Bakery Orange Cupcakes, with a Minnie Mouse theme:

Disney cupcakes


Orange cupcakes with orange blossom buttercream 

Ingredients (single batch of 12 cupcakes)
  1. 110g butter, at room temperature
  2. 225g golden castor sugar
  3. 2 large eggs
  4. 150g self-raising flour, sifted
  5. 125g plain flour, sifted
  6. 90ml semi-skimmed milk
  7. 2 tblsp orange juice
  8. Grated zest of 2 oranges
Buttercream:
  1. 115g butter, at room temperature
  2. 500g icing sugar, sifted
  3. 4 tblsp freshly squeezed orange juice
  4. 2 tsp orange blossom water
  5. Red food colouring (preferably a paste rather than a liquid)
Method:
  1. Preheat oven to 160C/350F/GM4.
  2. Line a 12 hole muffin tin with cupcake cases.
  3. In a large mixing bowl, cream the butter and sugar until light and fluffy this will take at least 5 minutes with an electric hand mixer – don’t rush this stage).
  4. Add the eggs, one at a time, mixing for a few minutes after each addition. It should result in a lovely light mousse-like mixture.
  5. Combine the two flours in a separate bowl.
  6. Combine the milk and orange juice in a jug.
  7. Add one third of the flours to the creamed mixture and stir gently to combine.
  8. Pour in one third of the milk mixture and stir gently.
  9. Continue to add flours and then milk mixture alternately, stirring gently after each addition, until all have been added.
  10. Gently stir in orange zest.
  11. Spoon mixture into the cupcake cases, filling to about 2/3 full.
  12. Bake in the oven for about 30 minutes until lightly golden brown. The cakes will spring back lightly when touched, if cooked.
  13. Remove from the oven and leave to cool in tin for about 10 minutes, before carefully placing on a wire rack to finish cooling.

While the cakes are in the oven, make up the buttercream:
  1. In a large mixing bowl, beat the butter, juice and half of the icing sugar until smooth.
  2. Add the rest of the icing sugar and beat until smooth and creamy.
  3. Add 1 tsp of orange blossom water and mix well.
  4. Taste the icing to check flavour – add more orange blossom water as desired.
  5. Divide buttercream into two bowls. Colour one lot with red food colouring.
Once cakes are fully cool, place buttercream into an icing bag with a star shaped nozzle (I use the Wilton 1M nozzle). Swirl onto cupcakes. Use a different icing bag and clean nozzle for second coloured batch of icing. (Blog on buttercream swirls to follow - I promise!)

Minnie Mouse Decorations:

Ingredients:
  1. Ready coloured black, red and white ready-to-roll icing
  2. Red and white writing icing 
Method:
  1. Roll out black icing to approx 2-3mm thick. Stamp out 2cm circles (I used the back of a piping nozzle). Lay out to dry.
  2. Roll out red icing to approx 2-3mm thick. Stamp out small hearts using plunger cutter.
  3. Use red writing icing to join together two hearts at the tip to create Minnie bows. Once firm, use white writing icing to add dots.
  4. Roll out white icing to approx 1-2mm thick. Stamp out small stars using plunger cutter. 
  5. Allow all decorations to dry and firm. Allow buttercream on cakes to dry and firm before pushing decorations into icing swirls. 
Disney cupcakes

 So, not the beautiful Disney castle and fireworks that I had envisioned, but most importantly - the Birthday Girl was delighted and the cakes tasted good!

The disastrous orange cake? When I eventually turned it out of the tin, it tasted pretty good so I decided to break it up and freeze it. The plan is to use it to have a go at making cake pops. I've never attempted these but have a book (given to me by a friend) and it seems a good way to use up this leftover cake - blog to follow ...