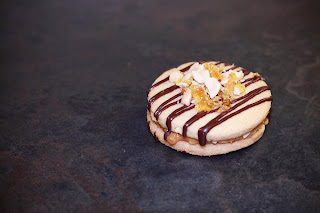
Sunday, 27 October 2013

Caramel Apple Crumble Cake


Caramel apple crumble cake filled with pureed apple and cinnamon buttercream

Bake Number Three for EHH’s birthday! Having been given a carrier bag full of Bramley apples, I’ve been searching out cake recipes using cooking apples. I found this recipe on the Waitrose website and, seeing that EHH loves anything caramelly and we still had loads of apples, it seemed like the perfect thing to bake for his birthday.

I made a few adaptations to the recipe. Firstly, my deep 20cm cake tin was already in use for my carrot cake, so I decided to split the recipe between two sandwich tins and then sandwich the cakes together with a filling. As you can see from the photo, I went rather OTT with the fillings and used pureed apple (that I already had in the fridge), cinnamon buttercream and the remaining Carnation caramel – layering the buttercream, then the apple and then the caramel. This was way too much and it oozed out everywhere! I would recommend that you use one of the fillings, or alternatively, make less of each and put the apple in the middle with a ring of buttercream around the edge!

I also added the crumble topping. The original recipe was simply topped with a tablespoon of Demerara sugar, but I just love crumble cakes and so decided to add this to my version.

As I sent the complete cake into EHH’s work, I didn’t get a taste! However, the comments that came back were very enthusiastic, so I hope that it was nice! Will definitely be giving this one another go soon – possibly with a caramelised nut topping that I have seen in another recipe…

Caramel Apple Crumble Cake

Caramel apple crumble cakes cooling on the rack
Ingredients:

  1. 125g unsalted butter, softened, plus extra for buttering
  2. 397g can Carnation Caramel
  3. 2 medium eggs
  4. 225g self-raising flour, sifted
  5. 2 tsp baking powder
  6. 2 tsp ground cinnamon
  7. 300g Bramley apples, peeled, cored and diced
  8. 2 tbsp semi-skimmed milk

For the crumble topping

  1. 75g plain flour
  2. 50g butter
  3. 40g chopped nuts (optional)
  4. 25g demerara sugar
  5. 25g butterscotch pieces

To fill

  1. Cinnamon buttercream:
  2. 55g butter, at room temperature
  3. 30ml semi-skimmed milk, at room temperature
  4. ½ tsp vanilla extract
  5. 2 tsp cinnamon
  6. 250g icing sugar, sifted

Or

  1. 100g Bramley apples (peeled and chopped)
  2. 20g soft brown sugar

Method

  1. Preheat the oven to 160C.
  2. Lightly grease and base-line two 20cm sandwich tins.
  3. Firstly prepare the crumble topping: Sift the flour into a bowl and rub in the butter. Stir through the sugar and nuts and set aside.
  4. Place the butter with 225g of the caramel in a large bowl and beat with an electric mixer until well combined.
  5. Beat in the eggs one at a time.
  6. Sift over the flour, baking powder and cinnamon and fold together.
  7. Gently stir in the apple and the milk.
  8. Spoon the cake mix into your cake tins and smooth the top.
  9. Sprinkle the crumble mixture over the top of one of the cakes.
  10. Bake for 40 minutes - 1 hour, or until risen and springy. You will probably find that the crumble-topped cake will need slightly longer in the oven.
  11. Allow to cool slightly and then remove the cake from the tins and cool on a wire rack.

While the cakes are cooling, make up the filling. Either make cinnamon buttercream:

  1. In a large mixing bowl, beat the butter, milk, cinnamon, vanilla extract and half of the icing sugar until smooth.
  2. Add the rest of the icing sugar and beat until smooth and creamy.

Or:

  1. Place the apples in a saucepan with a tablespoon of water.
  2. Cook gently over a gentle heat until the apples are mushy.
  3. Remove from the heat and taste.
  4. Add the soft brown sugar to sweeten as desired.

   12. Spread the cake without the crumble with your chosen filling.
   13. Drizzle over the remaining caramel.
   14. Sandwich with the crumble-topped cake. 
   15. Sprinkle the top of the cake with the butterscotch pieces. 
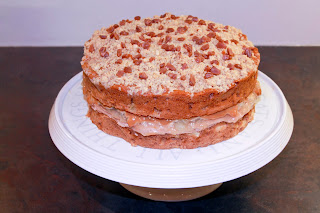
Saturday, 26 October 2013

Carrot cake with cream cheese frosting and caramelised walnuts


Carrot cake with ceam cheese frostinng and caramelised walnuts


Bake number two for EHH’s birthday – carrot cake. Looking back through the blog, I haven’t made a carrot cake in absolutely ages, so this seemed like a great reason to make one. Digging out my recipe – beautifully handwritten by a work colleague while I was temping about 10 years ago – it was definitely time to make and therefore write up this recipe as the paper was rather worn and the handwriting fading!

I’m a big fan of carrot cake – I love the moist multi-textured cake and rich complex flavours, topped with a not-too-sweet cream cheese frosting. This is not a standard or traditional carrot cake due to the addition of banana, but I think that it is delicious! Unusually for carrot cake, there is no spice in this recipe - you could choose to add some but (although I love spice) I don't think that this cake needs it. The frosting is delicious and the addition of the caramelised walnuts makes it extra special.

This is a beautifully easy cake to make – no beating, no melting, no big pile of washing up! Just throw everything in one bowl, mix it up and then stick it in the oven! If you are a regular reader of my blog, you’ll know that I’m a big fan of magi-cake strips (keep an eye out as the price for these seems to vary quite a lot – I’ve seen them for as little as £15, but they are definitely worth the money regardless!) – they work brilliantly for cakes like this that take a while to cook and may otherwise bake rather unevenly.  

The frosting is also very simple to make – there isn’t loads of it, so you do need to spread it fairly thinly over the top and around the sides: a tilted turntable and a good palette knife makes this much easier. Sprinkling the nuts around the edges of the cake is completely optional, but it does help to disguise any bits of the frosting that aren’t beautifully smooth! Again, the tilting turntable does make this much easier to do, but, be warned, no matter how hard you try, the nuts will go everywhere when you do this!

As there is cream and cream cheese in the frosting, you will either need to eat this cake immediately or store in the fridge. If you do store in the fridge, remove one hour before serving to allow it to return to room temperature.

Carrot cake with cream cheese frosting and caramelised walnuts

Carrot cake on a stand, before decorating with cream cheese frosting and caramelised nuts
Pre-decoration - the cake strips help to ensure a beautifully even bake
Ingredients

  1. 225g self-raising flour
  2. 1 tsp baking powder
  3. 140g soft brown sugar
  4. 50g mixed chopped toasted nuts
  5. 50g raisins
  6. 120g carrots (grated)
  7. 2 ripe medium-sized bananas (mashed)
  8. 2 eggs (beaten)
  9. ¼ pint oil

For the frosting

  1. 100ml double cream
  2. 80g icing sugar
  3. 85g full fat cream cheese (like Philadelphia)
  4. ½ tsp vanilla extract

For the caramelised walnuts and mixed nut sprinkles

  1. 30g butter
  2. 30g light brown sugar
  3. 60g walnuts
  4. 100g mixed chopped toasted nuts

Method

  1. Preheat the oven to 180C.
  2. Line a 20cm deep cake tin with baking parchment.
  3. Stir together flour, baking powder and sugar in a large mixing bowl.
  4. Add nuts, raisins, grated carrot and the mashed bananas and stir to mix.
  5. Add beaten eggs and oil and stir until well mixed.
  6. Pour into the prepared tin and bake for 45 – 60 minutes, or until firm to the touch.  
  7. Remove from tin and cool on a wire rack.
  8. While the cake is cooling, melt the butter in a small frying pan.
  9. Add in the sugar and the walnuts and stir for about 4 minutes until caramelised.
  10. Tip out onto baking parchment and set aside to cool.   
  11. Whip cream until softly stiff.
  12. Cream icing sugar, vanilla and cream cheese together.
  13. Fold in cream.
  14. When the cake is completely cool, spread frosting over the top and around the sides of the cake.
  15. Sprinkle the chopped mixed nuts around the edge of the cake and top with the caramelised walnuts.

Billionaire’s Shortbread with salted caramel


Billionaire's shortbread with salted caramel and butterscotch pieces
It’s that time of year again – EHH’s birthday!  What this means is that not only do I have to come up with some imaginative birthday presents but I have to make cakes for the 70 odd people at his work! I’ve set quite a precedent so I had to make sure that I delivered!


As it was EHH’s birthday, the first choice was his – Billionaire’s shortbread! I haven’t made this in a while and so was very happy to have another go. Last time I made Millionaire's shortbread, it turned out pretty well, but I felt that I could have cooked the caramel longer for a more intense taste: this time I cooked the caramel for nearly 25 minutes, stirring constantly and it made a real difference! The caramel had much more flavour and was deliciously chewy rather than just sticky and smooth.  I also suggested adding some salt to the caramel to add a bit more oomph, so I’ve added this in on this occasion.  Finally, I found some butterscotch pieces in the bottom of a cupboard and so decided to sprinkle these over the top of the chocolate, thus making this Billionaire’s rather than just Millionaire’s shortbread! The butterscotch pieces really added an extra dimension, a real crunch, to this bake and I would highly recommend!


Billionaire’s shortbread with salted caramel


Billionaire's shortbread with salted caramel and butterscotch pieces
Ingredients

  1. 175g butter, at room temperature
  2. 75g caster sugar
  3. 250g plain flour
  4. 60g butterscotch pieces
  5. 200g dark chocolate, broken into pieces
  6. 50g white chocolate, broken into pieces

For the caramel

  1. 100g butter
  2. 50g light brown sugar
  3. 50g golden syrup
  4. 2 x 397g tins of condensed milk
  5. I tsp sea salt flakes

Method

  1. Preheat the oven to 170C and grease and line a deep 30cm x 20cm baking tin with baking parchment
  2. Put the butter and sugar in a large bowl and cream with an electric mixer for about 5 minutes until light and fluffy.
  3. Stir in flour until evenly mixed, forming a dough.
  4. Press the dough into the prepared tin, then bake for 20-25 minutes, until golden.
  5. Remove from oven and allow to cool completely in the tin.
  6. In a heavy based, non-stick pan, melt the butter, light brown sugar, golden syrup and condensed milk over a low heat.
  7. Stirring constantly, bring the mixture to a simmer and then bubble gently for at least 20 minutes, until it turns a dark golden colour.
  8. Remove from heat and stir through ½ tsp sea salt flakes.
  9. Pour the salted caramel evenly over the shortbread, sprinkle with the remaining ½ tsp salt and then leave to set.
  10. Put the dark chocolate into a heatproof bowl and melt over a pan of just simmering water (don

    ’t allow the water to touch the bowl).
  11. Melt the white chocolate in the same way and set aside.
  12. Allow the dark chocolate to cool slightly and then pour it over the caramel and spread evenly.
  13. Sprinkle over the butterscotch pieces.
  14. Set aside and allow to cool and set.    
  15. Drizzle the white chocolate over the top of the dark chocolate and butterscotch pieces.
  16. Leave to cool completely and then cut the shortbread into squares.

Monday, 21 October 2013

Shortcake biscuits with salted peanut caramel filling


shortcake biscuit with salted peanut caramel filling

I love baking when there is no pressure - an opportunity to try something new, experiment with new techniques and flavours, without the pressure of cooking for an occasion. A couple of weeks ago, I had a quiet Sunday afternoon with nothing planned and so decided to try out this recipe, recommended tby a friend. I’d never baked with peanuts and never tried making proper caramel so they seemed like something fun to try out!

The caramel peanuts were actually very easy to make – just keep a very close eye on the caramel while it is in the pan. Don’t stir it but give it a very gentle swirl when you can see it turning golden – just to ensure that it cooks evenly.

The biscuits were simple, but time-consuming to make. Don’t make these if you are in a hurry! The actual processing time is fairly quick and easy but you do need to let the biscuits rest in the fridge twice before baking. Once cool, the biscuits are a lovely crunchy texture and have a great flavour, even without all the extra bits!

Using a tin of Carnation caramel to sandwich the biscuits is easy – you could make the caramel yourself (see recipe for Millionaire’s shortbread) but for these, the ready-made caramel works just fine.

Overall, these biscuits are very sweet but tasty – I think my dad would love them! They are best eaten fresh – when the biscuits are lovely and crunchy and contrast well with the smooth sticky caramel. They do last ok – probably for about 5 days, but the biscuits lose their crunch after about a day and so aren’t quite so good.  

Shortcake biscuits with salted peanut caramel filling

shortcake biscuits with salted peanut caramel filling on a wire cooling rack

For the caramel peanuts

  1. 50g caster sugar
  2. 1 tbsp water
  3. 2 tbsp salted peanut halves

For the biscuits

  1. 250g unsalted butter
  2. 250g caster sugar
  3. 2 tbsp crunchy peanut butter
  4. 375g plain flour, plus extra for dusting

For the salted peanut caramel filling

  1. 300g dulce de leche / Carnation caramel
  2. ½ tsp sea salt flakes
  3. 1 tbsp salted peanuts, chopped
  4. 75g dark chocolate, melted

Method

  1. For the caramel peanuts, line a non-stick baking tray with baking parchment and arrange the peanuts on the tray.
  2. Heat the sugar and water in a saucepan until the sugar melts and the mixture is boiling and golden-brown in colour (do not stir the caramel).
  3. Pour the caramel over the peanuts and set aside to harden.
  4. Once set, roughly chop the caramel peanuts and set aside.
  5. Cream the butter and sugar together in a bowl, then beat in the peanut butter until well combined. Sift over the flour and stir until the mixture comes together as a dough.
  6. Divide the dough into two balls, cover both with cling film and chill in the fridge for 15 minutes.
  7. Place the first piece of dough between two sheets of baking parchments. (This means that you do not have to add extra flour when rolling.)
  8. Roll the dough out evenly until it is approximately 5-6mm thick all over (you can buy rolling guides, but I have this rolling pin, which is brilliant!). If the top or bottom sheets of parchment crinkle at any time, peel it off and smooth out.
  9. Cut out biscuits, with a 5cm round cookie cutter, cutting each one as close to the last as possible, in order to use the dough efficiently. Re-roll the dough as necessary, but try to work the dough as little as possible.
  10. Place the biscuits onto the lined baking trays and chill for a further 15 minutes.
  11. Preheat the oven to 170C and line two baking sheets with baking parchment.
  12. Bake the biscuits in the oven for 12-15 minutes, or until golden-brown.
  13. Remove the biscuits from the oven and set aside to cool for 5 minutes, then transfer to wire rack to cool completely.
  14. Repeat stages 8-13 for the second piece of biscuit dough. 
  15. Spread the caramel on half the biscuits, then sprinkle with sea salt and chopped peanuts. Sandwich together with a plain biscuit.
  16. Melt the chocolate in a bowl set over a saucepan of simmering water (do not let the base of the bowl touch the water).
  17. Drizzle the melted chocolate over the biscuits then sprinkle over the caramel peanuts.
  18. Set aside until the chocolate has set, then serve.

Saturday, 19 October 2013

Chai latte cupcakes


Chai latte cupcakes piped with violet, pink and cream vanilla buttercream flowers


I’ve recently found Pinterest and have been enjoying flicking through lots of cupcake pictures in search of inspiration. I’d been asked to make cakes for a colleague’s birthday - I’m known for my cupcakes but I wanted to have a go at something a bit more unusual than the standard lemon / orange / red velvet. The idea of chai latte cupcakes caught my interest and so I flicked through a few webpages in search of recipes. There weren’t many UK recipes around and so I decided to make it up, basing it on a Earl Grey recipe in my ever-reliable Cupcakes from the Primrose Bakery book.


I followed the recipe, substituting Earl Grey teabags for chai teabags but also adding in a teaspoon of cinnamon, two-thirds of a teaspoon of cardamom, quarter of a teaspoon of cloves and half a teaspoon of nutmeg. I think this was too much spice! The cakes were very strongly scented and spiced! I was planning to top the cupcakes with a cinnamon buttercream, but as they were rather highly spiced anyway, I decided to balance the flavour a little by topping with a simple vanilla buttercream.


These cupcakes really split opinion – some people loved them (the birthday girl’s husband thought they were the best cakes ever!), while others really weren’t sure. This could be purely down to the chai tea flavour, which is fairly controversial anyway! I love spice but even for me, I found the spicing a bit much. In the recipe below, I have suggested less spice than I used, as this is what I will try next time – the choice is up to you!


I was planning to decorate with something a bit more intricate but I ran out of time (having also made the amazing carrot, pistachio and coconut cake, and mini lemon layer cakes on this day!), so I went for simple piped flowers. To keep it simple, I piped the cream roses first. Then, I added pink food colour to the remaining buttercream and piped the pink flowers. Finally, I added violet food colour to the remaining buttercream and piped the violet flowers. I left the cupcakes for about an hour to allow the buttercream to set and then gave them a quick spray with pearl lustre spray, which gives a fab shiny finish.


People are always amazed by rose swirls on cakes and cupcakes but they are really not that difficult to do. This is a good photo tutorial and there are lots of film clips on YouTube. To be honest, the main things are getting the consistency of the buttercream right, a Wilton 2D piping nozzle, steady pressure on the icing bag and lots of practice! The other flowers were piped very simply with a Wilton 1M piping nozzle – just lots of little stars piped one by one around and on top of each other.


Chai latte cupcakes (single batch of 12 cupcakes)


Ingredients


  1. 175ml semi-skimmed milk, at room temperature
  2. 4 Chai tea bags
  3. 110g butter, at room temperature
  4. 225g golden castor sugar
  5. 2 large eggs
  6. 125g self-raising flour, sifted
  7. 120g plain flour, sifted
  8. ½ tsp cinnamon
  9. ½ tsp mixed spice
  10. ¼ tsp cardamon


Buttercream:


  1. 110g butter, at room temperature
  2. 60ml semi-skimmed milk, at room temperature
  3. 1 tsp vanilla extract
  4. 500g icing sugar, sifted
  5. Food colouring (preferably a paste rather than a liquid)

Method
  1. Heat 125ml milk in a saucepan over a medium heat until it just begins to boil.
  2. Remove from the heat and add the tea bags.
  3. Cover with clingfilm and leave to infuse for about 30 minutes.
  4. Discard the tea bags and add the extra 50ml of milk.   
  5. Preheat oven to 160C/350F/GM4.
  6. Line a 12 hole muffin tin with cupcake cases.
  7. In a large mixing bowl, cream the butter and sugar until light and fluffy (this will take at least 5 minutes with an electric hand mixer – don’t rush this stage).
  8. Add the eggs, one at a time, mixing for a few minutes after each addition. Add a level tablespoon of the plain flour with each egg. It should result in a lovely light mousse-like mixture.
  9. Combine the rest of the plain flour with the self-raising flour and all of the spices in a separate bowl.
  10. Add one third of the flours to the creamed mixture and stir gently to combine.
  11. Pour in one third of the infused milk and stir gently.
  12. Continue to add flours and then milk mixture alternately, stirring gently after each addition, until all have been added.
  13. Spoon mixture into the cupcake cases, filling to about 2/3 full.
  14. Bake in the oven for about 30 minutes until lightly golden brown. The cakes will spring back lightly when touched, if cooked.
  15. Remove from the oven and leave to cool in tin for about 10 minutes, before carefully placing on a wire rack to finish cooling.


While the cakes are in the oven, make up the buttercream:

  1. In a large mixing bowl, beat the butter, milk, vanilla extract and half of the icing sugar until smooth.
  2. Add the rest of the icing sugar and beat until smooth and creamy.