Showing posts with label cupcake. Show all posts

Sunday, 11 May 2014

Monster cupcakes (apple and cinnamon)

Purple and green monster cupcakes
The monsters! 
These apple and cinnamon cupcakes were actually made back in February - before I used the same recipe to make the Sheep Cupcakes for my friend’s hen weekend – I just haven’t gotten around to writing them up!  These cupcakes were made for a visit to see my sister, brother-in-law and 18-month-old nephew. I wanted to make something fun and remembered having pinned monster cupcakes to my Cupcake Inspiration board on Pinterest.

I experimented with different piping nozzles for the buttercream – making spiky monsters with a small round nozzle, hairy monsters using a grass effect nozzle, and wiggly wormy-like monsters with a medium round nozzle. I chose purple and green buttercream to contrast, but you could make any colour monsters!

To decorate the cupcakes, I made circles out of white fondant icing for the eyes and mouths out of black fondant icing. I have this small cutter set, which has lots of basic shapes and is very useful! Making the teeth and sticking them on was quite fiddly – as they are tiny pieces of fondant – but worth the effort! The easiest way to make tiny triangles is to cut out stars using a star cutter, and the cut the triangles off each star. The tongues were made from fizzy belt sweets, cut with a pair of kitchen sweets and then inserted through the mouths – again a bit fiddly! The hair/antennae were simply made from strawberry pencil sweets, cut into short lengths. You could experiment with various different sweets for different hair-types / antennae.

If you wanted to make these cupcakes as a fun activity with kids, you could use white chocolate buttons for the eyes, teeth / lip / fang sweets for the mouths and various different types of sweets for the hair!

These cakes tasted fantastic, but the cake / icing didn’t really go with the strong taste of the sweets on top! If I were to make monster cupcakes again, I’d probably go for a simple vanilla cupcake, or a strawberry cupcake to go with the sweets!

Cinnamon cupcakes with apple puree and maple syrup buttercream 
(makes 12 cupcakes and 4-6 mini cupcakes)
Green monster cupcake sticking out his multi-coloured tongue!
Ingredients
  1. 110g butter, at room temperature
  2. 225g golden castor sugar
  3. 2 large eggs
  4. 150g self-raising flour, sifted
  5. 125g plain flour, sifted
  6. 120ml semi-skimmed milk
  7. 2 tsp cinnamon
  8. 1 tsp vanilla extract
  9. 2 large / 3 small Bramley apples
  10. ½ - 1 tblsp soft brown sugar

Buttercream:
  1. 115g butter, at room temperature
  2. 500g icing sugar, sifted
  3. 2 tblsp maple syrup
  4. 2 tblsp milk
  5. Food colouring

To decorate
  1. Sweets (I used fizzy belt sweets and strawberry cables)
  2. White fondant icing
  3. Black fondant icing
  4. Black writing icing (optional)
  5. Red food colour pen (optional)

For the eyes and mouths (this can all be done in advance):
  1. Roll out a small amount of white fondant icing.
  2. Use various circle cutters to cut out different sized eyes.
  3. Use a star-shaped cutter to cut out several stars and then use a knife to cut these stars into small triangles for teeth.
  4. Cut out small rectangles for additional teeth.
  5. Roll out a small amount of black fondant icing.
  6. Use an oval cutter to cut out mouths and shape as desired.
  7. Use a paint brush dipped in a tiny amount of water to attach the teeth to the mouths.
  8. Use scissors to cut tongue shapes from the belt sweets.
  9. Cut small slits in the mouths and then push tongues through these.
  10. Use black writing icing or a black food colour pen to add pupils to the eyes.

For the cakes:
  1. Peel and chop the Bramley apples.
  2. Place the chopped apples in a saucepan with two tablespoons of water and half a tablespoon of soft brown sugar.
  3. Cook over a low heat until softened and mostly pureed ( a few small lumps is fine).
  4. Taste and add extra brown sugar as required.
  5. Place to one side to cool.
  6. Preheat oven to 160C.
  7. Line a 12 hole muffin tin with cupcake cases.
  8. In a large mixing bowl, cream the butter and sugar until light and fluffy (this will take at least 5 minutes with an electric hand /stand mixer – don’t rush this stage).
  9. Add the eggs, one at a time, mixing for a few minutes after each addition. It should result in a lovely light mousse-like mixture.
  10. Combine the two flours and the cinnamon in a separate bowl.
  11. Combine the milk and vanilla extract in a jug.
  12. Add one third of the flour mixture to the creamed mixture and stir gently to combine.
  13. Pour in one third of the milk mixture and stir gently.
  14. Continue to add flours and then milk mixture alternately, stirring gently after each addition, until all have been added.
  15. Spoon mixture into the cupcake cases, filling to about 2/3 full.
  16. Bake in the oven for about 30 minutes until lightly golden brown. The cakes will spring back lightly when touched, if cooked.
  17. Remove from the oven and leave to cool in tin for about 10 minutes, before carefully placing on a wire rack to finish cooling.

While the cakes are in the oven, make up the buttercream:
  1. In a large mixing bowl, beat the butter, maple syrup and half of the icing sugar until smooth.
  2. Add the rest of the icing sugar and beat until smooth and creamy.
  3. Add milk (if needed to bring the buttercream to a piping consistency) and beat again.
  4. Put buttercream into a piping bag with a nozzle adaptor.

Once cakes are cooked and cooled: 
    Purple monster cupcake sticking out his multi-coloured tongue!
  1. Use a tea spoon to cut a cone out from the centre of the cakes.
  2. Cut the top disk off each cone and retain.
  3. Fill the hole in each cake with a teaspoon of pureed apple and then replace a cake disk onto each cake to seal the hole.
  4. Pipe the butter cream onto the cakes using various nozzles.
  5. Add eyes, mouths and hair / antennae.  


Saturday, 19 October 2013

Chai latte cupcakes


Chai latte cupcakes piped with violet, pink and cream vanilla buttercream flowers


I’ve recently found Pinterest and have been enjoying flicking through lots of cupcake pictures in search of inspiration. I’d been asked to make cakes for a colleague’s birthday - I’m known for my cupcakes but I wanted to have a go at something a bit more unusual than the standard lemon / orange / red velvet. The idea of chai latte cupcakes caught my interest and so I flicked through a few webpages in search of recipes. There weren’t many UK recipes around and so I decided to make it up, basing it on a Earl Grey recipe in my ever-reliable Cupcakes from the Primrose Bakery book.


I followed the recipe, substituting Earl Grey teabags for chai teabags but also adding in a teaspoon of cinnamon, two-thirds of a teaspoon of cardamom, quarter of a teaspoon of cloves and half a teaspoon of nutmeg. I think this was too much spice! The cakes were very strongly scented and spiced! I was planning to top the cupcakes with a cinnamon buttercream, but as they were rather highly spiced anyway, I decided to balance the flavour a little by topping with a simple vanilla buttercream.


These cupcakes really split opinion – some people loved them (the birthday girl’s husband thought they were the best cakes ever!), while others really weren’t sure. This could be purely down to the chai tea flavour, which is fairly controversial anyway! I love spice but even for me, I found the spicing a bit much. In the recipe below, I have suggested less spice than I used, as this is what I will try next time – the choice is up to you!


I was planning to decorate with something a bit more intricate but I ran out of time (having also made the amazing carrot, pistachio and coconut cake, and mini lemon layer cakes on this day!), so I went for simple piped flowers. To keep it simple, I piped the cream roses first. Then, I added pink food colour to the remaining buttercream and piped the pink flowers. Finally, I added violet food colour to the remaining buttercream and piped the violet flowers. I left the cupcakes for about an hour to allow the buttercream to set and then gave them a quick spray with pearl lustre spray, which gives a fab shiny finish.


People are always amazed by rose swirls on cakes and cupcakes but they are really not that difficult to do. This is a good photo tutorial and there are lots of film clips on YouTube. To be honest, the main things are getting the consistency of the buttercream right, a Wilton 2D piping nozzle, steady pressure on the icing bag and lots of practice! The other flowers were piped very simply with a Wilton 1M piping nozzle – just lots of little stars piped one by one around and on top of each other.


Chai latte cupcakes (single batch of 12 cupcakes)


Ingredients


  1. 175ml semi-skimmed milk, at room temperature
  2. 4 Chai tea bags
  3. 110g butter, at room temperature
  4. 225g golden castor sugar
  5. 2 large eggs
  6. 125g self-raising flour, sifted
  7. 120g plain flour, sifted
  8. ½ tsp cinnamon
  9. ½ tsp mixed spice
  10. ¼ tsp cardamon


Buttercream:


  1. 110g butter, at room temperature
  2. 60ml semi-skimmed milk, at room temperature
  3. 1 tsp vanilla extract
  4. 500g icing sugar, sifted
  5. Food colouring (preferably a paste rather than a liquid)

Method
  1. Heat 125ml milk in a saucepan over a medium heat until it just begins to boil.
  2. Remove from the heat and add the tea bags.
  3. Cover with clingfilm and leave to infuse for about 30 minutes.
  4. Discard the tea bags and add the extra 50ml of milk.   
  5. Preheat oven to 160C/350F/GM4.
  6. Line a 12 hole muffin tin with cupcake cases.
  7. In a large mixing bowl, cream the butter and sugar until light and fluffy (this will take at least 5 minutes with an electric hand mixer – don’t rush this stage).
  8. Add the eggs, one at a time, mixing for a few minutes after each addition. Add a level tablespoon of the plain flour with each egg. It should result in a lovely light mousse-like mixture.
  9. Combine the rest of the plain flour with the self-raising flour and all of the spices in a separate bowl.
  10. Add one third of the flours to the creamed mixture and stir gently to combine.
  11. Pour in one third of the infused milk and stir gently.
  12. Continue to add flours and then milk mixture alternately, stirring gently after each addition, until all have been added.
  13. Spoon mixture into the cupcake cases, filling to about 2/3 full.
  14. Bake in the oven for about 30 minutes until lightly golden brown. The cakes will spring back lightly when touched, if cooked.
  15. Remove from the oven and leave to cool in tin for about 10 minutes, before carefully placing on a wire rack to finish cooling.


While the cakes are in the oven, make up the buttercream:

  1. In a large mixing bowl, beat the butter, milk, vanilla extract and half of the icing sugar until smooth.
  2. Add the rest of the icing sugar and beat until smooth and creamy.

Sunday, 7 April 2013

Passion fruit cupcakes


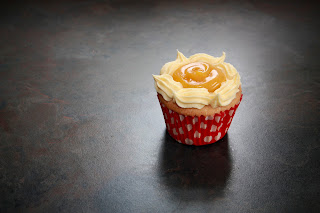
Vanilla cupcakes with passion fruit curd and passion fruit buttercream
Having made Millionaire’s Shortbread for my cousin’s visit, I was in a baking mood, so I decided to make some cupcakes too. I had half a jar of passion fruit curd left from making lemon and passion fruit cupcakes not long ago, which needed using up, so I convinced EHH to pop up to the shop to buy me some passion fruits and decided to make passion fruit cupcakes.


I started by straining the passion fruit pulp through a sieve and realised that you don’t get much from three passion fruit! Therefore, I decided to stick with a simple vanilla cupcake base, fill it with passion fruit curd and top with buttercream flavoured with the passion fruit juice.


The vanilla cupcakes worked well as a base for the passion fruit curd and buttercream. However, I think these cupcakes ended up with too much curd and not enough buttercream – the curd over-powered and made the cake slightly too tart (even for my tastes). I think the cakes would have worked better with a filling of curd and a whole swirl of buttercream. The strained passion fruit juice had a real hit of flavour and worked well in the buttercream, although I would suggest 4 passion fruits for slightly more flavour.


Vanilla cupcakes with passion fruit curd and buttercream


Ingredients

  1. 110g butter, at room temperature
  2. 225g golden castor sugar
  3. 2 large eggs
  4. 150g self-raising flour, sifted
  5. 125g plain flour, sifted
  6. 120ml semi-skimmed milk
  7. I tsp vanilla extract
  8. 4 tblsp passion fruit curd

Buttercream:


  1. 115g butter, at room temperature
  2. 500g icing sugar, sifted
  3. 4 passion fruits – juice strained through a sieve
  4. Milk (as needed)

Method

  1. Preheat oven to 160C/350F/GM4.
  2. Line a 12 hole muffin tin with cupcake cases.
  3. In a large mixing bowl, cream the butter and sugar until light and fluffy this will take at least 5 minutes with an electric hand mixer – don’t rush this stage).
  4. Add the eggs, one at a time, mixing for a few minutes after each addition. It should result in a lovely light mousse-like mixture.
  5. Combine the two flours in a separate bowl.
  6. Combine the milk and vanilla extract in a jug.
  7. Add one third of the flours to the creamed mixture and stir gently to combine.
  8. Pour in one third of the milk mixture and stir gently.
  9. Continue to add flours and then milk mixture alternately, stirring gently after each addition, until all have been added.
  10. Spoon mixture into the cupcake cases, filling to about 2/3 full.
  11. Bake in the oven for about 30 minutes until lightly golden brown. The cakes will spring back lightly when touched, if cooked.
  12. Remove from the oven and leave to cool in tin for about 10 minutes, before carefully placing on a wire rack to finish cooling.


While the cakes are in the oven, make up the buttercream:

  1. In a large mixing bowl, beat the butter, passion fruit juice and half of the icing sugar until smooth.
  2. Add the rest of the icing sugar and beat until smooth and creamy.
  3. Add milk (if needed to bring the buttercream to a piping consistency) and beat again.
  4. Put buttercream into a piping bag with a medium star nozzle.

To decorate:

  1. Use a wide skewer to make three deep holes into each cooled cupcake.
  2. Put the passion fruit curd into a piping bag and pipe into each of the holes.
  3. Pipe small swirls of buttercream around the edge of the cupcake.
  4. Fill the centre of the buttercream swirls with curd.


Sunday, 10 February 2013

Baby Shower Cupcakes

12 pastel Baby Shower cupcakes

As mentioned in my previous post on Chocolate and Cherry Cupcakes, I’d been asked by a colleague to make 12 cupcakes for her daughter-in-law’s baby shower.  A quick consultation with my colleague confirmed that the baby’s gender wasn’t yet known, so the cakes needed to be gender-neutral, and the theming of the baby shower was fairly bright pastels.  I spent lots of time on Flickr doing searches for baby cupcakes, christening cupcakes, baby shower cakes, etc, created a Flickr gallery of my favourites and then, after lots of inspiration, sketched out a design for the 12 cupcakes.  


First, I made the lemon cupcakes – using my usual recipe. Except, annoyingly, I forgot to fill them with curd! I was so worried about getting the decoration right that I completely forgot the filling stage and by the time I remembered, it was too late! Never mind – I’m sure they’ll taste ok anyway. 


Having had a practise at making chocolate cupcakes last week, it was finally time to make them. After deliberating, I decided to just make plain chocolate rather than chocolate and cherry. My preference would be the chocolate and cherry, however, I was asked for chocolate and decided to stick with that. Batch One was a disaster! Why do things always go wrong when you are baking for something special?! Everything went fine until I was measuring out the flour, baking powder and bicarbonate of soda. Having done all the measuring and mixed it all together, I realised that I had grabbed my half tablespoon measuring spoon instead of my teaspoon measuring spoon.  Stupidly, I decided to carry on anyway – deciding it wouldn’t make too much difference! Big mistake! Don’t know what I was thinking – the raising agent put into a mixture is vital and too much results in the cakes rising spectacularly and then sinking once taken out of the oven. And this is exactly what happened! 


So, Batch One will be heading to EHH’s work – edible but definitely not pretty! On to Batch Two. Careful measuring out this time, with the correct spoon! The recipe says that it makes 14 but I made 16 and they still ended up spilling out of their cases slightly – so be careful how much mixture goes into each case – don’t fill much beyond half-full.  Batch Two didn’t work out quite as well as last’s week’s and sunk slightly again – not sure why – could be that doing all milk rather than a mix of milk and cherry brandy made the difference, or it could be that I didn’t quite combine the egg white with the rest of the mixture enough. I’m not sure.  I managed to find 6 respectable looking ones – which was all that I needed for the order – so that was ok.


Decorating the cakes:

Tin of fondant cutters 


I bought this little set of cutters online earlier this week and it has been invaluable for decorating these cakes. I have rather a huge collection of fondant cutters but I think that this set of basic shapes could be the most useful! 


I started by colouring the icing. I mixed some plain white ready-to-roll icing with small amounts of red, blue, yellow and green Renshaw icing to create some pretty bright pastel colours. (I’m not at all keen on the taste of the Renshaw icing but it is the most commonly available icing – apparently because it is the best for modelling – and it comes in a wide variety of colours.) You could just add food colouring but I find that starting with a ready coloured icing is much less messy.


To create buttons:

Roll out coloured icing to approx. 5mm thick. Use a round cutter to cut out small circles. Use a round flat item (I used the top of a plunger cutter) to push down into the circles – so creating the rim of the button. Use a skewer to create four small holes in the centre of the button.


To create the patchwork effect cupcakes:

 Roll out some white icing to form a rectangle about A5 size, approx. 2 mm thick. Roll out small amounts of each colour of icing to approximately 2 mm thick. Use a square cutter to cut out squares of each colour. Use a clean paintbrush to lightly brush over the white icing with a small amount of water. Stick the squares of coloured icing onto the white icing in a random pattern – so that they are all touching and no white can be seen (you may also want to add in some squares of white icing). 

4 Patchwork Baby Shower cupcakesOnce the white icing has been covered, use a rolling pin to lightly and gently roll the icing again. Use a round cookie cutter (I used one with a diameter of 7.5cm) to stamp out circles. Use a suitable tool to create a stitching effect along the seams (I used the comb end of a scallop and comb tool, but you can also get a quilting tool)


Place a large round piping tip into a piping bag and fill the bag with buttercream. Pipe onto the cupcake to create a neatly domed mound. Gently lift a patchwork circle onto the cake. Top with a icing flower and button.


To create the button cupcakes:


4 pastel button baby shower cupcakesRoll out some coloured icing to approximately 3 mm thick. Place over an embossing mat (I used one from this set) and roll over again with a rolling pin. Gently remove from the embossing plate and use a round cookie cutter to cut out circles of embossed icing. 


Place a large round piping tip into a piping bag and fill the bag with buttercream. Pipe onto the cupcake to create a neatly domed mound. Gently lift an embossed icing circle onto the cake. Top with three buttons.


To create the baby bunting cupcakes:

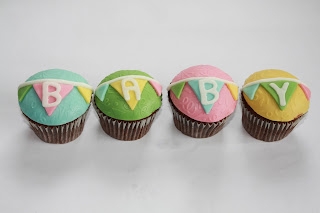
4 pastel baby bunting baby shower cupcakes

Roll out some coloured icing to approximately 3 mm thick. Place over an embossing mat (I used one from this set) and roll over again with a rolling pin. Gently remove from the embossing plate and use a round cookie cutter to cut out circles of embossed icing. 
 

Place a large round piping tip into a piping bag and fill the bag with buttercream. Pipe onto the cupcake to create a neatly domed mound. Gently lift an embossed icing circle onto the cake. 


Roll out some coloured icing to approx. 2mm thick. Use a large and a small triangle cutter to cut out triangles of icing. Roll out some white icing to approx. 2mm thick. Use alphabet cutters to stamp out letters to spell “baby”. Use a little water to attach the letters to the big triangles of icing. Use a little more water to attach the big triangles to the icing-topped cupcakes. Attach little triangles onto each side of the large triangles. Roll a thin strip of white icing into a string and attach gently across the  top of the triangles.  


Sunday, 3 February 2013

Chocolate and Cherry Cupcakes


Cherry topped chocolate cupcake with chocolate buttercream

I’ve been asked by a colleague at work to make some cupcakes for her daughter-in-law’s baby shower. Now, I've always said that I wasn’t interested in making cakes for sale, however, they only want 12 cupcakes – and I’ve not got plans for next weekend, so I decided to say yes. However, first problem – they would like 6 lemon and 6 chocolate. Lemon - I can do, no problem. Chocolate – now there’s the problem, I don’t generally make chocolate cakes (other than red velvet, which is a generally very light chocolate cake).  The truth is, I’m not a huge fan of chocolate, and less so of chocolate cake – so I just don’t generally make it!


So, I decided that I ought to have a practise this weekend – I turned to my ever reliable Cupcakes from the Primrose Bakery book and found their chocolate cupcake recipe right near the start. It is a bit of a faffy recipe – melting the chocolate, creaming the butter and sugar, beating the egg yolks separately (I’m not completely convinced why this is necessary – but hey, the recipe works, so who I am to argue?), whisking the egg whites to soft peaks … And the recipe says that it should be a “fairly liquid batter” – which mine definitely wasn’t – which made me very concerned. However, the cakes turned out brilliantly – incredibly light and fluffy, so all the hard work is definitely worth it!


I made one big mistake – I didn’t check how many the recipe made – and just divided the mixture between 12 cupcake cases. It appeared to fill the cases to about 2/3rds so it looked about right. However, the recipe does say that it makes 16! These cakes rose – lots! And ended up huge and spilling out of the cases – oops!


I did make one change to the standard chocolate cupcake recipe – I had some cherry brandy liqueur hanging around in the kitchen so I decided to replace 50ml 0f the milk with cherry brandy. However, this didn’t really show up in the flavour of the cupcakes – may try adding more next time. I also added a filling of cherry jam and added cherry brandy to the buttercream mixture as well.


Chocolate and Cherry Cupcakes
(makes 16)

6 cherry topped chocolate cupcakes with chocolate buttercream
Ingredients

  1. 115g good quality dark chocolate (70% cocoa solids)
  2. 85g butter, at room temperature
  3. 175g soft brown sugar
  4. 2 large eggs, separated
  5. 186g plain flour
  6. ¾ tsp baking powder
  7. ¾ tsp bicarbonate of soda
  8. Pinch of salt
  9. 150ml milk
  10. 100ml cherry brandy liqueur
  11. Approx 4 tblsp good quality cherry jam
  12. 12 cherries

Buttercream

  1. 175g good quality dark chocolate (70% cocoa solids)
  2. 225g butter, at room temperature
  3. 1.5 tblsp cherry brandy
  4. 250g icing sugar
Method
  1. Pre-heat the oven to 170C and line a couple of 12 hole cupcake tins with 16 cupcake cases.
  2. Break the chocolate into pieces and melt in a glass bowl over a saucepan of gently simmering water. Stir occasionally until it is completely melted and smooth. Set to one side to cool slightly.  
  3. In a large mixing bowl, cream the butter and sugar until light and fluffy this will take at least 5 minutes with an electric hand mixer – don’t rush this stage).
  4. In a separate bowl and with clean beaters, beat the egg yolks for several minutes.
  5. Gradually add the beaten egg yolks to the creamed mixture and beat well.
  6. Add the melted chocolate to the mixture and beat well.
  7. Combine the flour, baking powder, bicarbonate of soda and salt in a separate bowl.
  8. Put the milk in a jug and add the cherry brandy.  
  9. Add one third of the flour mixture to the creamed mixture and stir gently to combine.
  10. Pour in one third of the milk mixture and stir gently.
  11. Continue to add the flour mix and then milk mixture alternately, stirring gently after each addition, until all have been added.
  12. In a clean bowl, whisk the egg whites until soft peaks start to form.
  13. Carefully fold the egg whites into the batter, using a metal spoon. Do not beat or you will lose the air.
  14. Spoon mixture into the cupcake cases, filling to about 1/2 full.
  15. Bake in the oven for about 25 minutes. The cakes will spring back lightly when touched, if cooked.
  16. Remove from the oven and leave to cool in tin for about 10 minutes, before carefully placing on a wire rack to finish cooling. 
  17. While the cakes are in the oven, make up the buttercream:
  18. Break the chocolate into pieces and melt in a glass bowl over a saucepan of gently simmering water. Stir occasionally until it is completely melted and smooth. Set to one side to cool slightly. 
  19. In a large mixing bowl, beat the butter, cherry brandy and half of the icing sugar until smooth.
  20. Add the rest of the icing sugar and beat until smooth and creamy.
  21. Add the melted chocolate and beat again until thick and creamy.

To fill and decorate:

  1. Once cakes are cooked and cooled, use a tea spoon to cut a cone out from the centre of the cakes.
  2. Cut the top disk off each cone and retain.
  3. Fill the hole in each cake with a teaspoon of cherry jam and then replace a cake disk onto each cake to seal the hole.
  4. Place buttercream into an icing bag with a star shaped nozzle (I use the Wilton 1M nozzle). Swirl onto cupcakes.
  5. Top each cake with a cherry (you could drizzle the cherries with melted chocolate).