Showing posts with label raspberry jam. Show all posts

Monday, 25 August 2014

Lemon and raspberry Madeira cake

Lemon and raspberry Madeira cake topped with lemon buttercream and raspberries

I’m not a huge fan of Madeira cake – I’ve always found it to be rather dry and bland. However, when my friend asked for help in making a fondant-covered Mr Bump cake for her son’s first birthday cake, I knew that it had to be Madeira cake. We needed to make the cake on the Thursday for the party on the Saturday, which meant that the cake needed to last well and the cake needed to be covered in a decent layer of fondant icing. Sponge is too light and can collapse under heavy icing, and Madeira cake tends to last better as well.

Having never made Madeira cake, I decided that I needed to test some recipes in advance. This first recipe is adapted from the BBC Good Food’s Madeira Loaf Cake. When I baked it, I increased the quantities to a 5 egg recipe, however this was huge! Therefore, I have reduced the quantities below to make a 4 egg recipe, which should fit perfectly in a deep 20cm cake tin. I have also added the glycerine to this recipe as it was something suggested in the second Madeira cake recipe that I tried and I think it does help to maintain moisture in the cake.

In order to get a beautifully flat and evenly baked cake, I use my magi-cake strips: these are an investment but they make a huge difference! You soak them in water and then wrap them around the cake tin: this adds an extra layer therefore prevents the edge of the cake from cooking more quickly and drying out. It also prevents the cake from doming and so ensures a nice even top to your cake.

Unfortunately, I underestimated the length of time needed to bake my cake and opened the oven too many times! This meant that the cake ended up sunken in the middle. I managed to hide this under a thick layer of buttercream – as you can see from the picture, you would never know!

To cut cakes in half, I would hugely recommend a cake-cutting wire: this is a lot easier than trying to use a knife!

Overall, I wasn’t sure about this cake – EHH and I both felt that it was still a little dry. However, EHH took it into work and they loved it! Several of his colleagues claimed that it was the best cake that I have ever made!

Lemon and raspberry Madeira cake

Ingredients
  1. 235g butter, softened, plus extra for greasing
  2. 235g golden caster sugar
  3. 4 large eggs
  4. Grated zest 2 lemons
  5. Few drops vanilla extract
  6. 1 tsp glycerine
  7. 265g self-raising flour
  8. 65g ground almonds


Buttercream icing:
  1. 110g butter, at room temperature
  2. 500g icing sugar, sifted
  3. 3 tblsp freshly squeezed lemon juice

To fill and decorate:
  1. 6 tablespoons raspberry jam
  2. Raspberries
  3. Mint leaves

Method
  1. Pre-heat oven to 170C.
  2. Grease and base-line a 20cm deep round cake tin with baking parchment.
  3. Using an electric whisk or stand mixer, beat together the butter and sugar until light and creamy (about 5 minutes of beating).
  4. Beat the eggs together in a separate bowl.
  5. Beat the eggs into the butter/sugar mix, a little at a time, beating well between each addition.
  6. Mix in the lemon zest and vanilla.
  7. Fold in the flour and almonds until you have a thick batter. The batter should be loose enough that it falls off a wooden spoon, if it’s too thick mix in a splash of milk.
  8. Tip the batter into the tin and smooth over the top.
  9. Bake for 75 – 100 minutes, until a skewer inserted in the middle comes out clean. Cover with foil after about 60 minutes to stop the top from burning.
  10. Remove from the oven then leave to cool for 15 mins then remove from the tin, peel away the paper and leave on a wire rack to cool completely before slicing.
  11. While the cake is cooling, beat the butter, juice and half of the icing sugar in a large mixing bowl until smooth.
  12. Add the rest of the icing sugar and beat until smooth and creamy.
  13. Once the cake is completely cool, cut in half.
  14. Cover one half with raspberry jam.
  15. Cover with the other half and then top with buttercream.
  16. Decorate with the raspberries and mint leaves. 


Monday, 26 May 2014

Peppa Pig cupcakes

6 Peppa Pig cupcakes - 2 Peppa Pig, 2 suns and 2 clouds with the number 4

My friend’s little girl is obsessed with Peppa Pig! So, for her fourth birthday, the whole family travelled over from Guernsey for a holiday on “the Mainland” culminating in a two-day visit to Peppa Pig World. First though, they visited us here in Bath, so I decided to make some Peppa Pig cupcakes (and, as my rhubarb in the garden was ripe for picking, some rhubarb crumble muffins) to welcome them!

I had a quick flick through Pinterest for some inspiration and as I didn’t have loads of time, I decided to keep it reasonably simple: decorating 6 cupcakes with the Peppa theme and 6 with a simple pink rose swirl.

I made the Peppa cupcake toppers the night before making the cakes: this allows the icing to dry and firm and means that it is less likely to absorb the moisture from the buttercream and go floppy! Getting the right thickness is difficult – mine were too thick! I’d probably aim for about 1-2mm thick. For the images on top, I used cutters from this set

Tin of fondant cuttersThis set is fantastic! I have a rather huge collection of fondant cutters and plunger cutters, but this set is the one that I use time and time again! I don’t have a set of number cutters (must buy some!) so I cut the number fours from a triangle of icing.

As the cakes were for a four-year-old, I decided to go for a very simple vanilla cupcake, filled with raspberry jam to liven them up and help them last a bit longer. Adding a filling like jam to cupcakes not only boosts the flavour, but it also helps to increase the life of the cakes: as the cakes age, they tend to dry out a bit and so the jam adds moisture.

The final result: well, the Birthday girl loved them (and so did her mum!), which was the main thing! For me, they weren’t the best thing that I have ever made – the red outline on Peppa doesn’t quite work right – it should be pink (but I don’t have a pink food colour pen!) and the blue disks were way too thick! However, the cake was light and fluffy and tasted good – which is the main thing!  

Vanilla cupcakes with raspberry jam and vanilla buttercream
Ingredients
    6 Peppa Pig cupcakes - 3 with Peppa Pig cupcake toppers and 3 with rose swirl of buttercream
  1. 110g butter, at room temperature
  2. 225g golden castor sugar
  3. 2 large eggs
  4. 150g self-raising flour, sifted
  5. 125g plain flour, sifted
  6. 120ml semi-skimmed milk
  7. 1 tsp vanilla extract
  8. 4 tblsp raspberry jam
Buttercream:
  1. 110g butter, at room temperature and very soft
  2. 500g icing sugar, sifted
  3. 1 tsp vanilla extract
  4. 60ml milk 
  5. Pink paste food colouring
Method
  1. Preheat oven to 160C/350F/GM4.
  2. Line a 12 hole muffin tin with cupcake cases.
  3. In a large mixing bowl, cream the butter and sugar until light and fluffy this will take at least 5 minutes with an electric hand mixer – don’t rush this stage).
  4. Add the eggs, one at a time, mixing for a few minutes after each addition. It should result in a lovely light mousse-like mixture.
  5. Combine the two flours in a separate bowl.
  6. Combine the milk and vanilla extract in a jug.
  7. Add one third of the flours to the creamed mixture and stir gently to combine.
  8. Pour in one third of the milk mixture and stir gently.
  9. Continue to add flours and then milk mixture alternately, stirring gently after each addition, until all have been added.
  10. Spoon mixture into the cupcake cases, filling to about 2/3 full.
  11. Bake in the oven for about 30 minutes until lightly golden brown. The cakes will spring back lightly when touched, if cooked.
  12. Remove from the oven and leave to cool in tin for about 10 minutes, before carefully placing on a wire rack to finish cooling.
While the cakes are in the oven, make up the buttercream:
  1. In a large mixing bowl, beat the butter, milk, vanilla extract and half of the icing sugar until smooth.
  2. Add the rest of the icing sugar and beat until smooth and creamy.
  3. Put buttercream into a piping bag with a large star nozzle.
Once cakes are cooked and cooled:
  1. Use a tea spoon to cut a cone out from the centre of the cakes.
  2. Cut the top disk off each cone and retain.
  3. Fill the hole in each cake with a teaspoon of raspberry jam and then replace a cake disk onto each cake to seal the hole.
  4. Pipe rose swirls onto all of the cupcakes.
  5. Top cakes with a Peppa disk.


Peppa-themed cupcake toppers
  1. Pale blue, yellow, pink, red and white fondant icing
  2. Black writing icing / black food colour pen
  3. Red food colouring
  4. Pink food colour pen

Method
  1. Roll out the blue fondant icing to 1-2mm thick and cut out 6 circles with a 75mm round cutter.

For the sun cupcakes:
  1. Roll out the yellow fondant to about 1mm thick
  2. Cut out two 25mm circles and 16 small rectangles.
  3. Use a paintbrush and a very small amount of tap water to stick the suns to the blue disks.

For the cloud cupcakes:
  1. Roll out the white fondant to 2-3mm thick.
  2. Cut out two flowers and then carefully roll over each flower in one direction with a rolling pin.
  3. Use a number or a letter cutter to cut out an age or initial.
  4. Use a paintbrush and a very small amount of tap water to stick the clouds to the blue disks and then the numbers to the clouds.

For the Peppa cupcakes:
1 Peppa Pig cupcake
  1. Roll out red fondant to about 1mm thick.
  2. Cut out two triangles.
  3. Use a circle cutter to cut off one corner (to sit the head on) and to round off the opposite edge of the triangle (to sit against the side of the blue disk).
  4. Repeat for the second triangle
  5. Roll out pink fondant to 1mm thick.
  6. Cut out two ellipses.
  7. Use a knife to turn the ellipses into Peppa heads (whistle-shaped!)
  8. Use a paintbrush and a very small amount of tap water to stick the red dress shapes to the blue disks and then stick on the Peppa heads in the correct position.
  9. Roll four very small balls of pink fondant and flatten each slightly.
  10. Stick these flattened balls in place as ears.
  11. Roll very thin sausages of pink fondant and then stick in place as arms.
  12. Use the pink food colour pen to outline Peppa’s head and ears, and define the nose, nostrils and mouth.
  13. Add eyes with the black food colour pen.
  14. Dilute a tiny amount of red food colouring in a tiny amount of water.
  15. Using a paintbrush, use this diluted food colouring to paint on Peppa’s flushed cheeks.  


Monday, 7 October 2013

Mini Victoria sponge cakes

Mini Victoria sponge filled with vanilla buttercream and raspberry jam, topped with a fresh raspberry
A friend recently asked me for a standard, reliable Victoria sponge recipe and, checking through the blog, I realised that I haven’t written up the recipe that I generally use. My sponge cake is a bit of an amalgam of various recipes – picking up ideas from different people and traditions! 

Rather than just writing up the recipe, I thought I had better give it a run out and this seemed like an excellent opportunity to use this year’s favourite baking tin: the Lakeland mini sandwich tin. However, I didn’t really think too much about quantities and so made the standard quantity for a two layer Victoria sponge – half of this would have been plenty for the tin! Therefore, I ended up popping the spare mixture into cupcake cases to make Victoria sponge cupcakes.

This recipe makes a beautifully light and fluffy sponge cake – it can be made as a quick all-in-one cake in the food processor but I haven’t tried this! My food processor is too small and I’m a bit of a traditionalist! A few tips to ensure that your sponge is light and fluffy:

  • Make sure that all of your ingredients are at room temperature
  • Beat the butter and sugar for at least 5 minutes (with a stand / electric mixer, longer if by hand!)
  • Beat for at least 2 minutes after adding each egg, preferably more!
  • Fold the flour in carefully – do not beat at this stage, as this activates the gluten in the flour and will make your cake tough.
  • Add enough milk to create a smooth, soft mixture that drops off a spoon in smooth lumps – not so much that it runs off.

What you choose to fill it with is completely up to you! Traditionalists will argue whether a Victoria sponge is filled with jam / jam and cream and will tell you that it should not have a topping but merely dusted with icing/castor sugar. Personally, I love raspberry jam and whipped double cream as a filling, but this does require keeping the cake in the fridge if you are not serving immediately. On this occasion, I decided to fill with jam and vanilla buttercream. If you don’t make your own jam (I don’t!), I would strongly recommend mashing up raspberries and adding these to shop-bought jam – this adds a real zing and liveliness to the filling.

The cupcakes were very different to my standard vanilla cupcakes: these were very light and fluffy – almost melting to nothing in your mouth! The ones I generally make are a little denser and richer – I guess it is very much down to personal preference! I filled these with raspberry jam and topped with vanilla buttercream.

Victoria sponge cake
Ingredients
(for two 21cm sandwich tins, halve ingredients to fill the mini sandwich tin or to make 12 cupcakes)


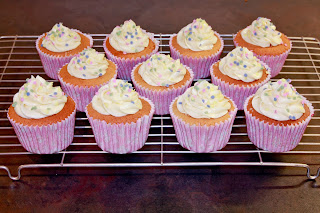
    Victoria sponge cupcake filled with raspberry jam and topped with a swirl of vanilla buttercream and polka dot sprinkles
  1. 4 large eggs – weighed
  2. Equal weight of butter
  3. Equal weight of golden castor sugar
  4. Equal weight minus 30g of self-raising flour
  5. 30g cornflour
  6. 1 tsp baking powder
  7. 1-2 tsp good quality vanilla extract
  8. 3-4 tblsp milk (at room temperature) 

To fill and top
Vanilla buttercream:

  1. 115g butter, at room temperature
  2. 500g icing sugar, sifted
  3. 60ml milk (at room temperature)
  4. 1 tsp vanilla extract
  1. 4 tablespoons raspberry jam
  2. 1 punnet raspberries
Method
  1. Preheat the oven to 165C.
  2. Grease your chosen baking tins. Wilton’s cake release spray is fantastic!
  3. Cream the butter and the sugar – beating for at least 5 minutes with a stand / electric mixer, until the mix is pale and fluffy.
  4. Add the vanilla extract.
  5. Add the eggs one at a time and beat for at least 2 minutes after each addition. Add a spoonful of flour with each egg to prevent curdling.
  6. Gently fold in the rest of the flour, cornflour and baking powder.
  7. Add in milk, a little at a time, until you reach a soft, dropping consistency.
  8. Spoon evenly into your chosen tin.
  9. Bake in pre-heated oven for 20-25 minutes. The cake should be lightly golden, slightly pulling away from the edge of the tin and springy when gently touched.
  10. Remove from oven and place on a wire cooling rack.
  11. Leave to cool for 15 minutes and then remove from tins.
  12. Cool on a wire rack.
To fill and top:

  1. In a large mixing bowl, beat the butter, 30ml milk, vanilla extract and half of the icing sugar until smooth.
  2. Add the rest of the icing sugar and beat.
  3. Add the remaining milk as needed to reach a smooth, creamy texture.
  4. Mash half of the raspberries with a fork and stir into the jam.
  5. Spread or pipe some of the buttercream onto one half of the sandwich cake.
  6. Spoon jam on top of the buttercream.
  7. Gently place the second cake on top of the first.
  8. Top with piped buttercream and the remaining raspberries.
11 Victoria sponge cupcakes filled with raspberry jam and topped with a swirl of vanilla buttercream and polka dot sprinkles


Monday, 28 January 2013

Mini Red Velvet cakes


Cup of tea and mini red velvet cake

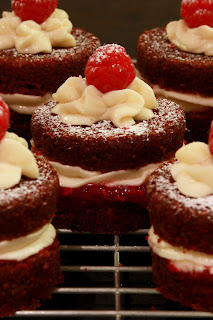
As per my previous post, I’ve been inspired by GBBO this week. My second bake of the weekend was mini Red Velvet cakes – partly inspired by Claudia Winkleman on GBBO and partly due to my wish to use my new mini sandwich tin

Mini Red Velvet CakesI used the Bertinet Kitchen Red Velvet cupcake recipe used previously for my Halloween Red Velvet cupcakes, simply spooned into the mini sandwich tin rather than cupcake cases. The recipe suggests that it makes 14 and it did overspill considerably out of my 12 hole tin, so I would use less next time! Before spooning the mix in, I sprayed the tin liberally with Dr Oetker cake release spray and the cakes came out very easily so I would definitely recommend!

Once baked, I allowed the cakes to cool for about 10 minutes before turning them out onto a wire rack. I then allowed them to cool completely before cutting their rather mushroomed tops off and cutting them in half. To improve their appearance, I then turned them over, so that the bottom edge became the top. The cakes were then filled with a mix of crushed raspberries and raspberry jam and vanilla buttercream, topped with a buttercream star and a raspberry and dusted with icing sugar. 

Tuesday, 30 October 2012

Halloween Red Velvet cupcakes


 9 Halloween Red Velvet cupcakes topped with ghosts, pumpkins and witches' hats

It was my turn to make cakes for the Friday meeting at work this week and, being so close to Halloween, I thought that they needed to be themed. I hadn’t made cupcakes for a while and so decided to make some Red Velvet cupcakes and also a Primrose Bakery Lemon Layer Cake.

Needing inspiration, I turned, as usual, to Flickr: a simple search for Halloween cakes brought up loads of ideas. Some of the cakes were extremely gory and although they were very clever, I just don’t fancy eating cakes with fake blood pouring out of them! I decided to go for something quite simple – grass-covered cupcakes with pumpkins, ghosts and witches’ hats!

The Red Velvet recipe came from a Sara Stanley cupcake course at the Bertinet Kitchen: we did 6 different flavours on the day – 3 of which I completely love – including this ultra-light and fluffy Red Velvet recipe. I’m not really a chocolate cake fan (secret, shameful fact – I’m actually not that fussed about chocolate at all), but these only have a tiny smidgeon of cocoa and they’re absolutely gorgeous! I add mashed up raspberries to the raspberry jam to liven it up a bit. I don’t use the food colouring as I don’t really see the need!

On this occasion, I topped the cupcakes with simple vanilla buttercream rather than a cream cheese frosting that normally tops them. The cream cheese frosting tastes fantastic and goes brilliantly with these cupcakes, but has to be eaten immediately, or be kept in the fridge, and the cakes go a little hard when kept in the fridge. A standard vanilla buttercream is also a lot easier to work with – which was necessary for piping the grass.

As a warning, this recipe rises a lot! It says that it makes 14 cupcakes (which is a bit annoying seeing as typically tins have 12 holes!) – I decided to just spread it over 12 and some of them overspilled by quite a bit!

Red Velvet cupcakes
(makes 14)
Red Velvet cupcake topped with buttercream grass and a fondant ghost


Ingredients

  1. 160g Castor sugar
  2. 110g soft margarine
  3. 1 egg
  4. 160g plain flour
  5. 10g cocoa
  6. ½ tsp salt
  7. ½ tsp bicarbonate of soda
  8. 120g buttermilk
  9. 1 tsp vanilla extract
  10. 1 tsp malt vinegar
  11. ½ whole bottle of red food colouring (optional)
  12. Approx 4 tblsp raspberry jam
  13. Approx 14 raspberries

Vanilla buttercream
  1. 110g butter at room temperature
  2. 60ml semi-skimmed milk, at room temperature
  3. 1 tsp vanilla extract
  4. 500g icing sugar
  5. Food colouring as required

 Method

  1. Preheat oven to 165C.
  2. Beat sugar and marge until pale and fluffy.
  3. Add beaten egg gradually, mixing until smooth and light.
  4. Weigh the dry ingredients into a separate bowl.
  5. Sieve the dry ingredients into the beaten mixture, bit by bit, stirring gently between each addition.
  6. Add the remaining ingredients and mix gently to incorporate.    
  7. Put cupcake cases into bun tin and fill two-thirds of each case with cake mixture.
  8. Bake for 20 – 30 minutes until the cakes spring back when touched lightly.  
While the cakes are baking, make the buttercream:
  1. In a large mixing bowl, beat the butter, milk, vanilla extract and half the icing sugar until smooth.
  2. Gradually add the rest of the icing sugar and beat again until smooth and creamy.
  3. If adding colour, add drop by drop until the desired colour is achieved.
Filling and decorating the cakes
  1. Mash the raspberries and mix with jam. Warm gently if needed
  2. Once cakes are cooked and cooled, use a tea spoon to cut a cone out from the centre of the cakes.
  3. Cut the top disk off each cone and retain.
  4. Fill the hole in each cake with the raspberry jam mix and then replace a cake disk onto each cake to seal the hole.
  5. Pipe buttercream on top of each cake. 
Red Velvet cupcake with buttercream grass and topped with a witch's hat


Sunday, 28 October 2012

Raspberry Bakewell Slice


Cake number 4 for EHH’s birthday. This is one of my favourite recipes, although a bit of a faff to make! It’s originally from GoodFood magazine a couple of years ago and I’ve made it several times. It can be eaten warm, with custard or cream, as a dessert, or it’s just as great cold – ideally with a cup of tea!

The original recipe suggested using Guernsey butter (which, as a Guernsey Girl, I’d highly recommend!) but I’ve not managed to find any available around here, so I use Kerrygold – an Irish butter, which is lovely and soft at room temperature.

The GF recipe suggests using defrosted frozen raspberries – I usually just use fresh. I also added in the step of glazing the pastry with egg/egg white and re-baking – something suggested by Mary Berry to ensure a lovely crispy pastry layer.

Not a very good picture as I finally finished cooking this one late at night and it was still cooling - so I couldn't take it out of the tin! EHH whipped it off to work early in the morning before I was up - so no chance to take a photo of what the slices look like! 

Raspberry Bakewell Slice

Image of raspberry bakewell slice in baking tin

Ingredients

  1. 375g pack sweet shortcrust pastry
  2. 1 egg / egg white
  3. 5 tbsp thick seedless raspberry jam
  4. 100g raspberries,
  5. 25g flaked almonds
  6. 4 tbsp apricot jam

For the sponge

  1. 200g butter, very soft, plus a little extra for the tin
  2. 200g golden caster sugar
  3. 100g ground almonds
  4. 100g self-raising flour
  5. 1 tsp baking powder
  6. ½ tsp almond extract
  7. 4 eggs, beaten
Method
  1. Heat oven to 200C/180C fan/gas 6.
  2. Line the base and sides of a buttered traybake tin, about 18-20cm x 30cm, with baking parchment.
  3. Roll out the pastry to line. Lift into the tin and evenly press right into the corners. Prick with a fork and chill for 20 mins.
  4. Bake the pastry for 8-10 mins until it's cooked but not too coloured.
  5. Brush with the egg / egg white and bake for another 5 minutes.
  6. Cool for a few mins and turn down the oven to 180C/160C fan/gas 4.
  7. Spread the raspberry jam over the pastry and scatter over the raspberries.
  8. For the sponge, put all the ingredients into a large bowl and beat with an electric whisk until soft and very well mixed.
  9. Spoon this over the raspberry layer, then smooth evenly.
  10. Scatter over the flaked almonds and bake for 35-40 mins (I find it takes much longer – usually about an hour) until golden and firm.
  11. Cool completely in the tin. Will freeze for up to 3 months - overwrap the tin with baking parchment and foil beforehand.


To serve, thaw for 4 hrs at room temperature, then reheat in a low oven. Melt the apricot jam with 1 tbsp water and brush over the top of the sponge just before serving.